Perth Glory Finals Preview
Perth Glory have just about managed to limp their way into the 2019/20 A-League finals series, recording two wins and four losses since the restart and pipping Adelaide United to 6th place by just a single point (but also a better goal difference). The absences of Diego Castro, Gregory Wüthrich and Kim Soo-Beom (in descending order of how much they have been missed) have resulted in a bit of a headache for Tony Popovic, and he’s changed his tactics in response. They find themselves against Ufuk Talay’s Wellington Phoenix, who themselves have been struggling for form with one win, two draws and three losses, although the single victory they had was a 2-1 victory against Perth Glory a few weeks back.
This article is focused on how Perth’s style of play has changed since the restart.
Diego Castro prompts a formation change
The most obvious issue that Perth have had since the restart is the Diego Castro sized hole in their lineup. He’s been Perth’s key player this season, linking play between the midfield and the attack, and also having excellent combination play with Fornaroli and Joel Chianese. Some stats that show his impact in the final third are his tally of 5 assists this campaign, while he’s second in the league for smart passes per 90 minutes, smart pass accuracy and key passes.
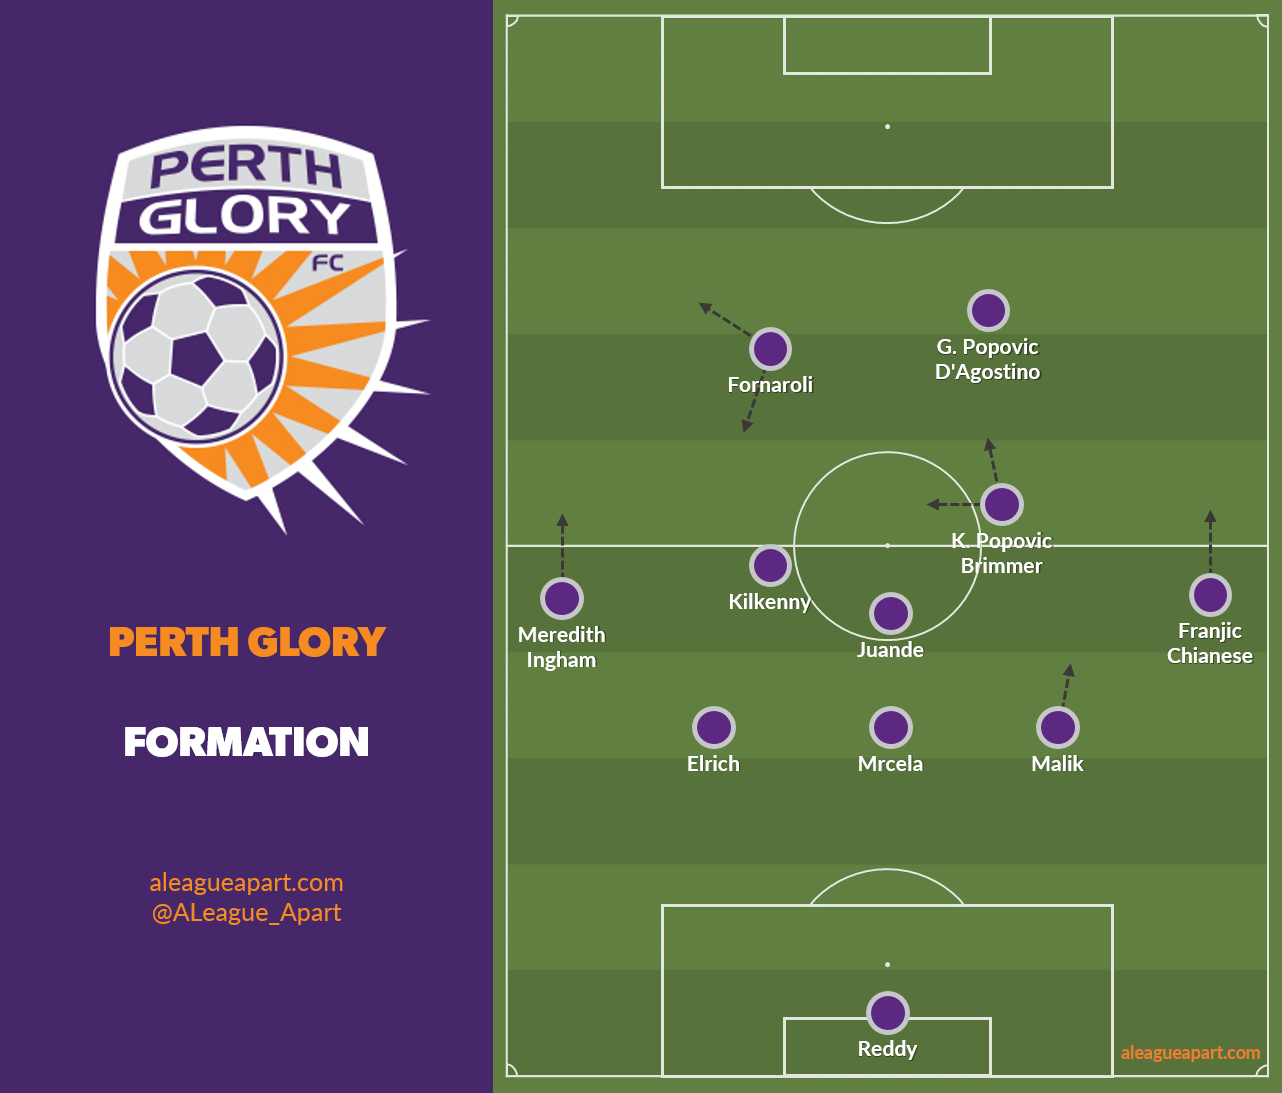
Having lost this attacking contribution, (Papa) Popovic has had to change his setup from a 5-2-3 to a 5-3-2 (or 3-4-3 to a 3-5-2 if you prefer). What used to be the front three (with Diego Castro) is now a front two, with the playmaking responsibilities being moved to the additional man in midfield.
Bruno Fornaroli - Perth’s main man
Bruno Fornaroli has now become the target for most of Perth’s play, with his teammates looking to play the ball to him whenever possible. He’s even been the target from goal kicks, which is a bit surprising when you consider his height of 1.75m, but he’s good with his use of his body to hold off defenders.
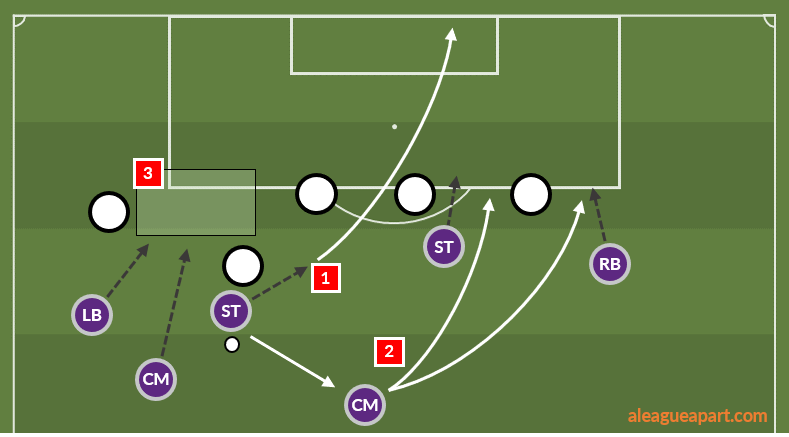
The main way he receives the ball is dropping in between the lines to receive the ball to feet with his back to goal, and it seems the objective is to do a few things:
Turn with the ball (or make a quick combination to turn) and drive at the back line and shoot. When he’s able to do this, it frequently results in an attempt on goal.
Play a wall pass into the midfield, who can receive the ball facing forwards to play penetrating passes behind a stretched back line
Open up space for the left wingback or central midfielder to overlap, with the centreback drawn out of position by Fornaroli coming deep
Joining Fornaroli up front is usually one of Nick D’Agostino or Gabriel Popovic. D’Agostino has a similar playing style to Fornaroli, and can drop into pockets of space to receive and turn, while also having a bit of pace to run in behind. I’m still not entirely sure about what G. Popovic’s playing style is - his build and strength suggest he’s a target man, although he’s provided a fair amount of energy to the press and offsets Fornaroli’s positioning. I’m surprised to have seen so little of Joel Chianese up front, considering his ability to stretch defences in behind with his pace, and he’s been a staple of Perth’s starting three up front for most of the campaign since Chris Ikonomidis injured his ACL. Instead, his involvements have been more as a right-sided wingback.
Behind the attackers, the three midfield roles are clearly defined:
Box-to-box midfielder (Kristian Popovic, Jake Brimmer): Provides energy and running. Can carry the ball and provides supporting or penetrative running off the ball.
Deep-Lying Playmaker (Neil Kilkenny): Dictates the tempo, controls play, looks for more ambitious passes
Defensive midfielder (Juande, Vince Lia): Provides a spare option behind the ball to help retain and circulate possession.
Aside from the midfielders, the wingbacks are also quite key to how Perth like to play. Perth will often patiently shift the ball side-to-side in order to probe for openings, and due to this, the wingbacks frequently pick up the ball and attempt to move it forwards. The wingbacks have seen a bit of rotation, with the usual starters James Meredith and Ivan Franjic sharing minutes with Dane Ingham and Chianese. They’ve been the most dangerous attacking threat, accounting for four of the eight goals they’ve scored since the restart.
Gregory Wüthrich prompts a shuffle at centreback
It looks Popovic hasn’t fully figured out his best defensive partnership due to the absence of Wüthrich, while it also looks like he’s juggling his squad fitness and injuries. As such, he’s rotated heavily, and surprisingly a total of seven players have had minutes at centreback since the restart:
Juande filled in at centreback for the first game before being moved back into midfield halfway through the second game
Alex Grant started the first four games but picked up a groin niggle (not serious) and wasn’t in the squad for the next three games
Osama Malik has gotten his first consistent run of games since November but then missed the last game against Western United
Tarek Elrich (ususally a fullback/wingback) has been involved as a centreback for three of the last four games
Tomislav Mrcela had a hamstring injury just before lockdown so missed the first three games but has played the three games since
Jacob Tratt has filled in gaps, playing a total of around 220 minutes
Trent Ostler played 30 minutes against Western Sydney Wanderers
It looks like Mrcela and Malik will play, and any one of Grant, Elrich or Tratt could partner them.
Perth’s high press
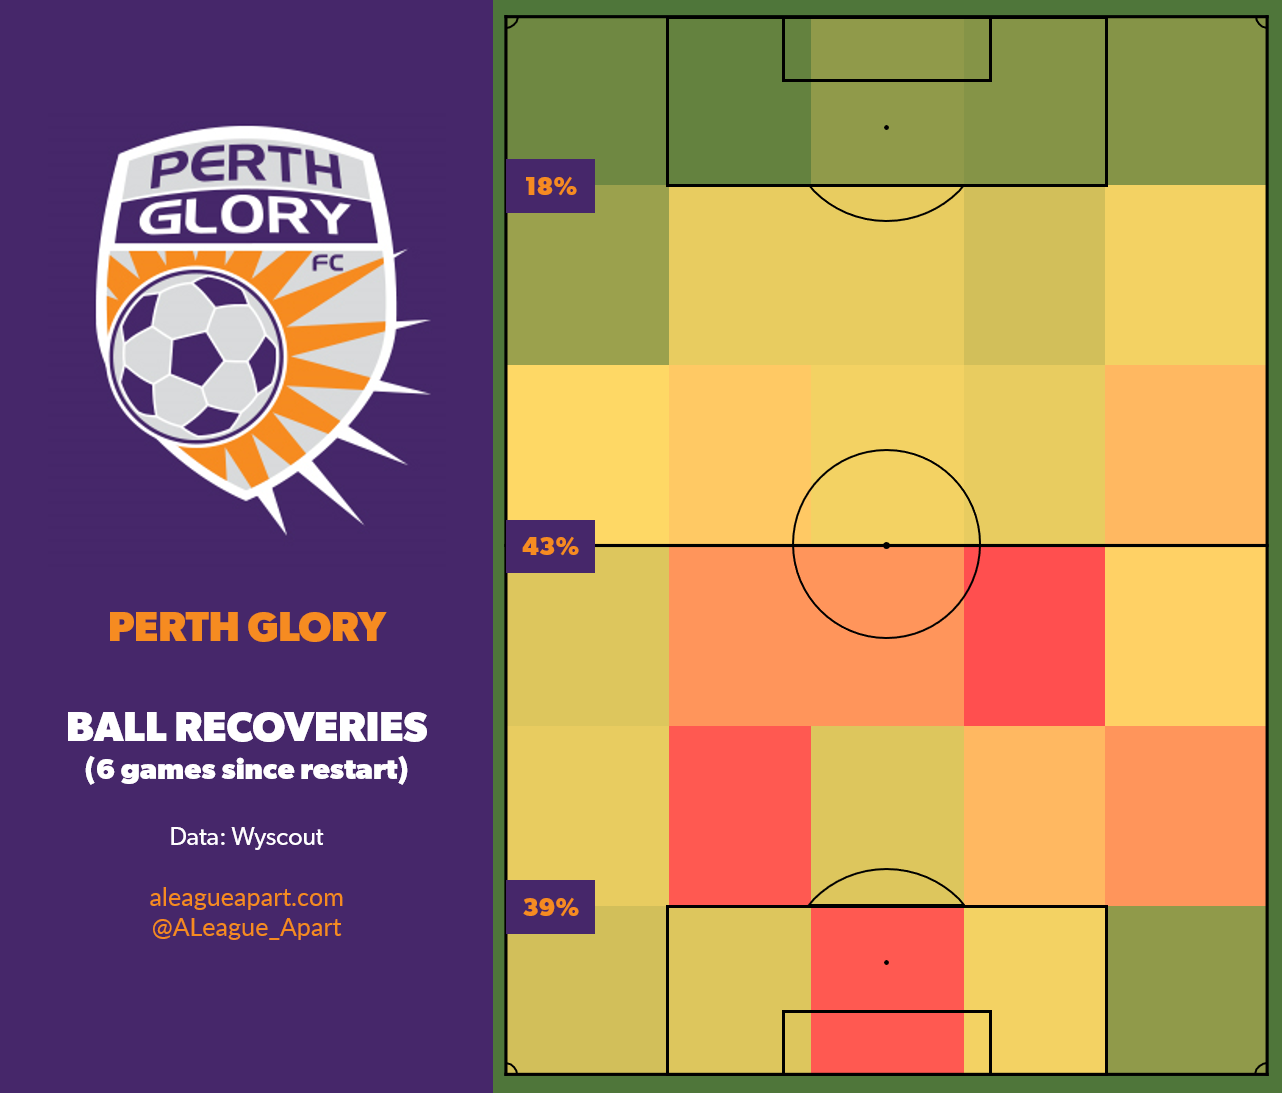
Perth employ a high press, and their stats since the restart reflect this playing style - they have allowed their opponents an average of 10.59 passes before a defensive action, which is the third least in the league. They’ve been fairly successful with the press - they have the highest percentage of their recoveries in the front and middle thirds (61%) and the lowest percentage of recoveries in their defensive third (39%), suggesting that they win the ball further forward on average than the rest of the league.
The press is fairly well organised:
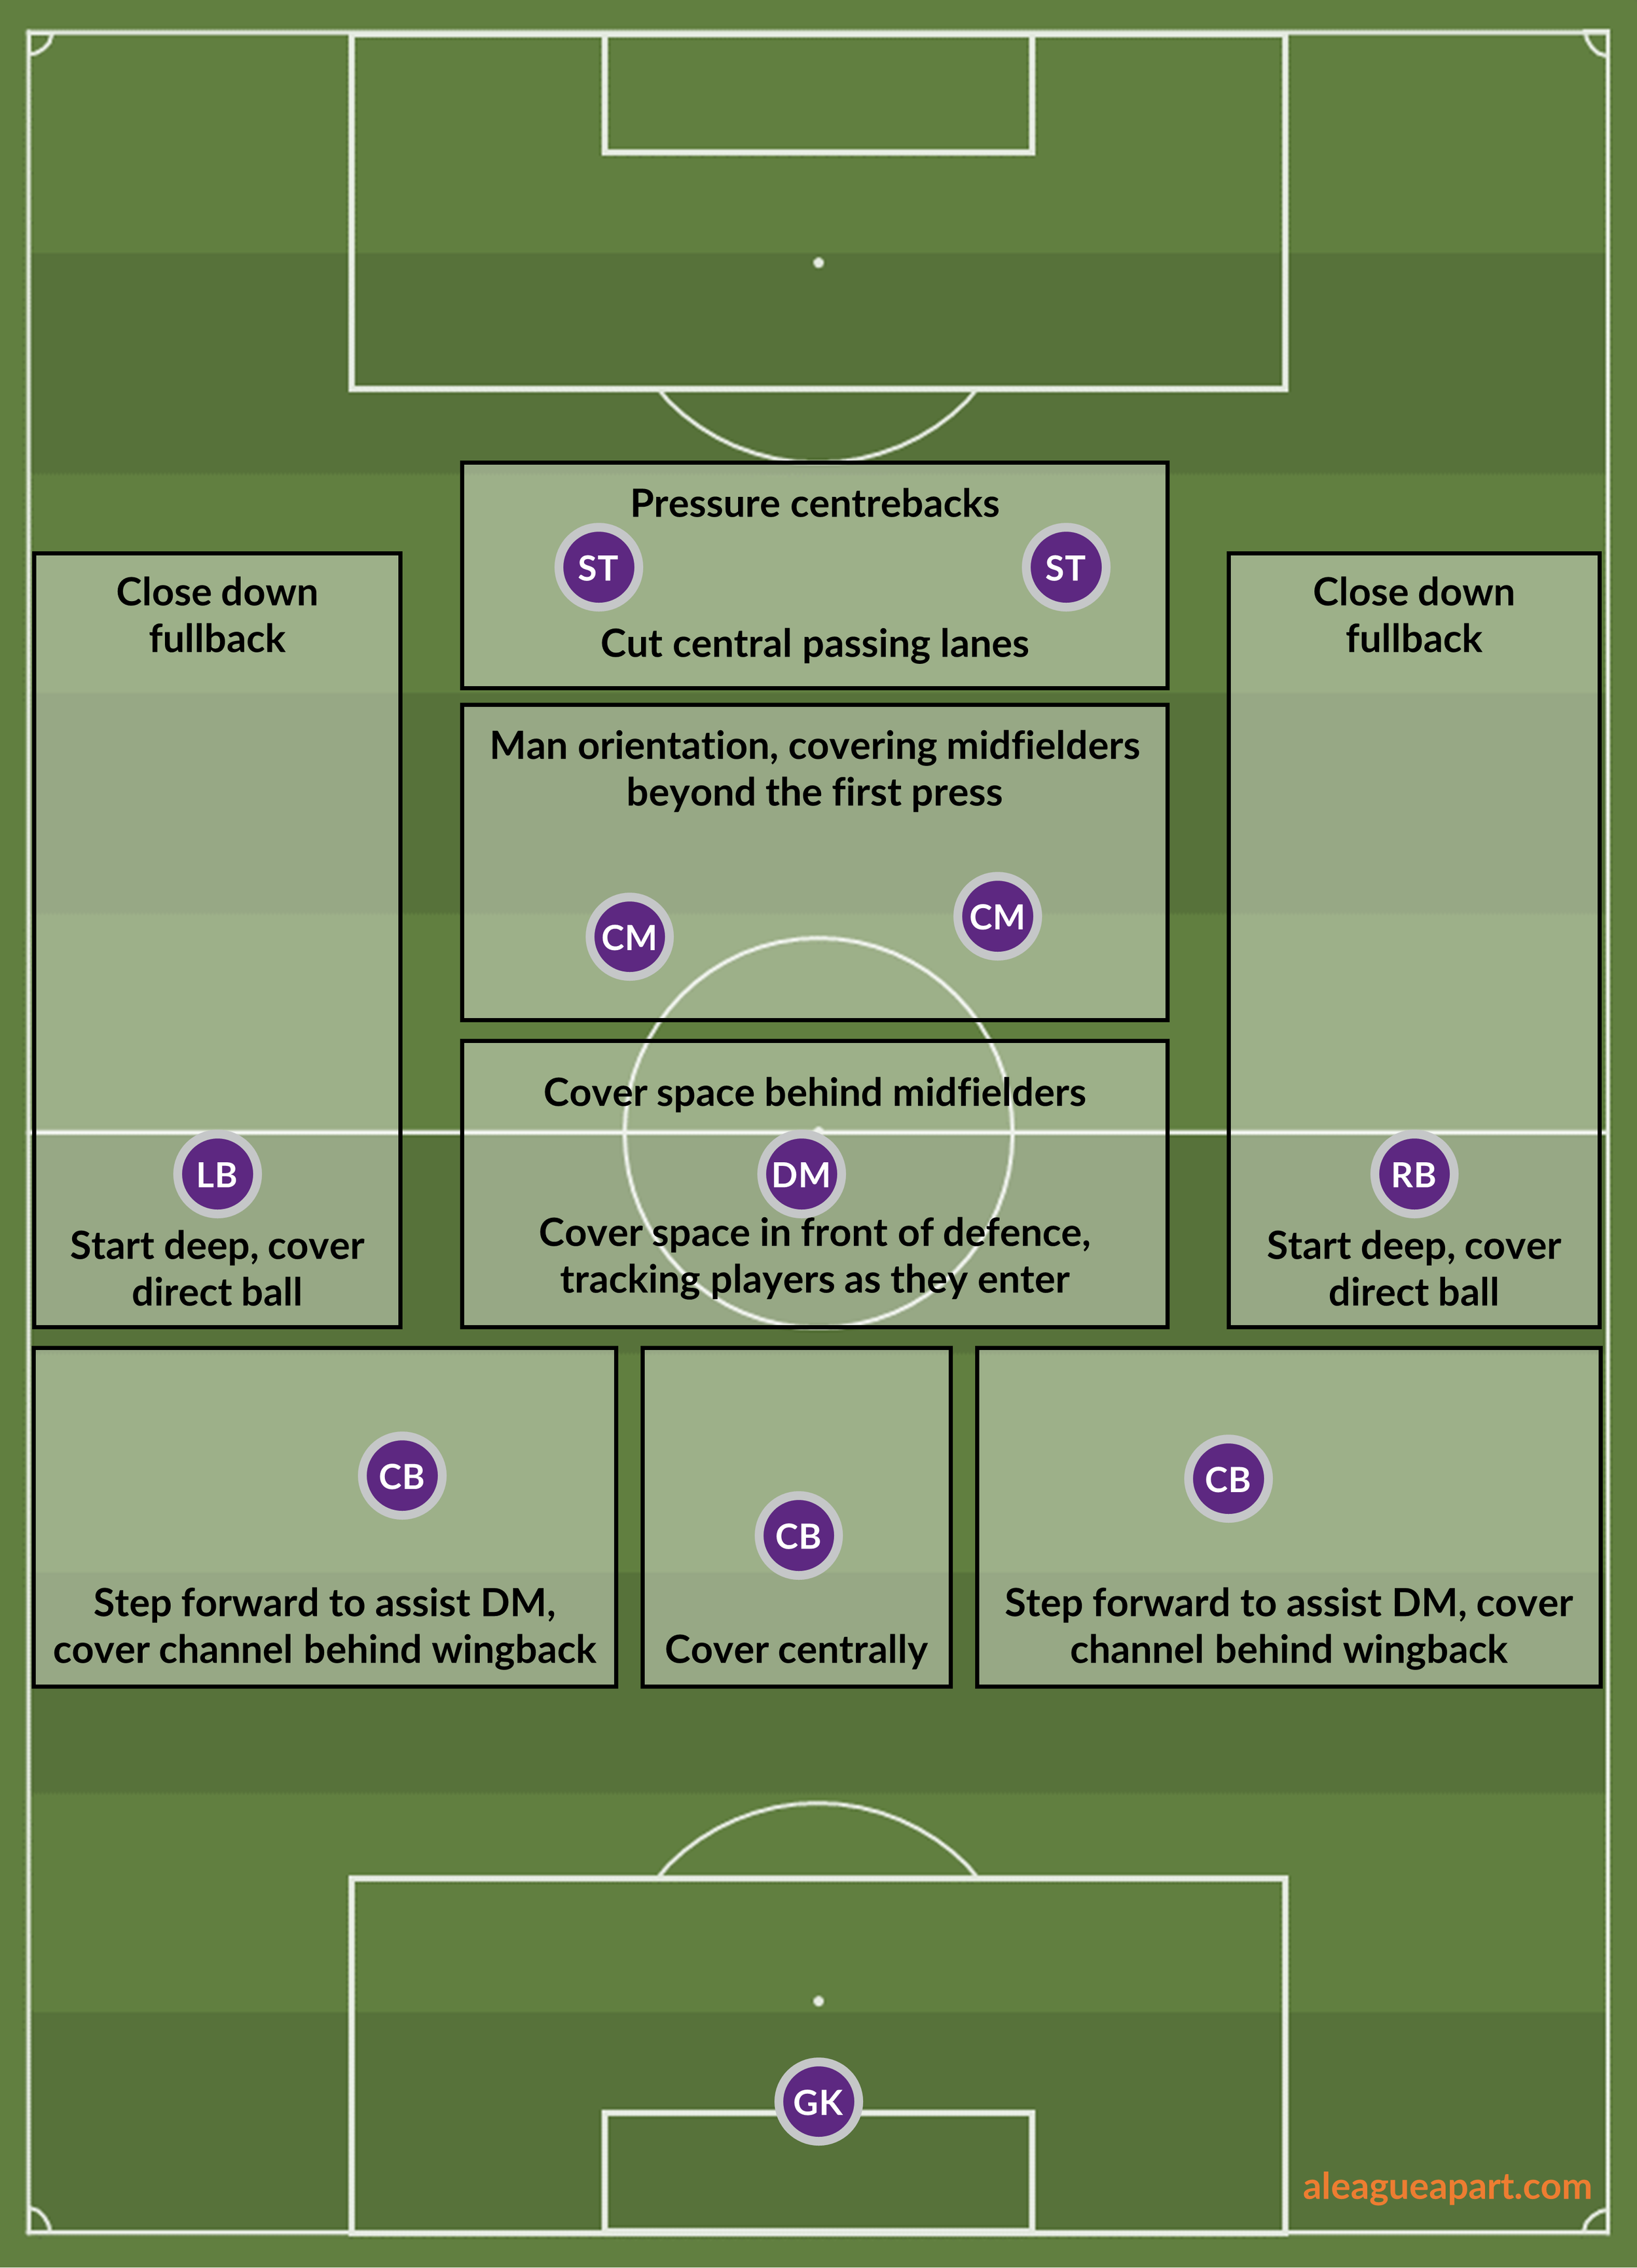
The strikers initiate the press, closing down the centrebacks. Depending on the opposition’s structure and their skillsets, the forwards may press centrally to stop the ball into the centre, or from wider positions, to cut passing lanes into the fullbacks. For example, against WSW, Perth’s strikers encouraged the ball into the wingbacks, where a pressing trap would be set, while against Western United, the strikers stayed more central, looking to cut out central passes into the midfield.
When the press has been initiated, the midfielders will follow behind the strikers, marking the opposition central midfielders as they push up
The wingbacks generally have a deep starting position (to watch for direct balls into the channels), but as the ball is being shifted into their flank, they will move forwards to close down the fullback.
The defensive midfielder plays more zonally rather than pushing up with the press. He’ll generally cover any player that enters into the zone behind the midfielders
Finally, the outside centrebacks will step up quite aggressively. With the midfielders and wingbacks pushing up, an opponent can find spaces in behind, and the outside centrebacks have the responsibility of stepping up to close down any opponents that enter into the areas in front of the defence.
Pressing triggers include backward passes or passes played between the centrebacks.
One interesting thing to note is that a lot of the ball recoveries in the middle third of the pitch are actually from the centrebacks, indicative of their high starting position and also their tendency to step forward to cut out play.
While the pressing is well organised, it does have some flaws.
Wingbacks covering ground
The wingbacks have a responsibility of pushing up the pitch to close down the opposition wingback/fullback. When their opponent plays as a wingback (ie. is pushed further forwards) they generally have an easier time, with less distance for the wingback to meet them. Against a 4-at-the-back system like Wellington’s, however, they can often struggle for two reasons:
Fullback’s low starting position
Fullbacks will generally be more conservatively positioned than wingbacks, which means that in order for them to be closed down, Perth’s wingbacks must cover a large distance, and often means that they arrive late and the opposition has time to turn, face forward and attack, breaking the press.
Flank overload opportunities
When they are against a winger and a fullback, there are easy opportunities for them to be overloaded 2v1, especially if the centrebacks cannot come out to assist them (ie. are being pinned by other attackers). If they press the fullback, the winger can proceed behind them, while if they follow the winger, the fullback can overload on the overlap.
Space in the centre
Juande usually doesn’t join the press, instead positioning himself to sweep up in the zone behind the midfield. He plays centrally, and covers players who enter the zone in between midfield and defence. Juande’s role is interesting - he’s often zonally oriented and not involved in the press (which can leave an easy option for the opposition), while other times he’s tracking a man into the half-spaces (leaving the central areas open). The outside centrebacks have the responsibility of covering behind the wingbacks, and also on either side of Juande. They’ll often step up quite aggressively to track wingers/attacking midfielders/strikers who drop deep in between the lines or in the half spaces.
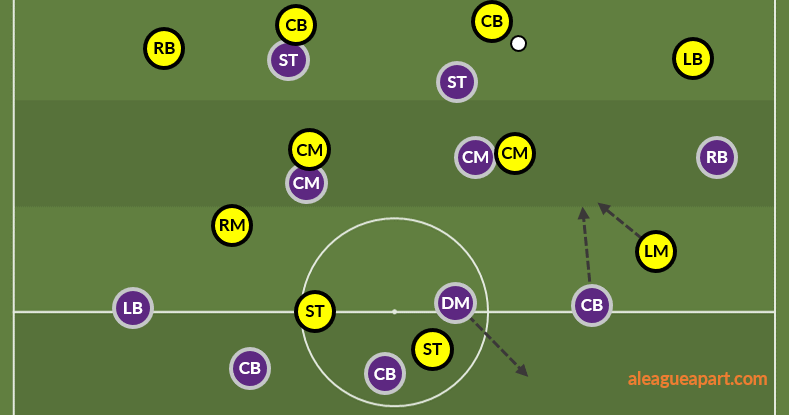
The defence frequently has trouble with covering all options. The press naturally means that most players move further forwards, and as a result, they are often left 2v2 or 3v3 at the back, especially when the opposition overloads one flank. It also makes it difficult for a centreback to push out comfortably without opening space in behind for a direct ball into an unmarked player.
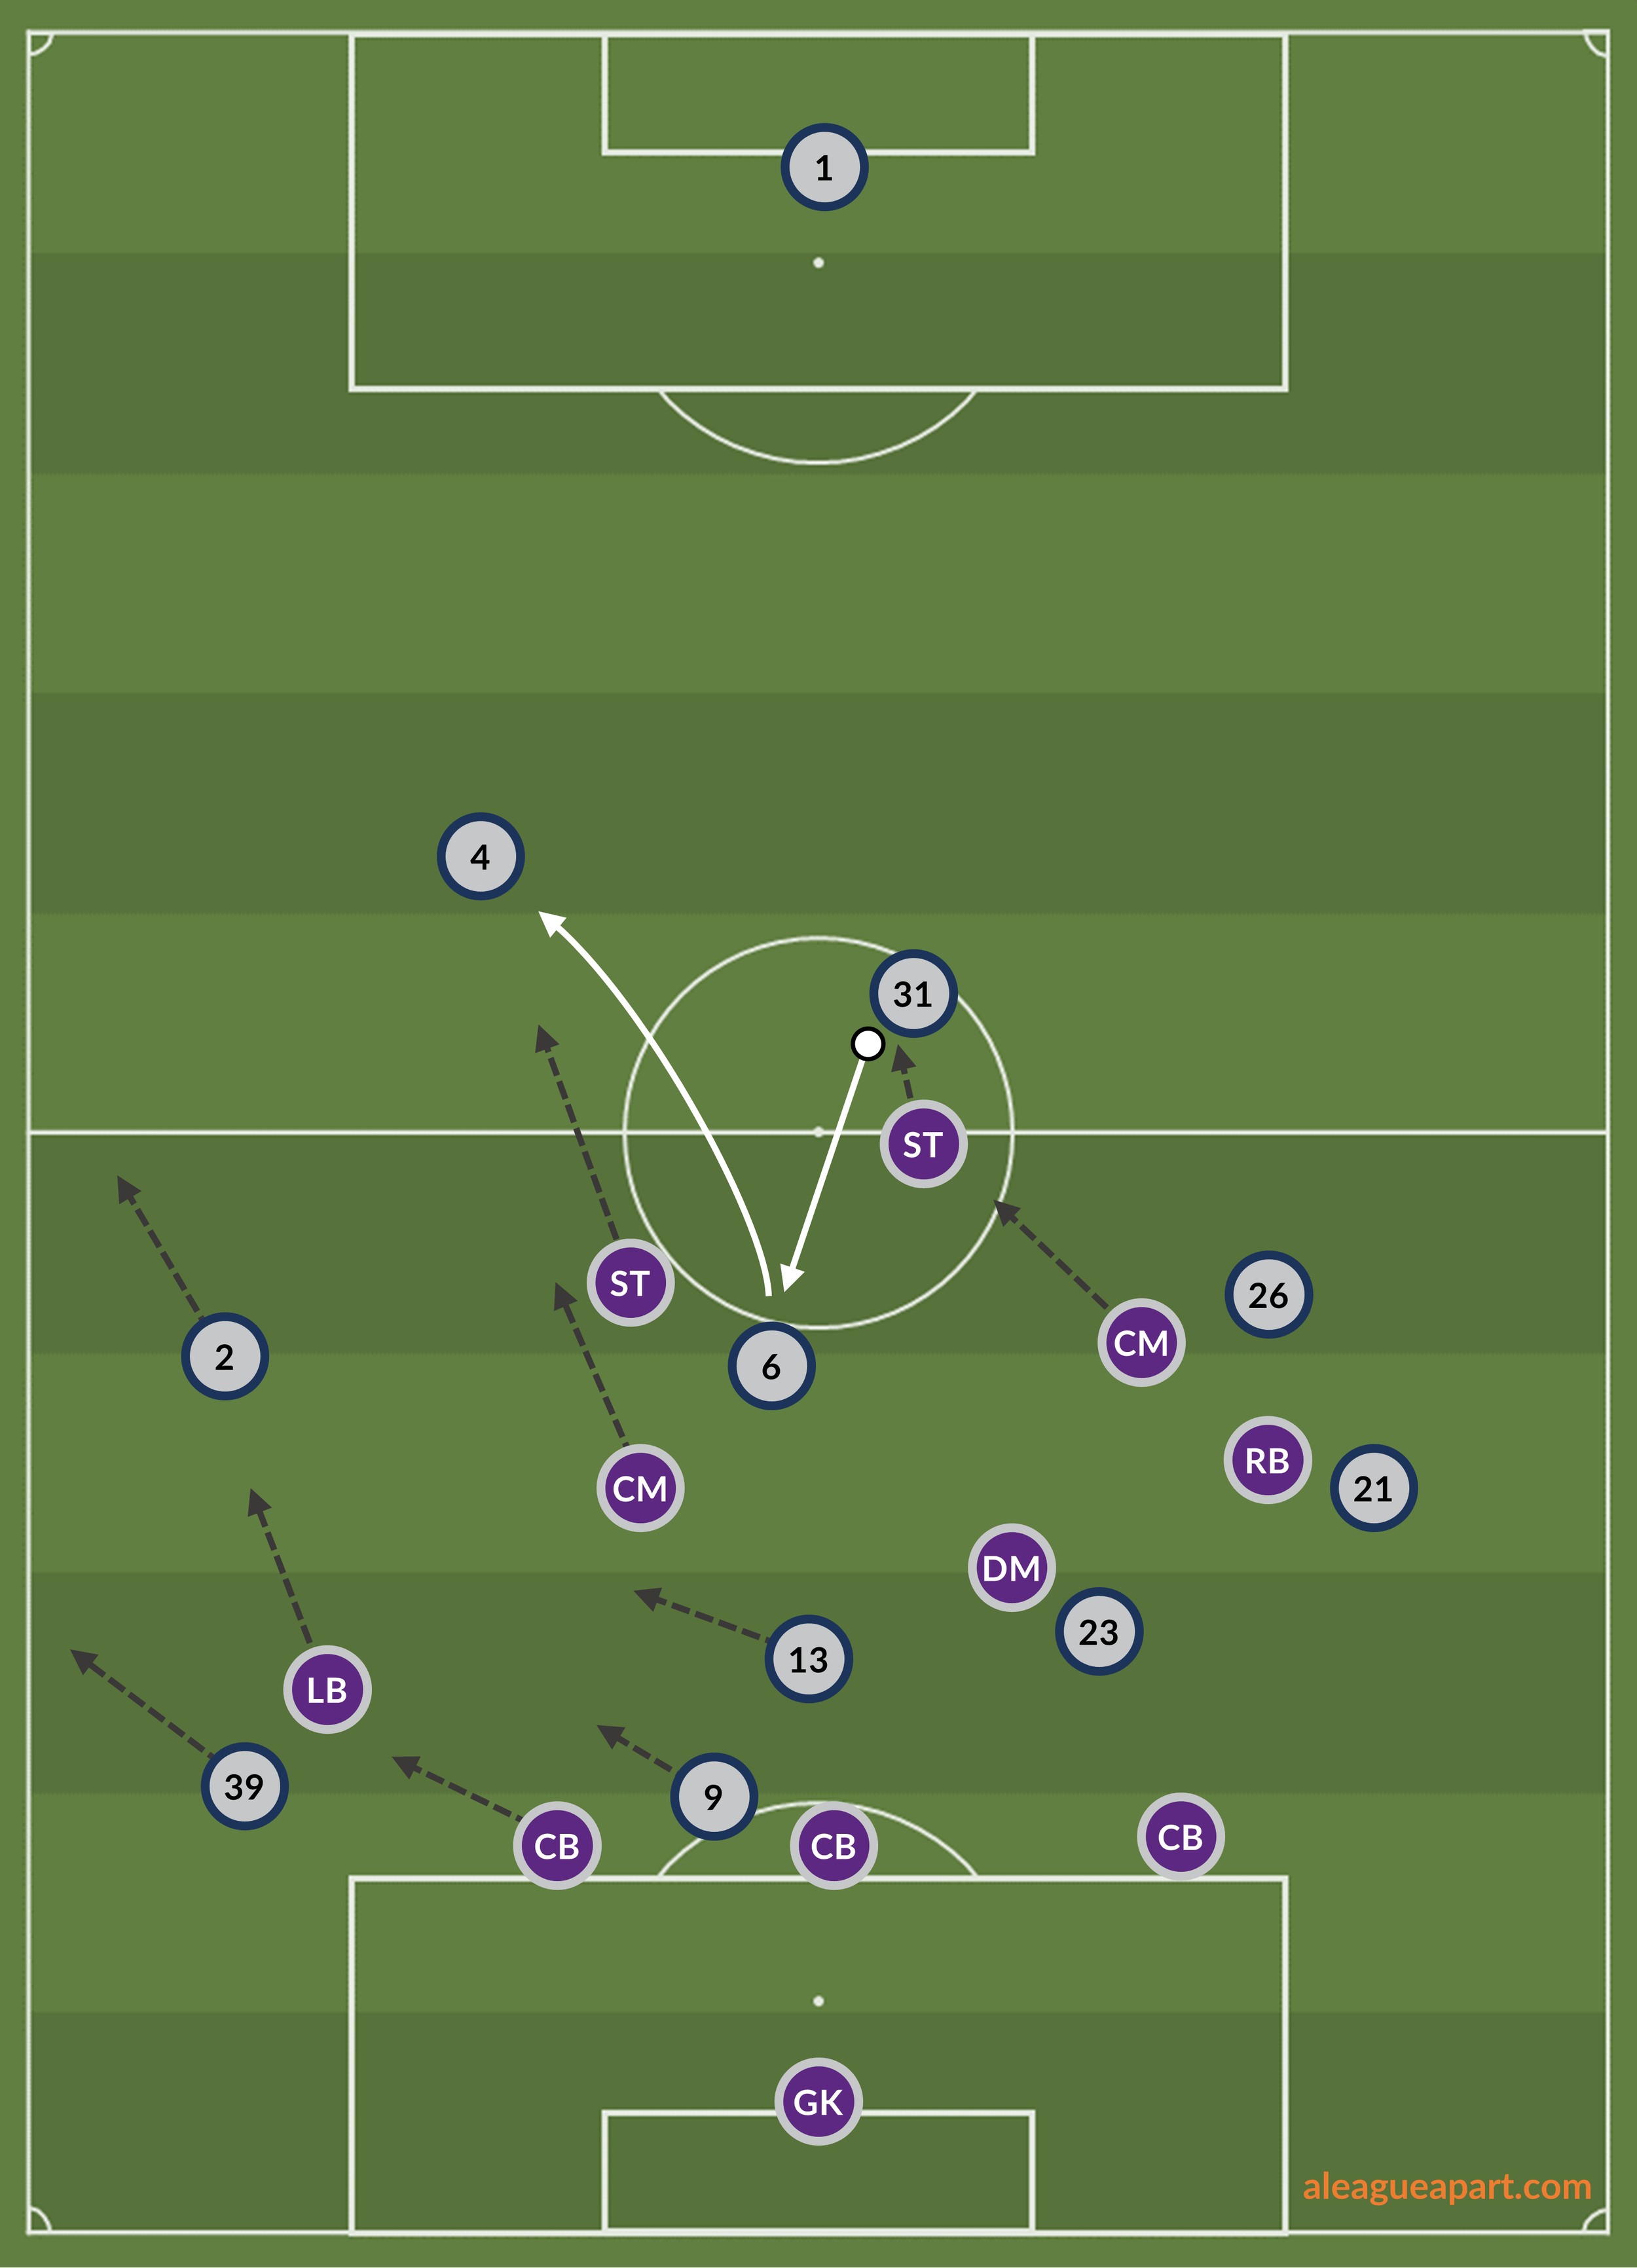
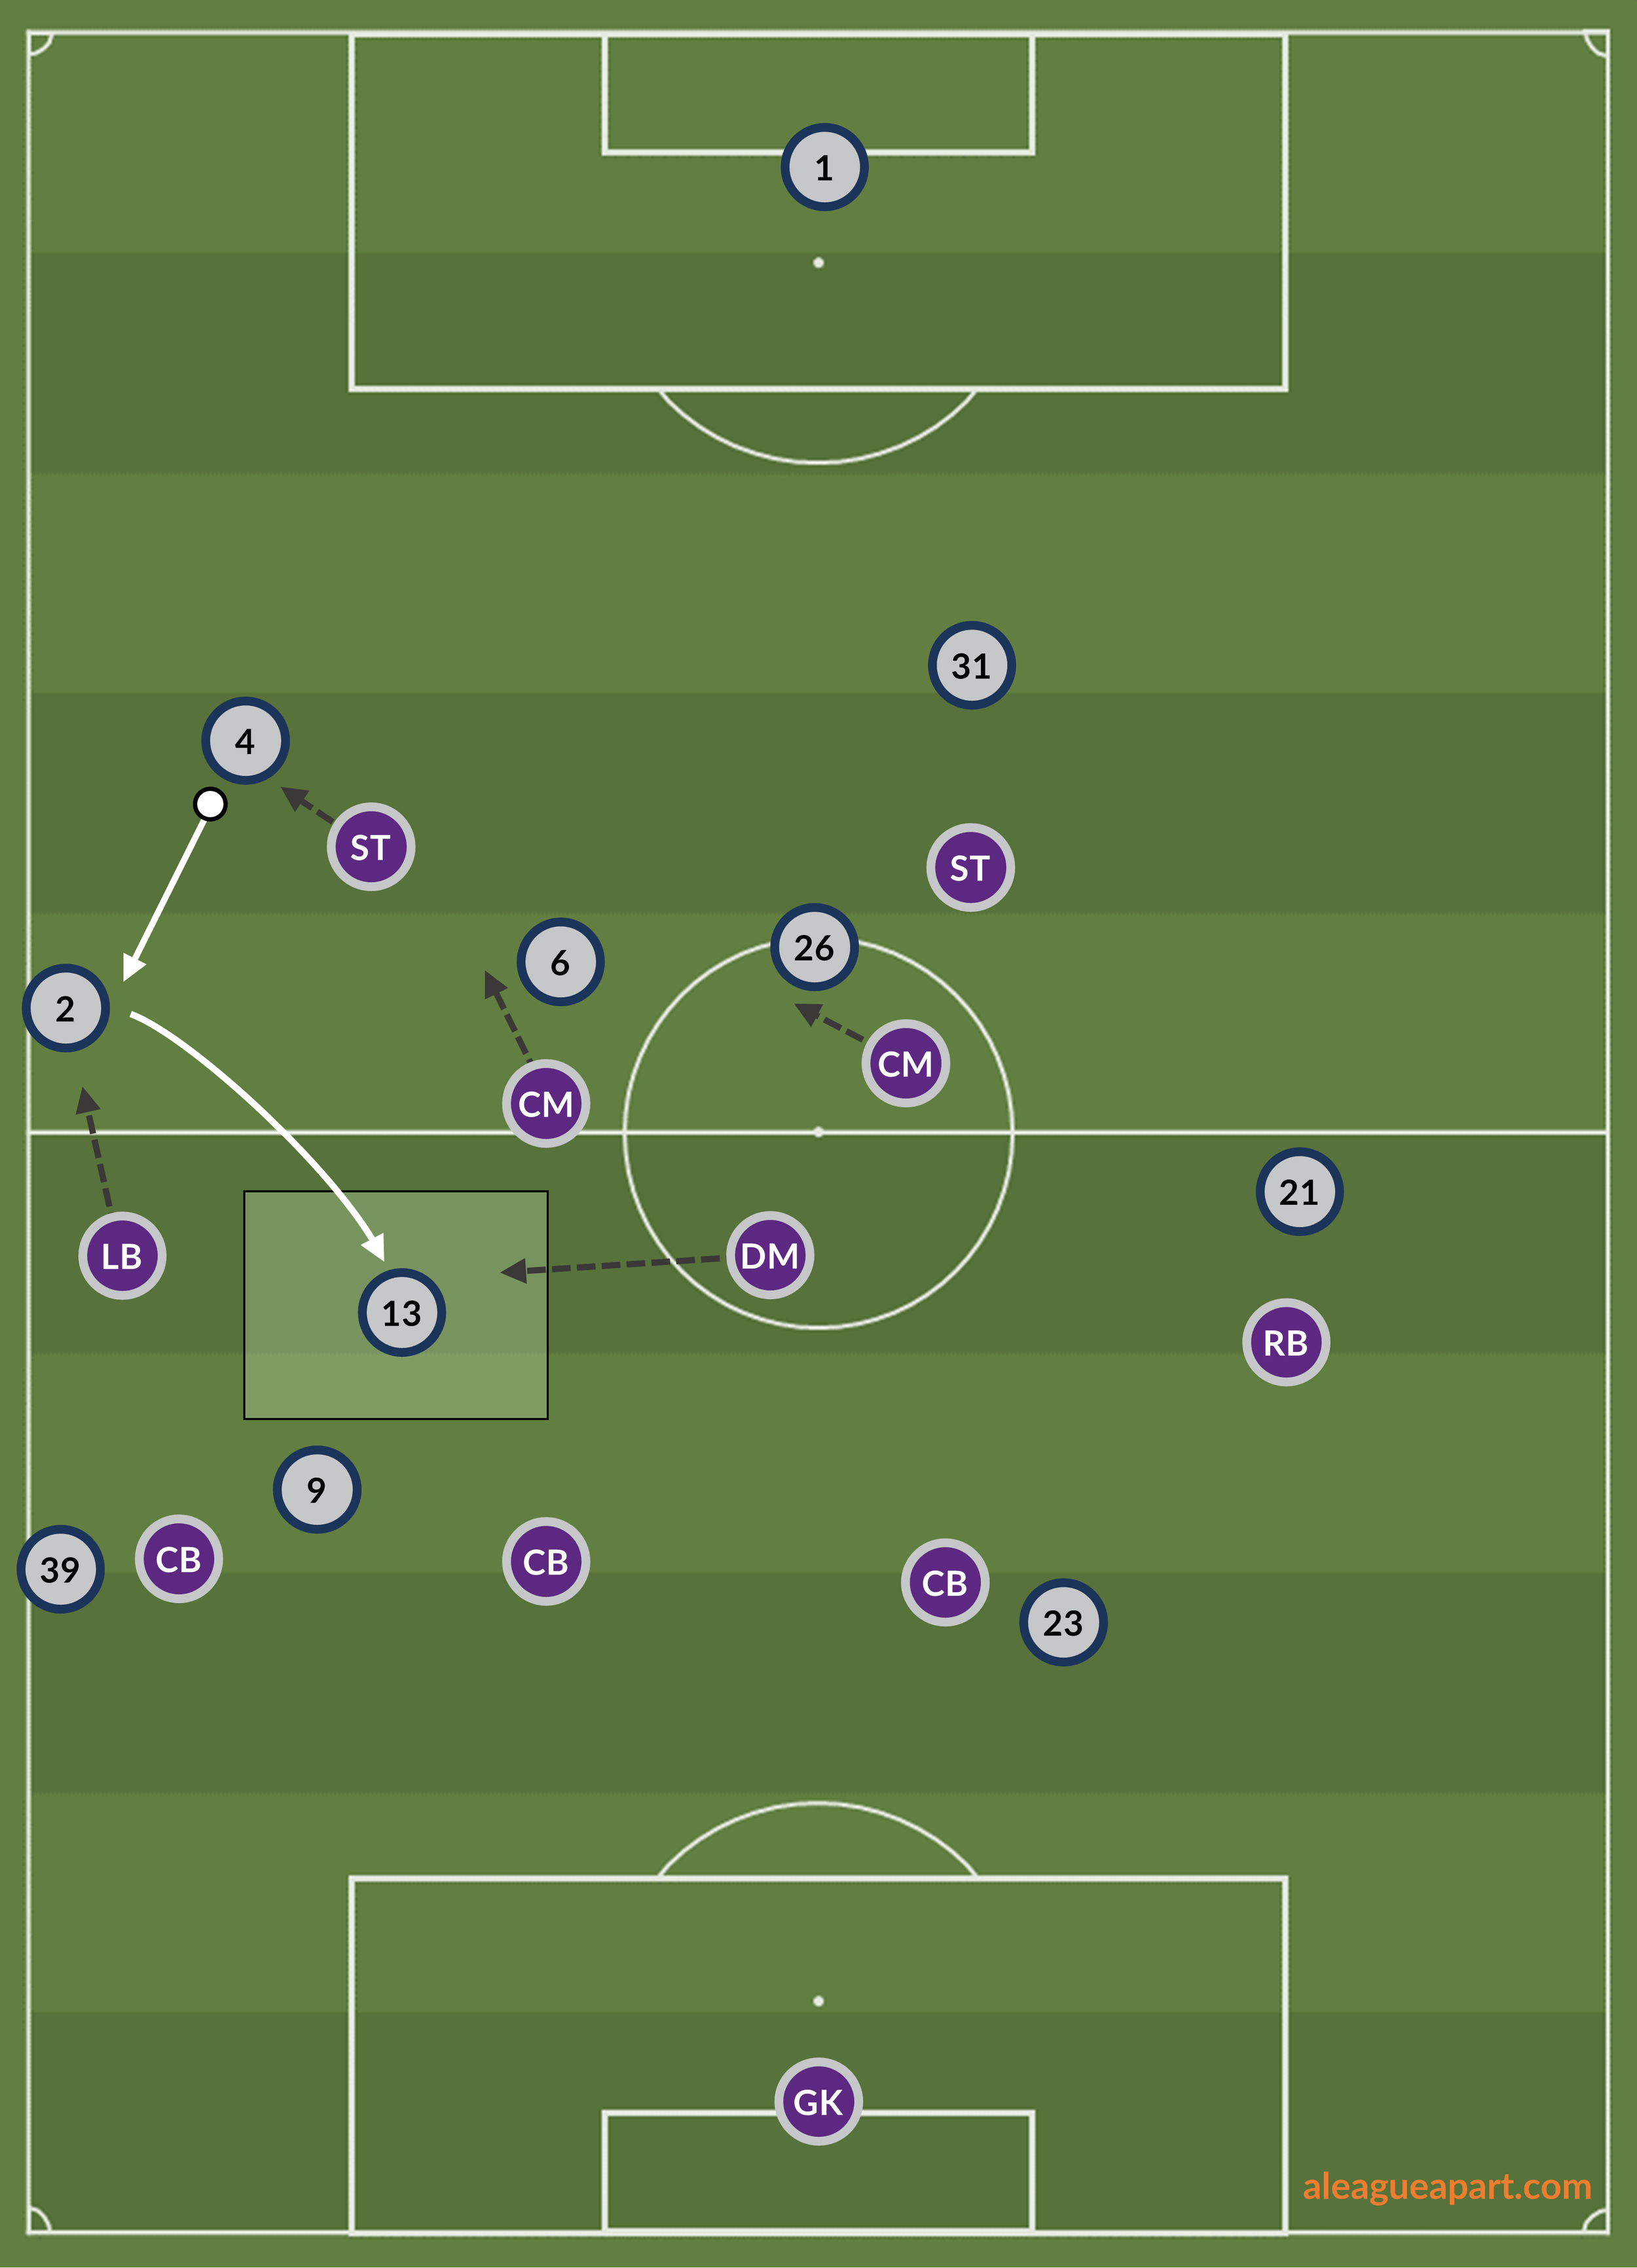
Press broken vs Melbourne Victory
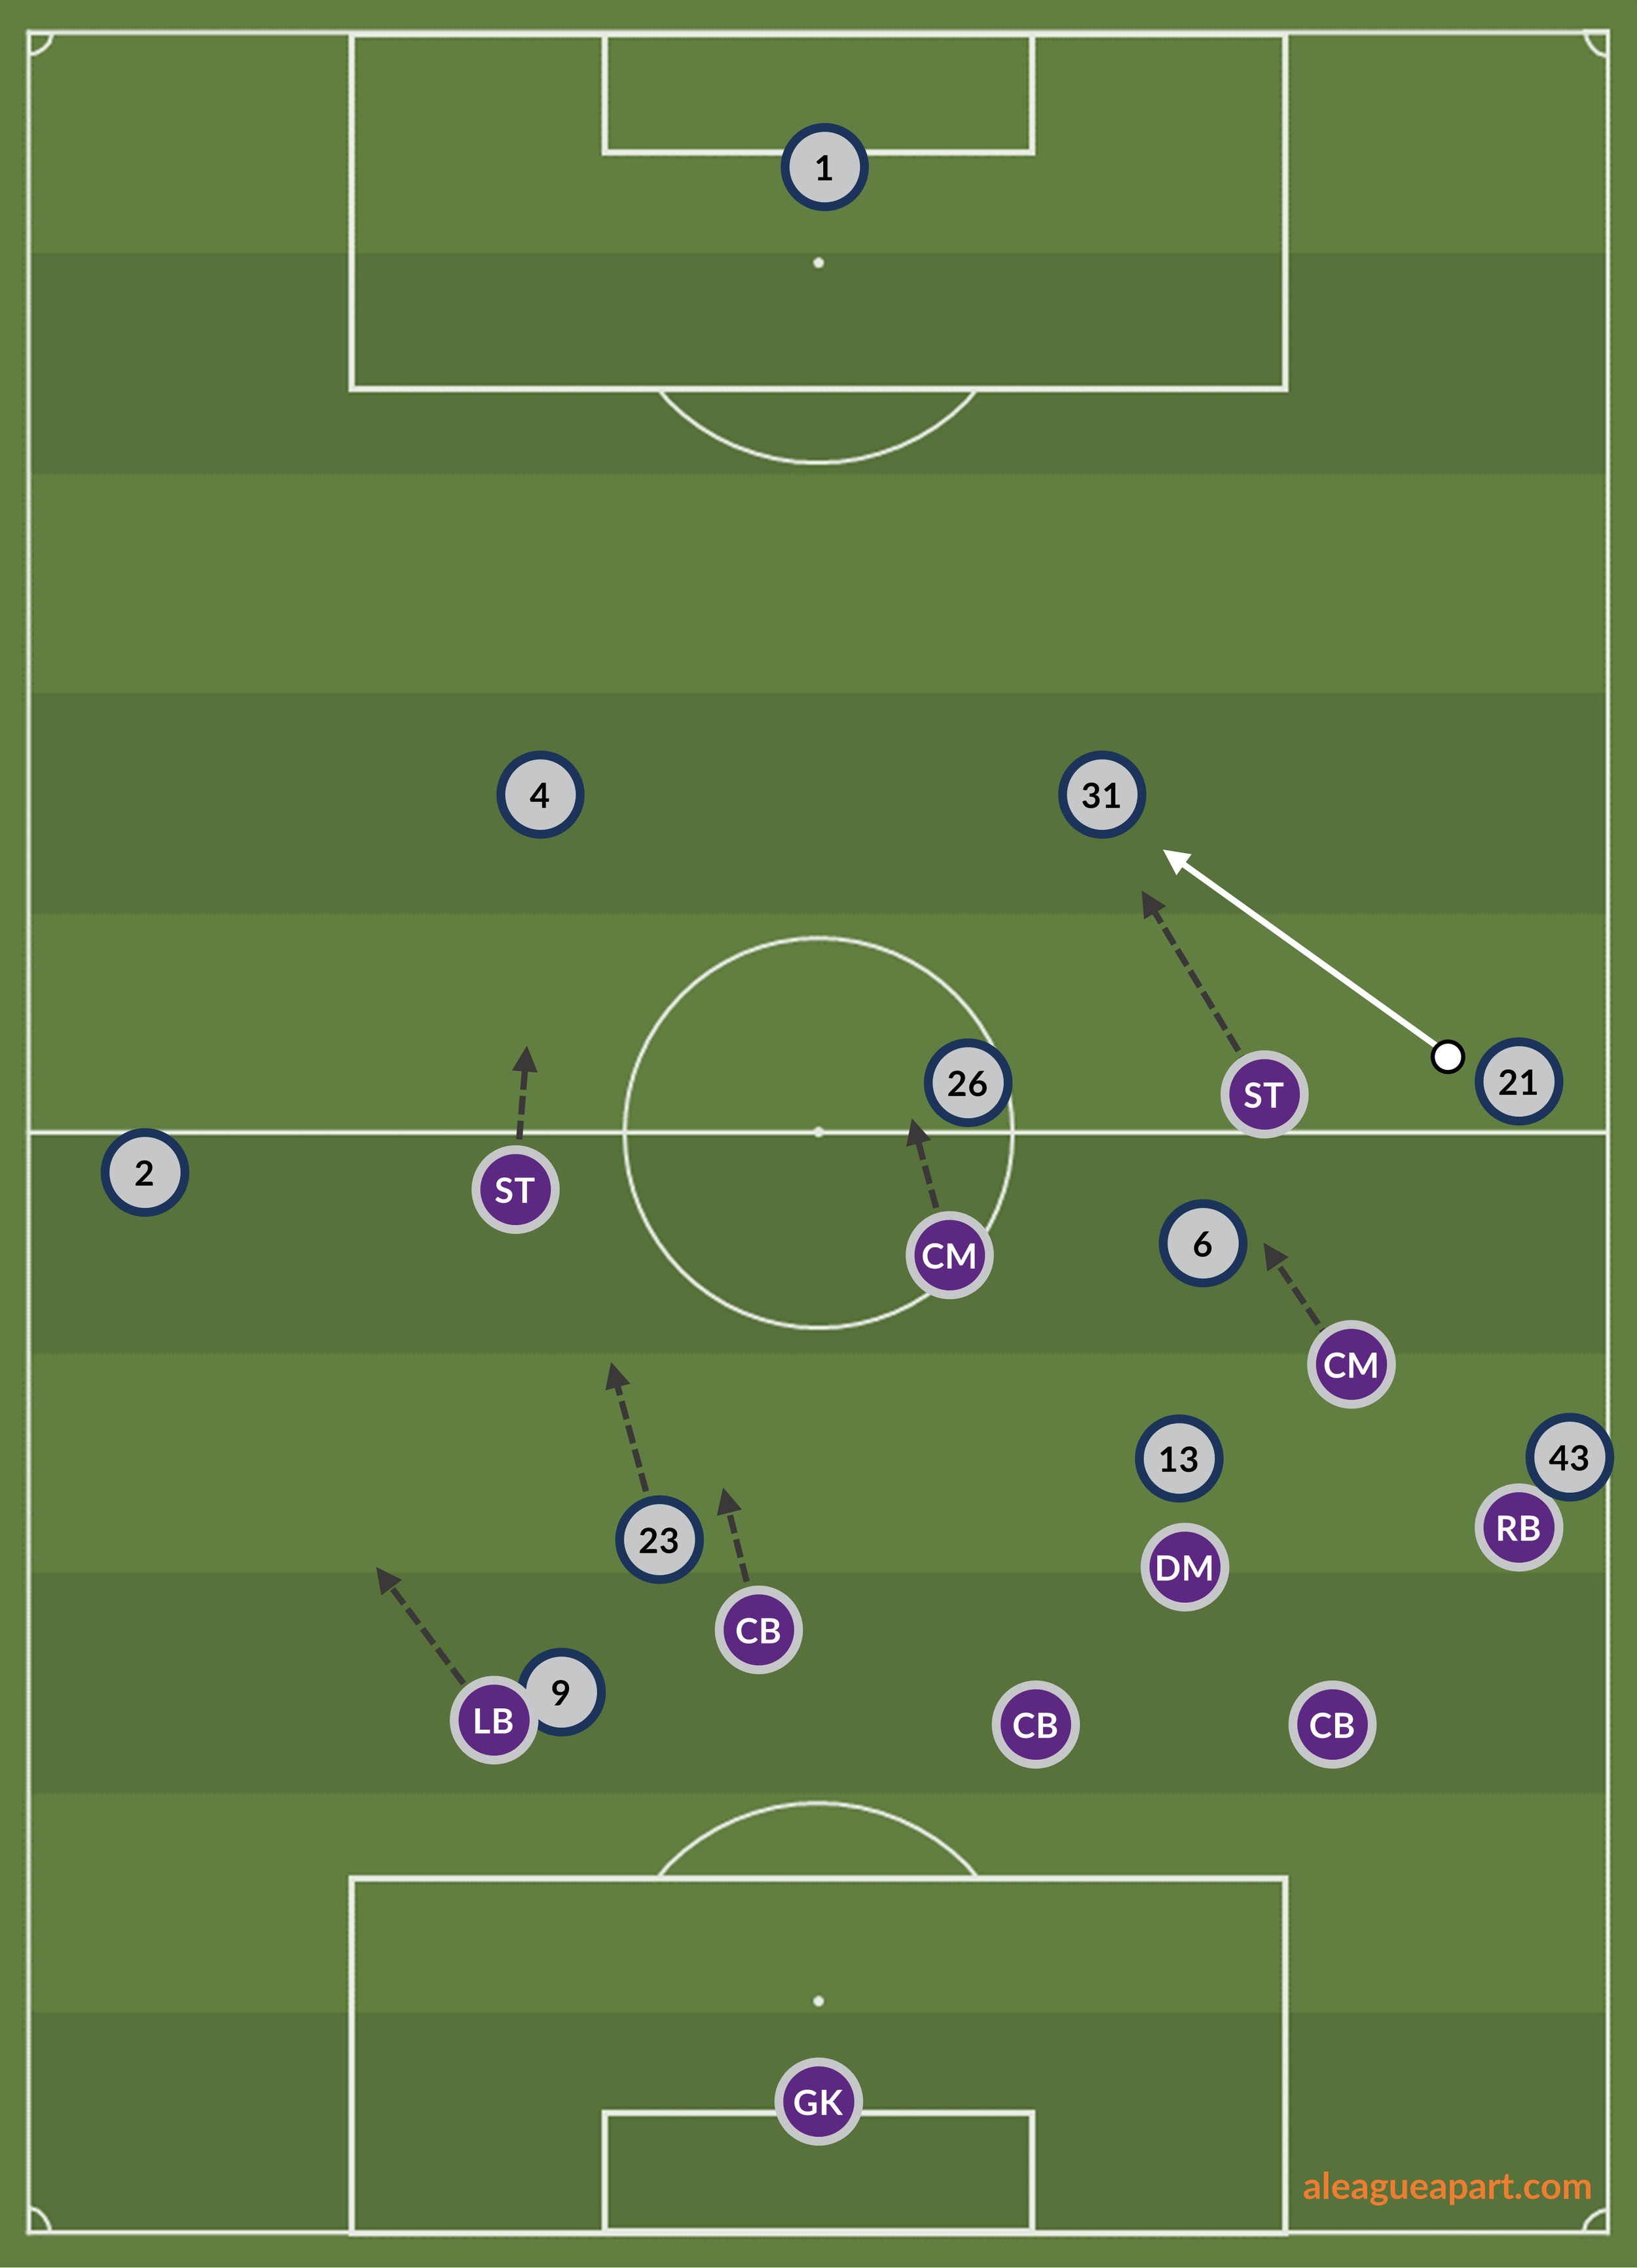
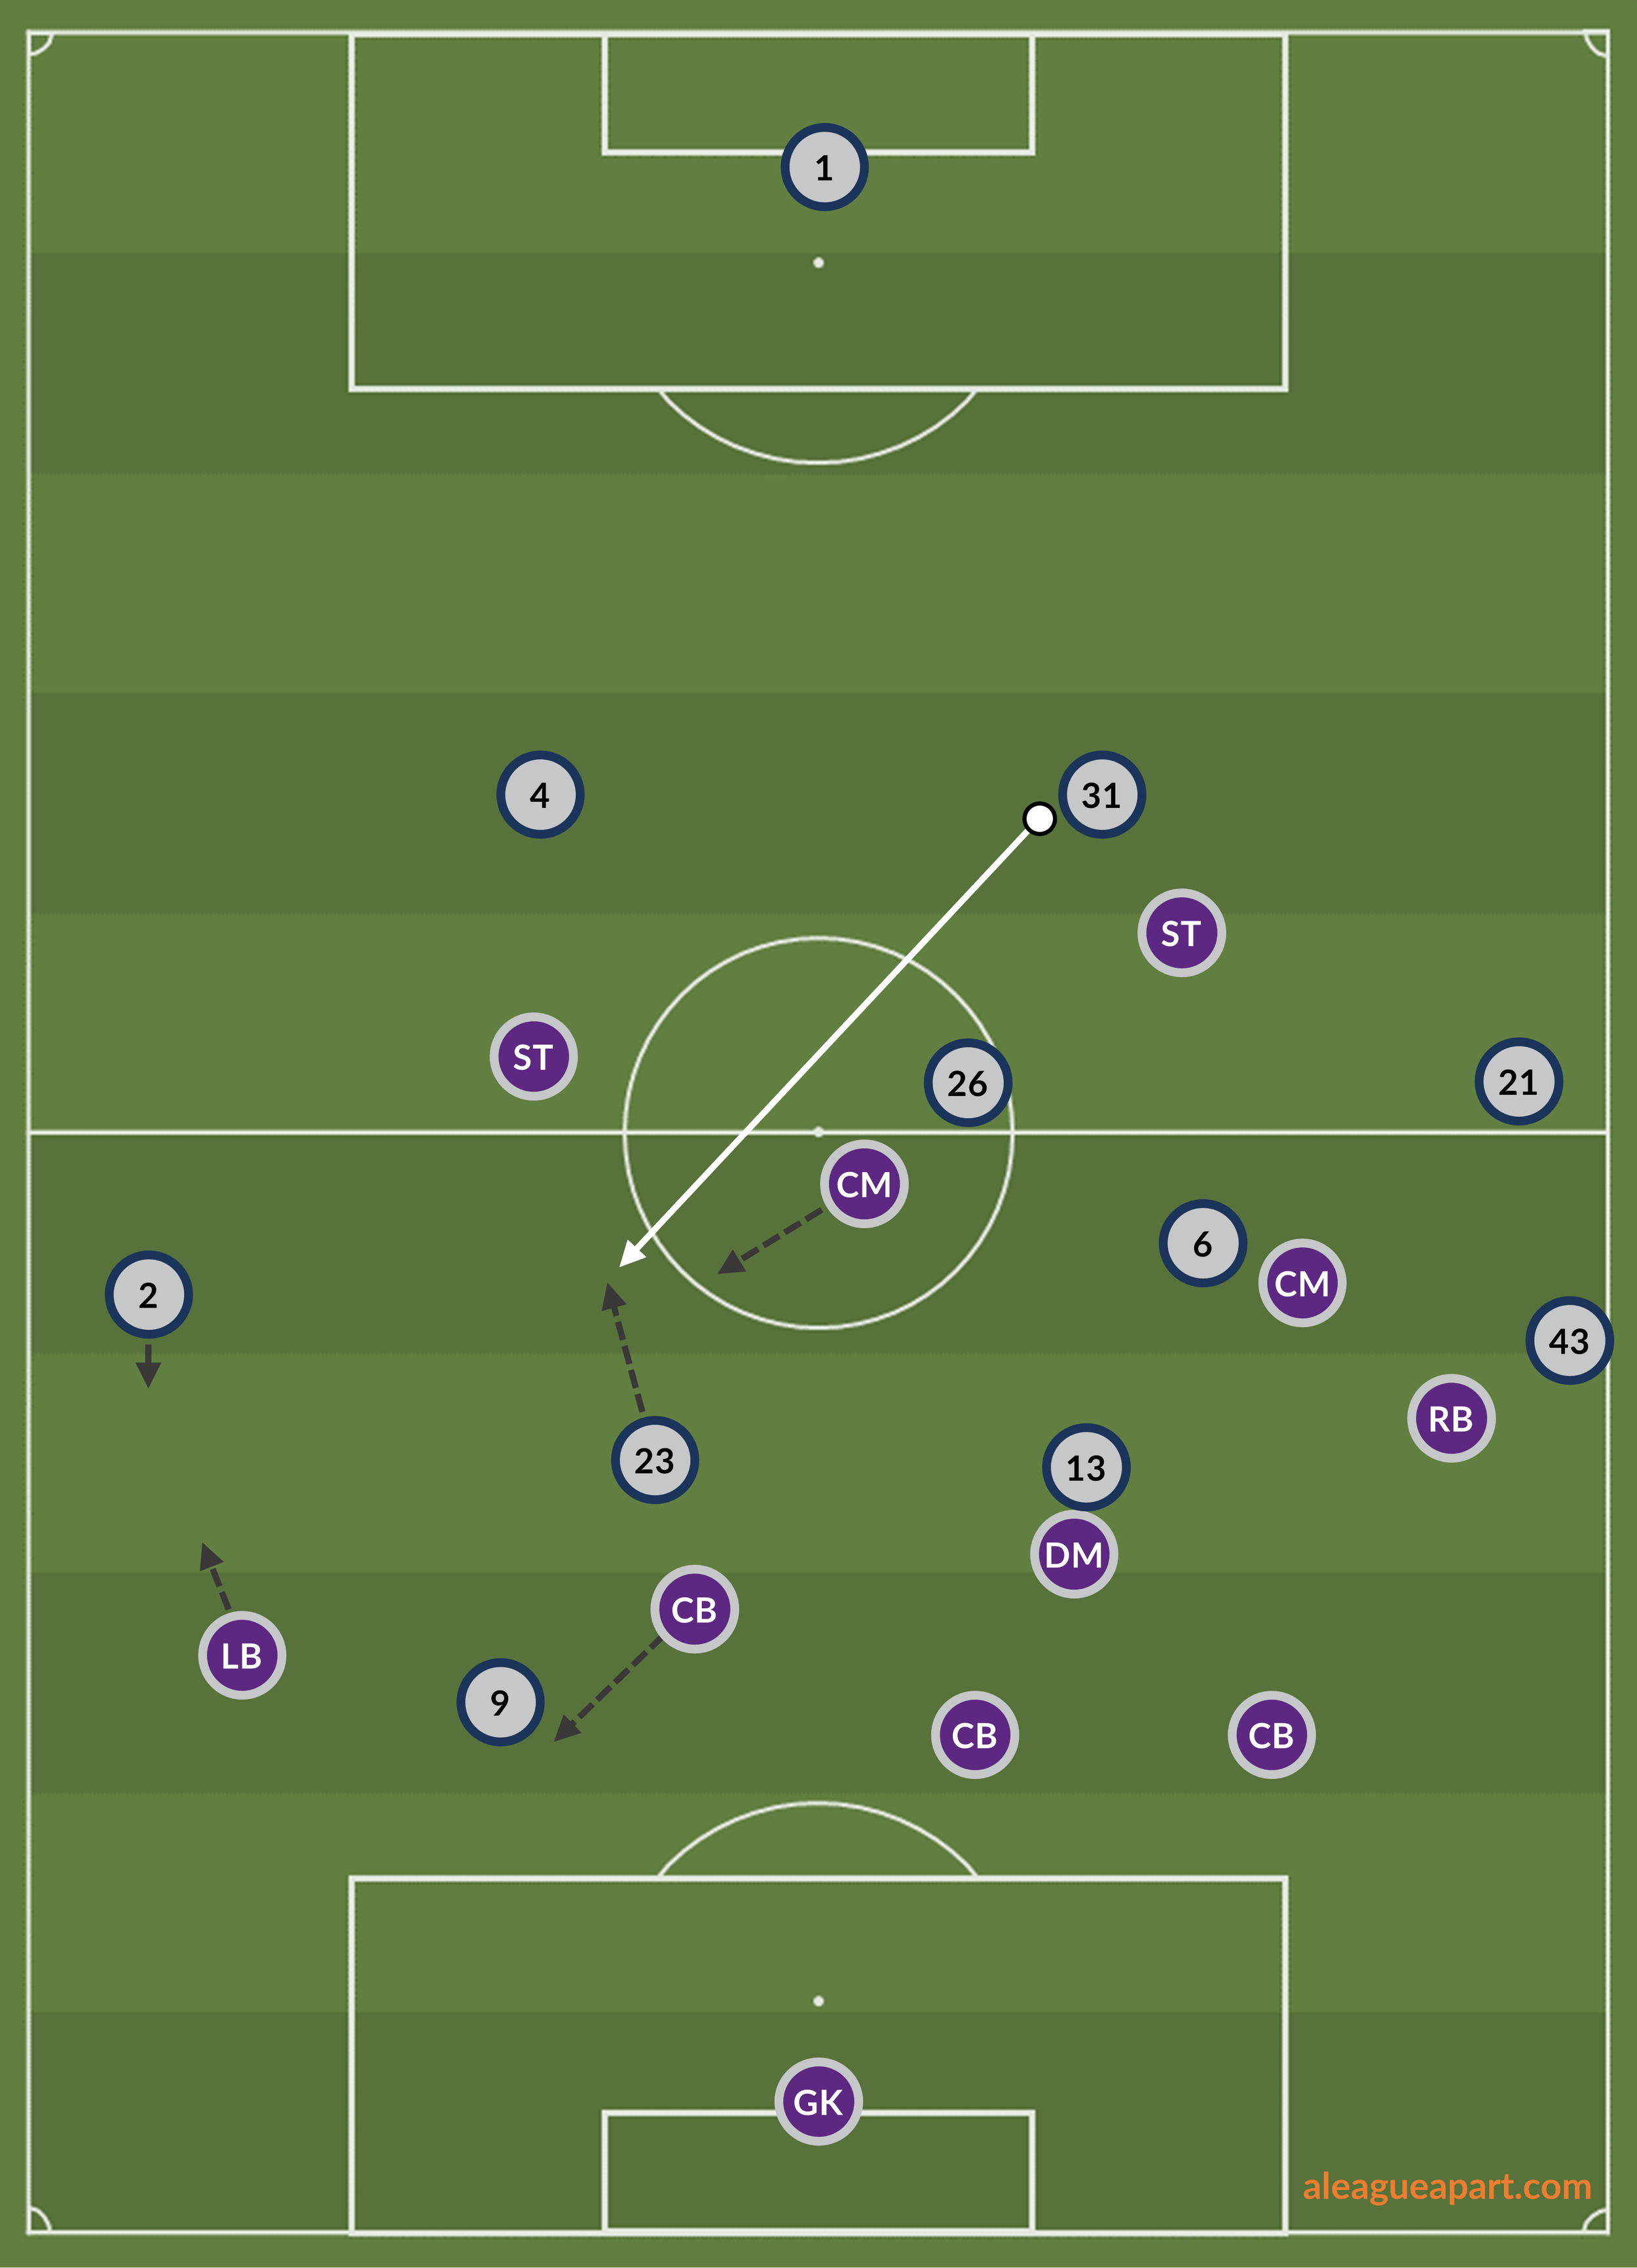
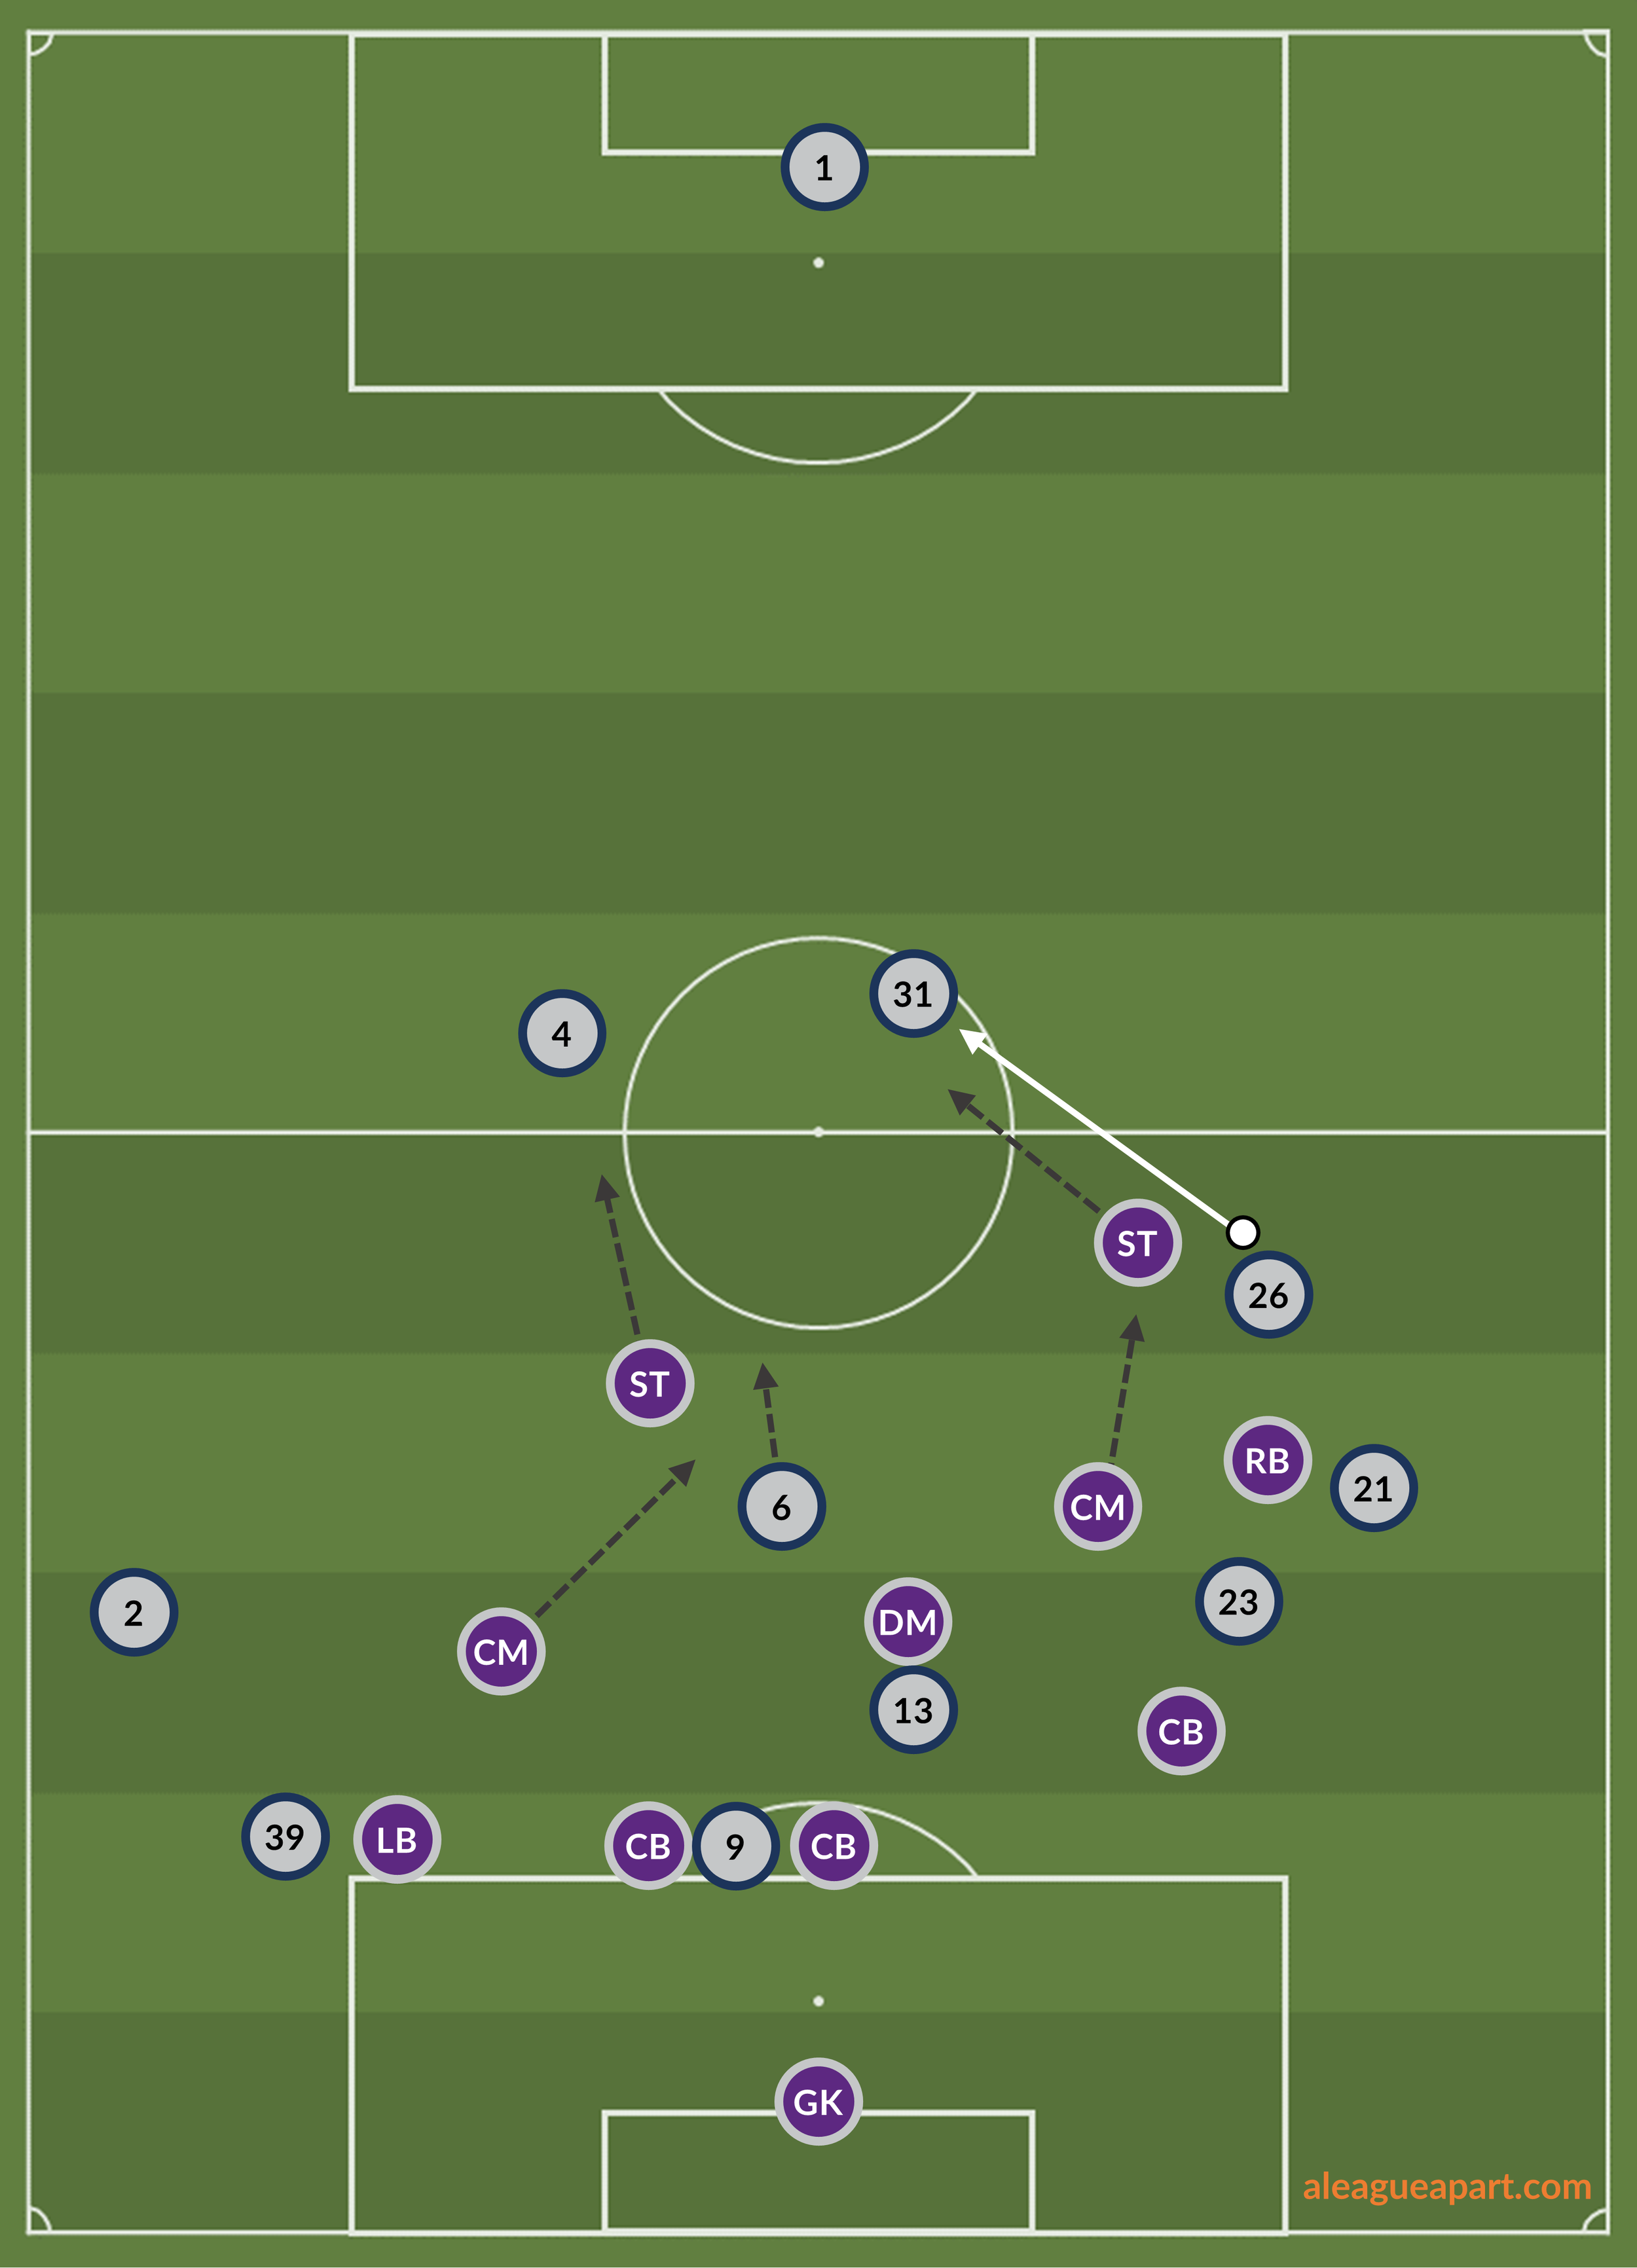
Their game against Victory (all 4 goals!) showed how susceptible the space behind the midfielders can be when the press is broken.
This passage of play that led to the 2-0 penalty came from a Perth press:
The 3-0 goal also arose from playing through the Perth press:
Summary
Perth’s opponent in the elimination final is Wellington, whom they lost to a few weeks back. It was a close game on the day with a penalty proving to be what separated the teams, and Perth didn’t have their best starting eleven on the pitch. With Gary Hooper out of contention for the Nix, they might feel like they have a chance. They’ll have to be mindful of how they protect the centre of the pitch behind the first two waves of the press, as well as how they cope with 2v1s on the flanks.
However, since the restart the four games they’ve played against teams in 4-at-the-back formations have resulted in a record of 11 goals conceded (5 v Adelaide, 4 v Victory, 2 v Wellington and 0 v Mariners) - it seems like it could be an uphill battle. I wonder if Popovic might consult the 5-2-3 formation again which had them record a 4-2 win against Wellington in February - a game in which Diego Castro was a notable absentee.