Western United: A few quick thoughts for finals
Mark Rudan has gotten Western United to the promised land in their inaugural season and they arrive in the A-League Finals Series as one of the form teams. having made the most of their remaining games with four wins and two losses since the restart. Their main men have also arrived in good goalscoring form, with Besart Berisha, Max Burgess and Alessandro Diamanti sharing nine goals and two assists between them. Their Elimination Final sees them come up against Warren Moon’s Brisbane Roar, a team still very much based on Robbie Fowler’s blueprint, who set up in a fairly similar formation and who seem to be playing some fairly attractive football themselves.
Here’s a few quick thoughts on Western United - mainly their defence.
Resolute Defence
Sydney’s Luke Brattan said this about Brisbane prior to their game two weeks ago:
"They have five big boys at the back - three centre-backs that don't really move away from the 18-yard box. So we've got to be patient, move the ball and I think we've just got to wait until someone makes a mistake and punish them."
He equally could have been referring to Western United, who they incidentally played four days later. Both defences are underpinned by a block of three central defenders who drop back and protect the box centrally, so the key for both teams will be to attempt to manipulate the centrebacks through movement to draw them out of position for their teammates to make runs into.
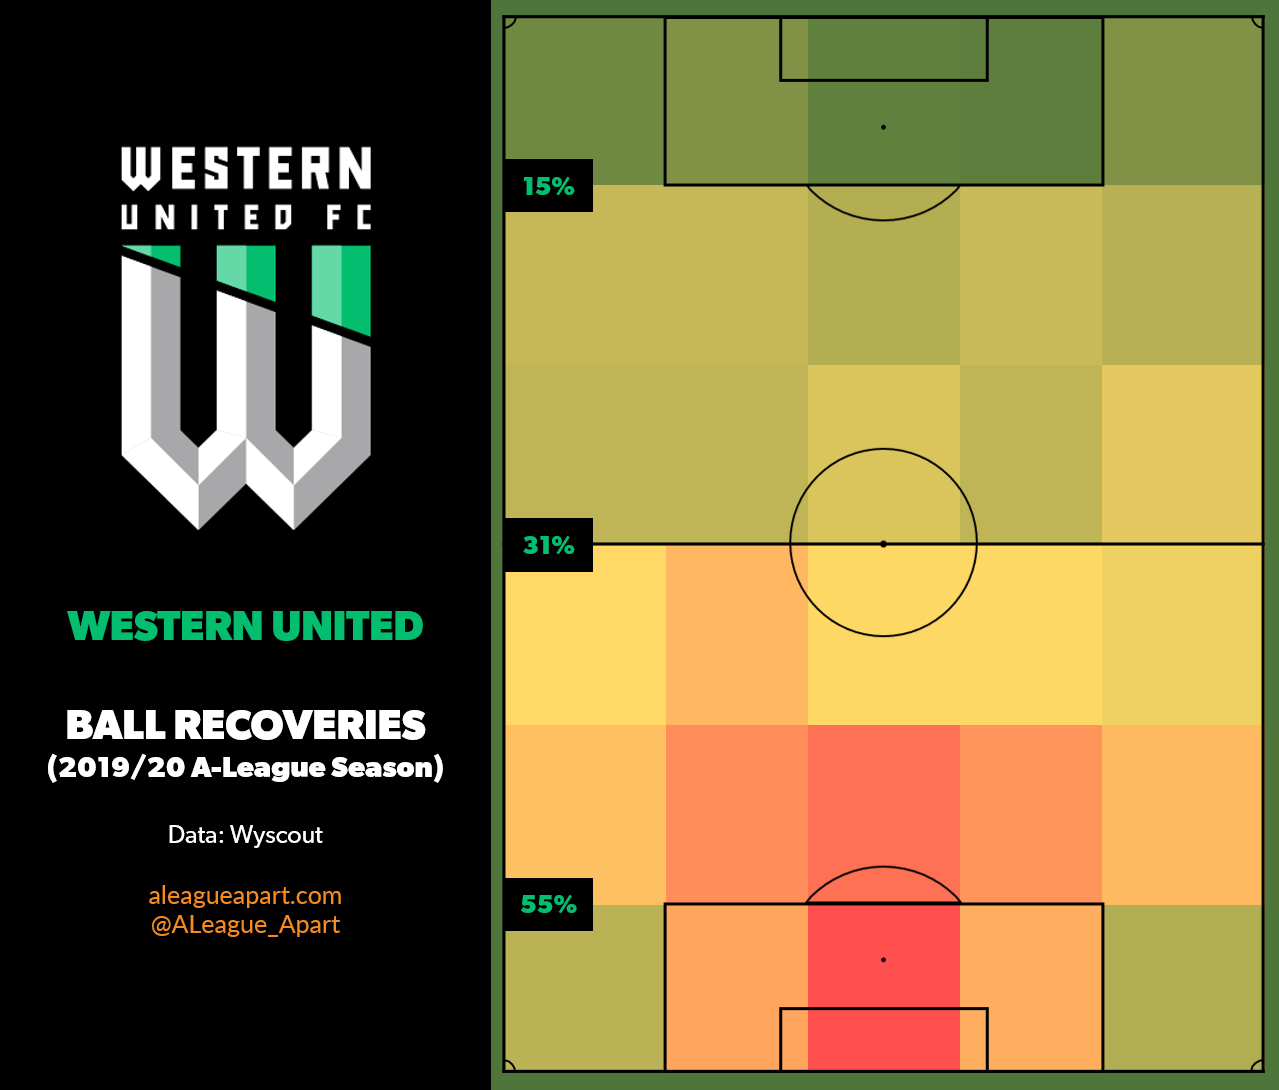
To show how much Western United like to defend deep, we can look at the positioning of their ball recoveries - 54.6% of their recoveries are within their own defensive third, which is the highest in the A-League this season (for reference, the second deepest defence is Sydney FC with 49% of recoveries within their own defensive third)
Playing through Western United’s defensive structure
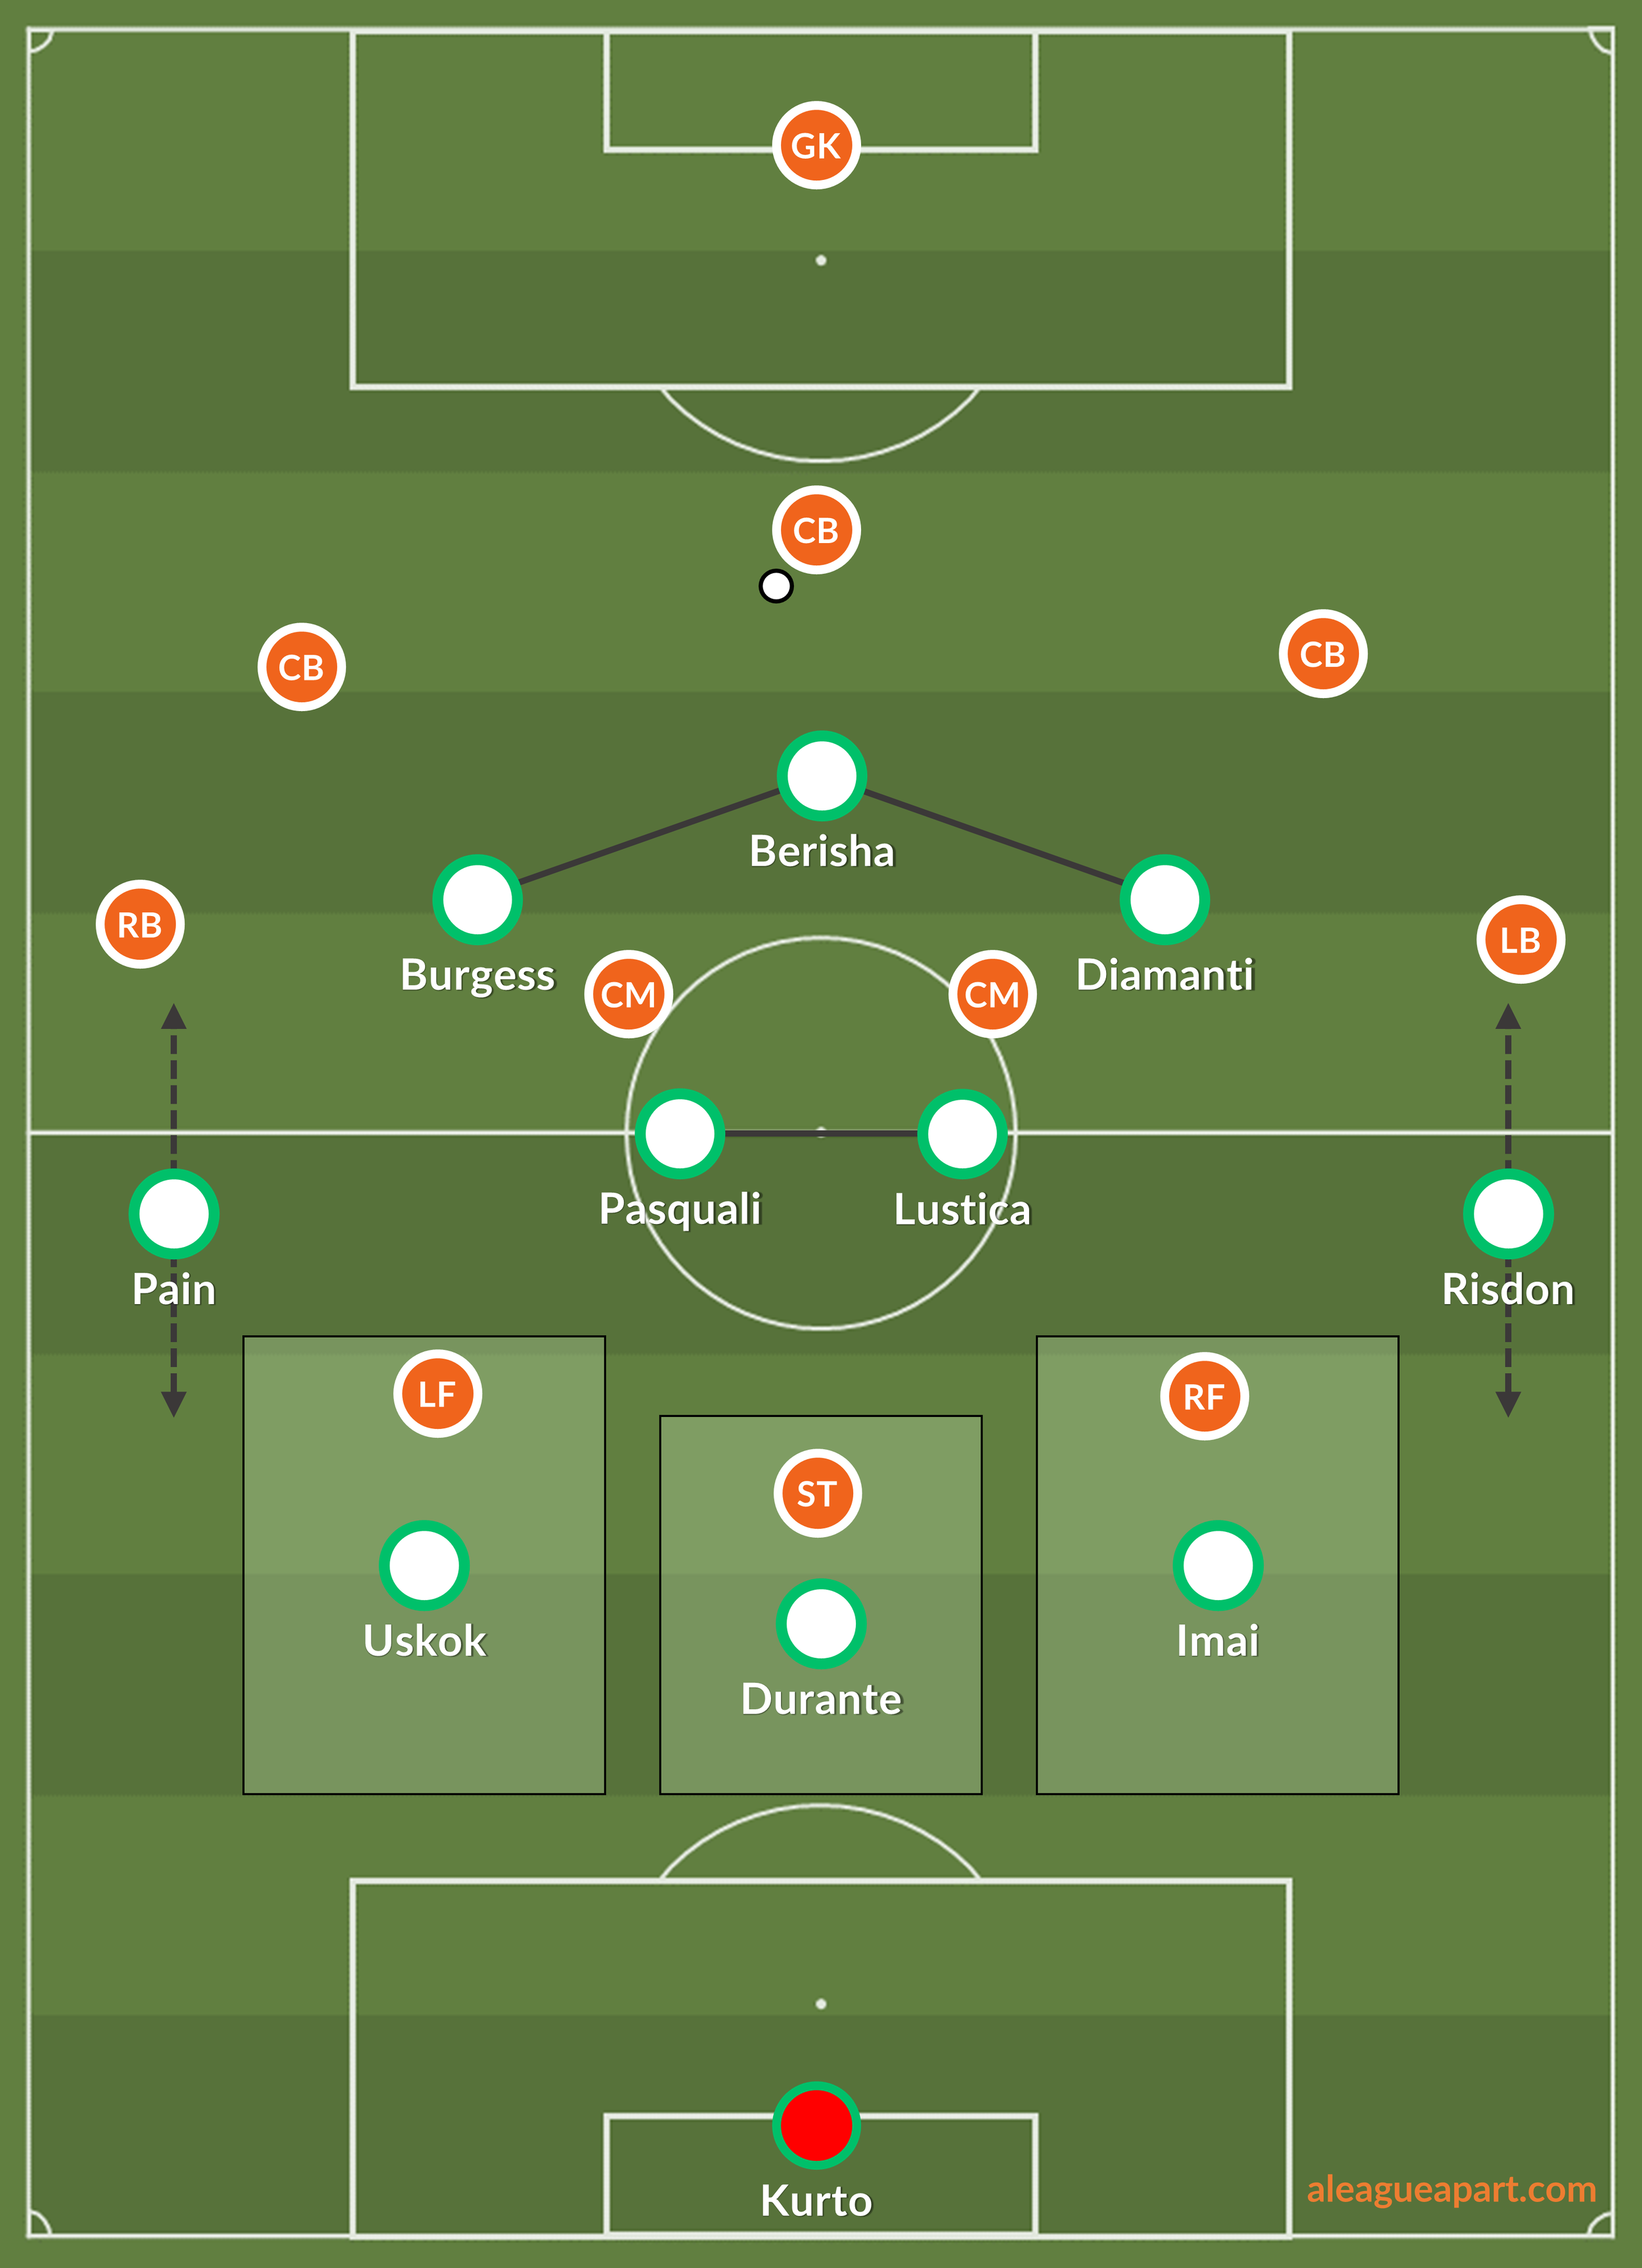
Western United generally defend against a back 3 in a 5-2-3 / 5-3-2 setup.
Western United defend in a central compact 2-3 shape, with the front three matching up against the centrebacks and the midfielders following up in behind. The intent is to lock down central areas and make it difficult for opponents to pass through the centre. When it comes to the flanks…
The wingbacks track the opposite wingback. Against Brisbane they will have a natural opponent, and will look to close them down when they are looking to receive the ball - this can be during the press, or for long diagonal balls that are played directly.
Diamanti’s defensive effort can cause some variance. At times he drops wide into the 2-3 shape, but other times he stays forward with Berisha. It looks like he has a bit of a free pass to not track back, which is fair - at 37 you’d much prefer him to conserve his energy for attacking, while it’s also be beneficial to have him further forward to help transition into attack after winning the ball back. This can result in more defensive load required behind him with Lustica often the one who compensates for Diamanti, frequently pushing up to assist in the press, or moving slightly wider to track a fullback coming up the pitch.
Once the first line of defence has been beaten, the central midfielders will shift from side to side in front of the defensive line, depending on which ball the flank is. In order to ensure the midfielders aren’t overloaded, Burgess and Diamanti track back centrally - although as above, Diamanti may or may not come back.
Finally, the centrebacks push out of defence to track attackers as they drop deep to provide a passing option, as is usually the two outside centrebacks. Tomoko Imai in particular has been outstanding at this - against Perth he martialled Bruno Fornaroli perfectly, always matching his darting runs as he came deep and making it extremely difficult for him to turn with the ball by using his strength well to apply pressure. On the other side, Uskok doesn’t react as quickly to come out of defence, but he’s alright when he has time to read the situation.
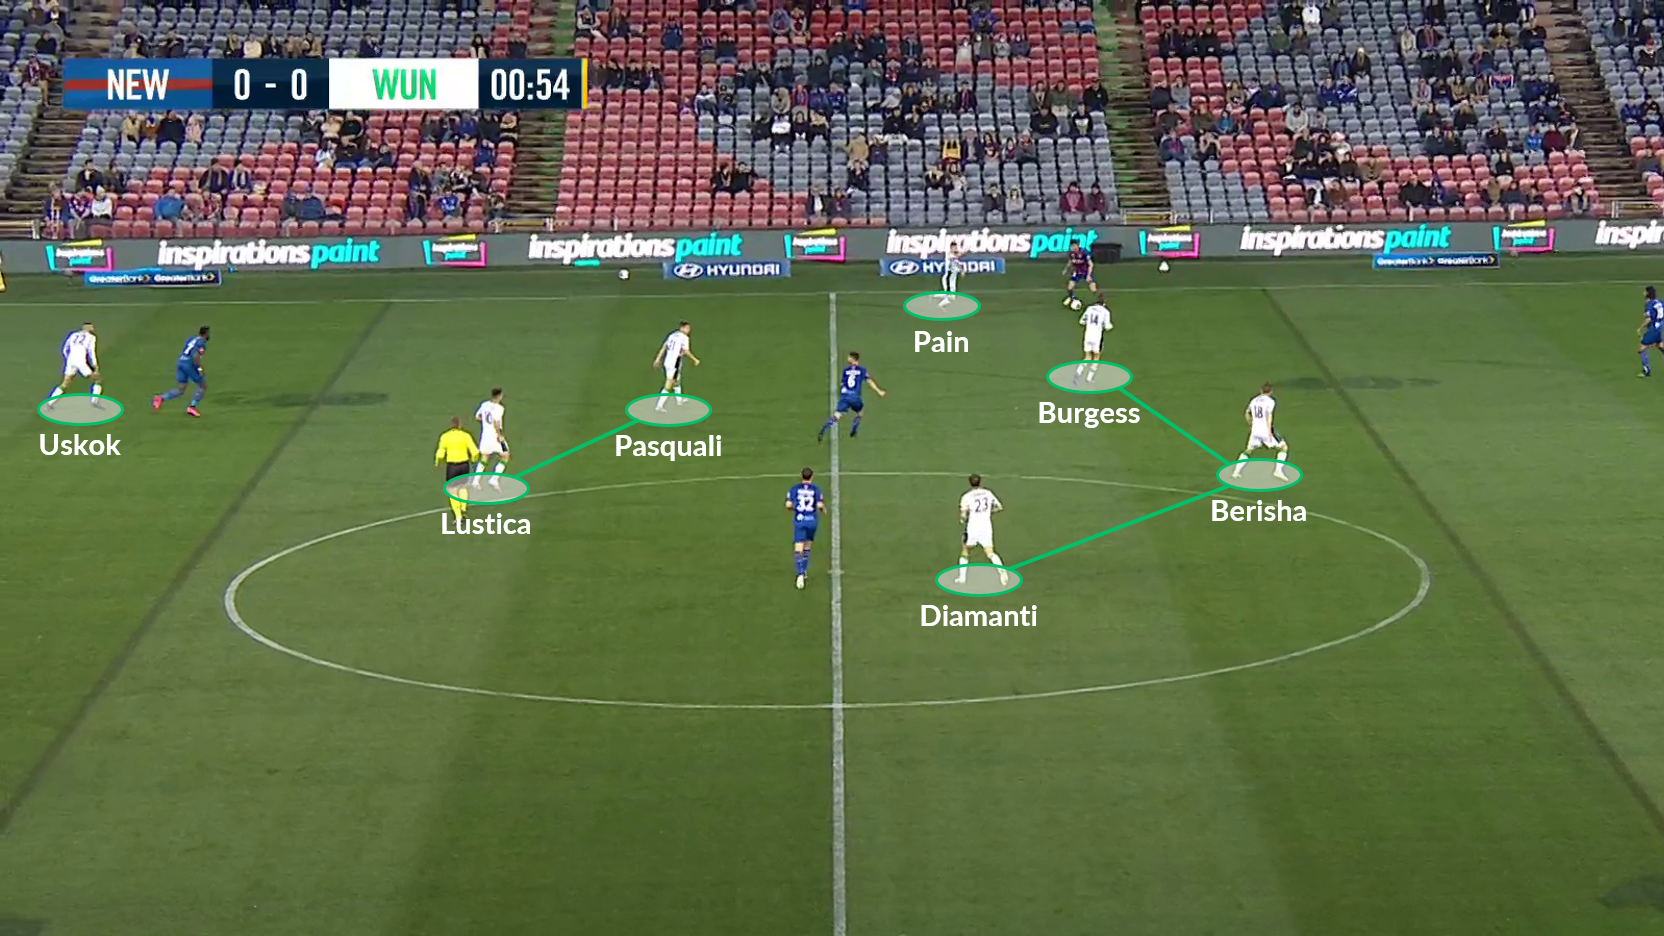
With this in mind, let’s look at how Brisbane might be able to break this defensive structure, with Western United’s game against Newcastle Jets as an example.
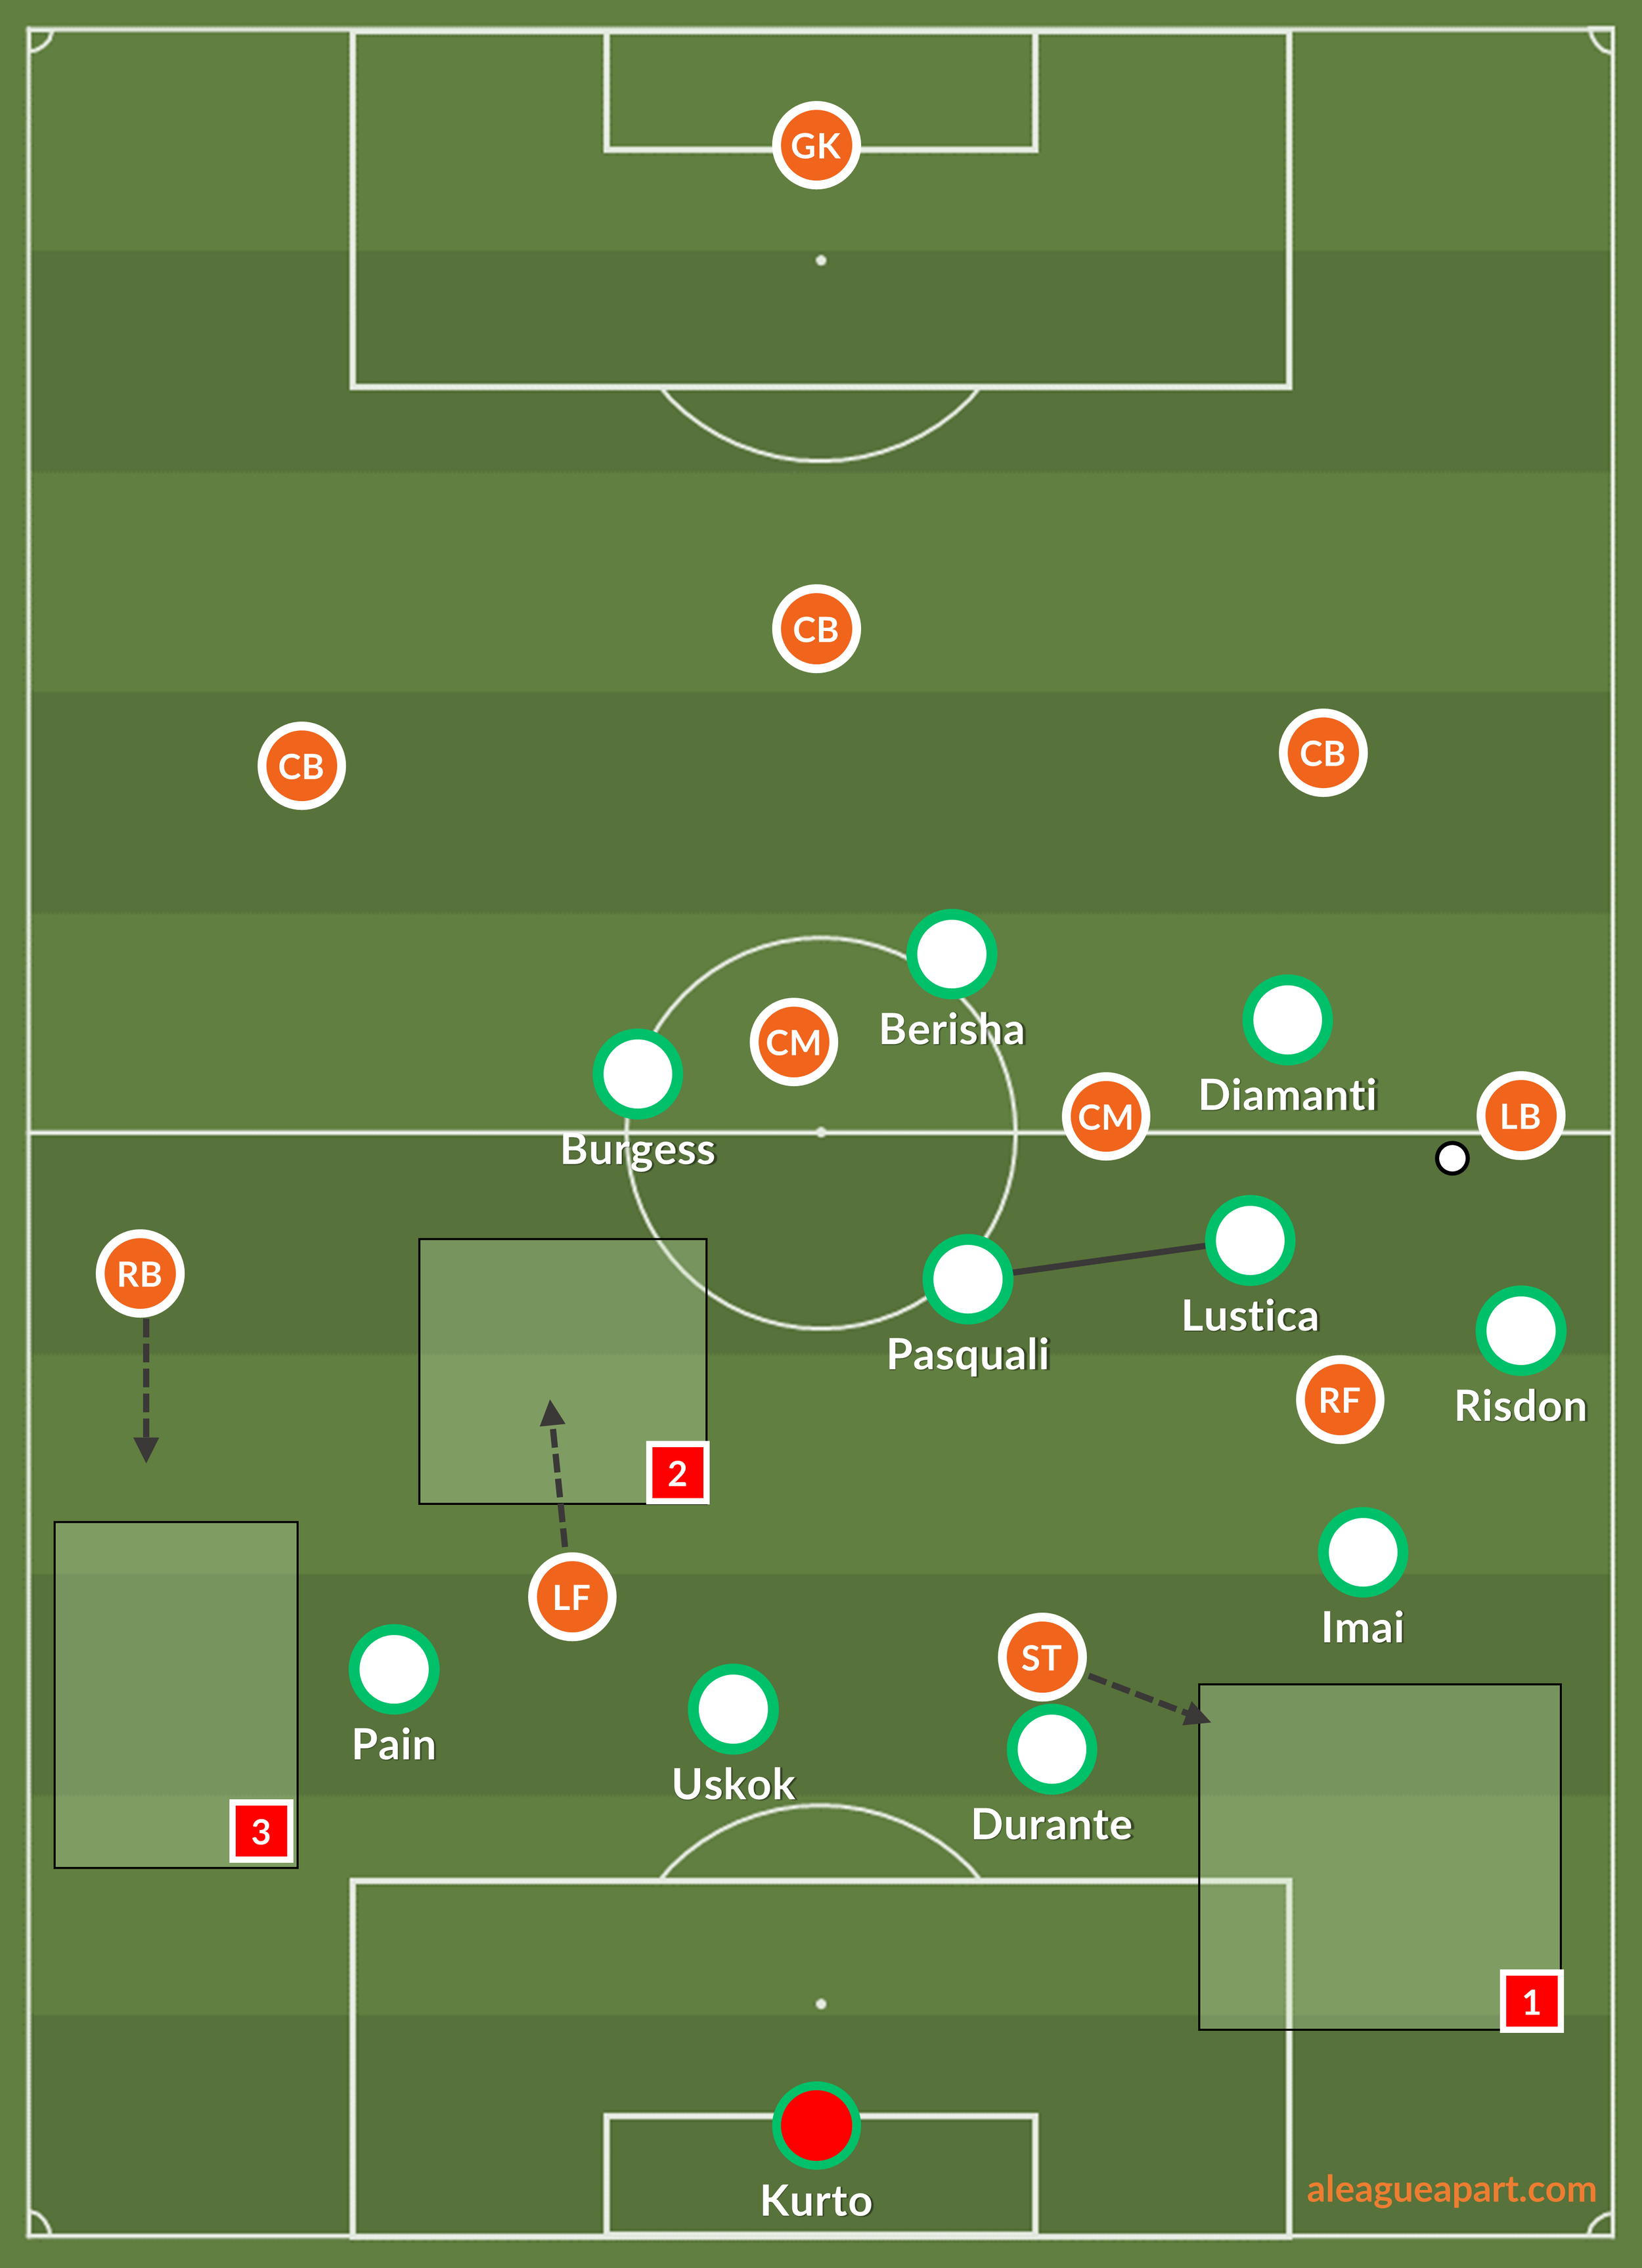
Run into the channels behind outside centreback
With the outside centreback drawn forward by the right forward, the space in behind is vacant, especially with Risdon high up the pitch. The striker can make a run into the channel behind him, against the less mobile Durante
Outside the central midfielders
With Pasquali and Lustica drawn over to the flank, the opposite half-space will be uncovered with both central midfielders closer to the ball-near side. Further back, the centreback Uskok may not be as comfortable stepping forward, with only two centrebacks in the defensive line. The wingback Pain cannot track this run as he has to deal with the opposite side wingback coming forwards. A few of these also happened when they played against Melbourne Victory last month.
Switch to the opposite wingback
Finally, the ball can be worked across to the opposite flank. This opens up a 1v1 between the wingbacks, and can open up a nice crossing opportunity.
The video shows a few times where Newcastle were able to work the Western United defence around.:
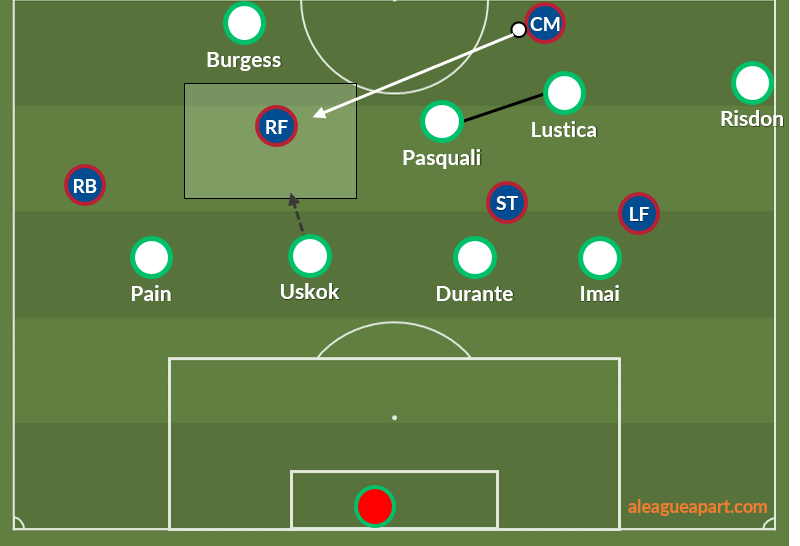
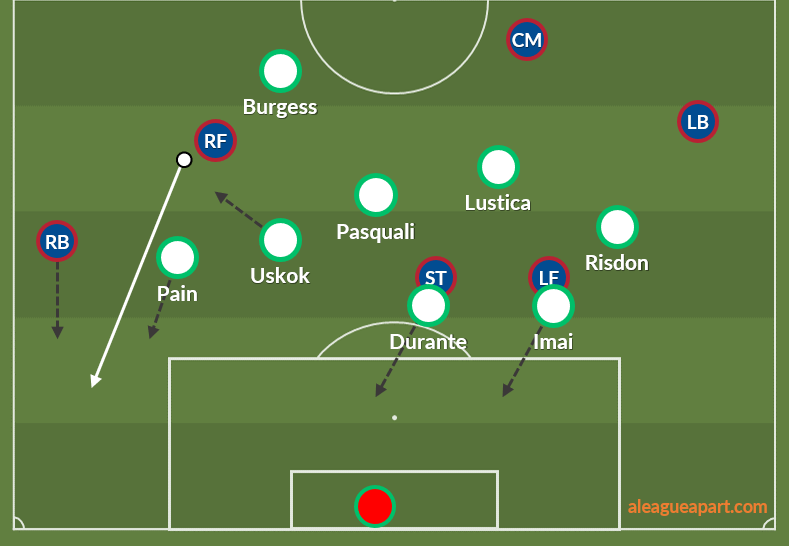
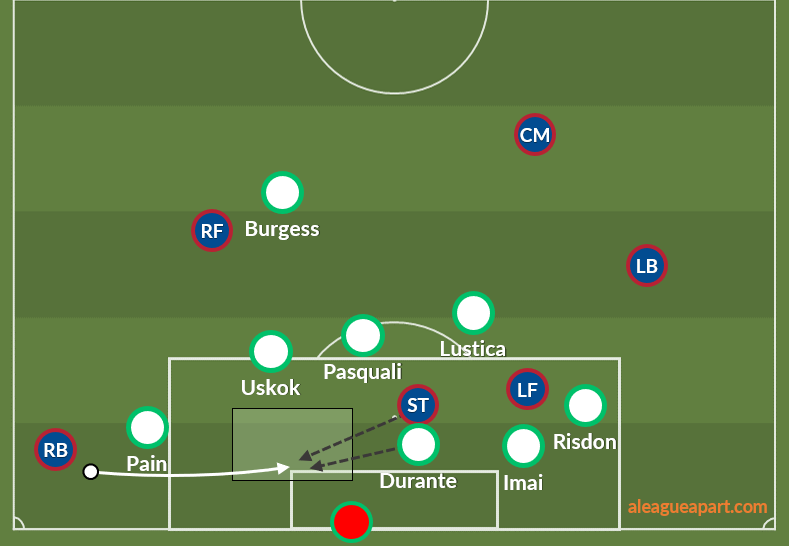
The final clip is the goal that was scored that incorporates all three - first the ball into Ibini who positions himself outside the two central midfielders. Uskok is hesitant to come out but does when Ibini receives, and Pain has to track the run of Hoffman on the overlap. Switch is completed, and the pass is perfect for Hoffman to deliver a cross. O’Donovan runs into the empty space that Uskok would be covering and beats Durante to the ball with a great header.
The underrated Steven Lustica
While Alessandro Diamanti, Max Burgess and Besart Berisha get most of the plaudits, it’s important to also credit the work that Steven Lustica does behind them. He doesn’t play too many penetrating passes, take many shots or take touches in the box, but his movement is key to allowing Burgess and Diamanti to get on the ball. Against Perth, for example, his role was to go forward and attract the attention of the defensive midfielder Juande so that Burgess and Diamanti could get on the ball either side of him, while in other games, he pushes up or pushes wide to draw attention away from Diamanti. In defence, he also works hard in defence to cover for Diamanti, often pushing up aggressively to assist in the press and also getting involved more on the right to offset Diamanti not coming back.
It’s quite interesting to watch his movement during the games as he counterbalances with Diamanti.