Sydney FC 2-1 Wellington Phoenix: 2 Clubs, 1 System
Sydney FC’s 2-1 victory over Wellington Phoenix saw Steve Corica and Ufuk Talay’s teams adopting similar tactics on the field. While it was subdued in comparison with the rest of the wild A-League season, it made for an interesting tactical battle, with both sides trying to impose their game on the other.
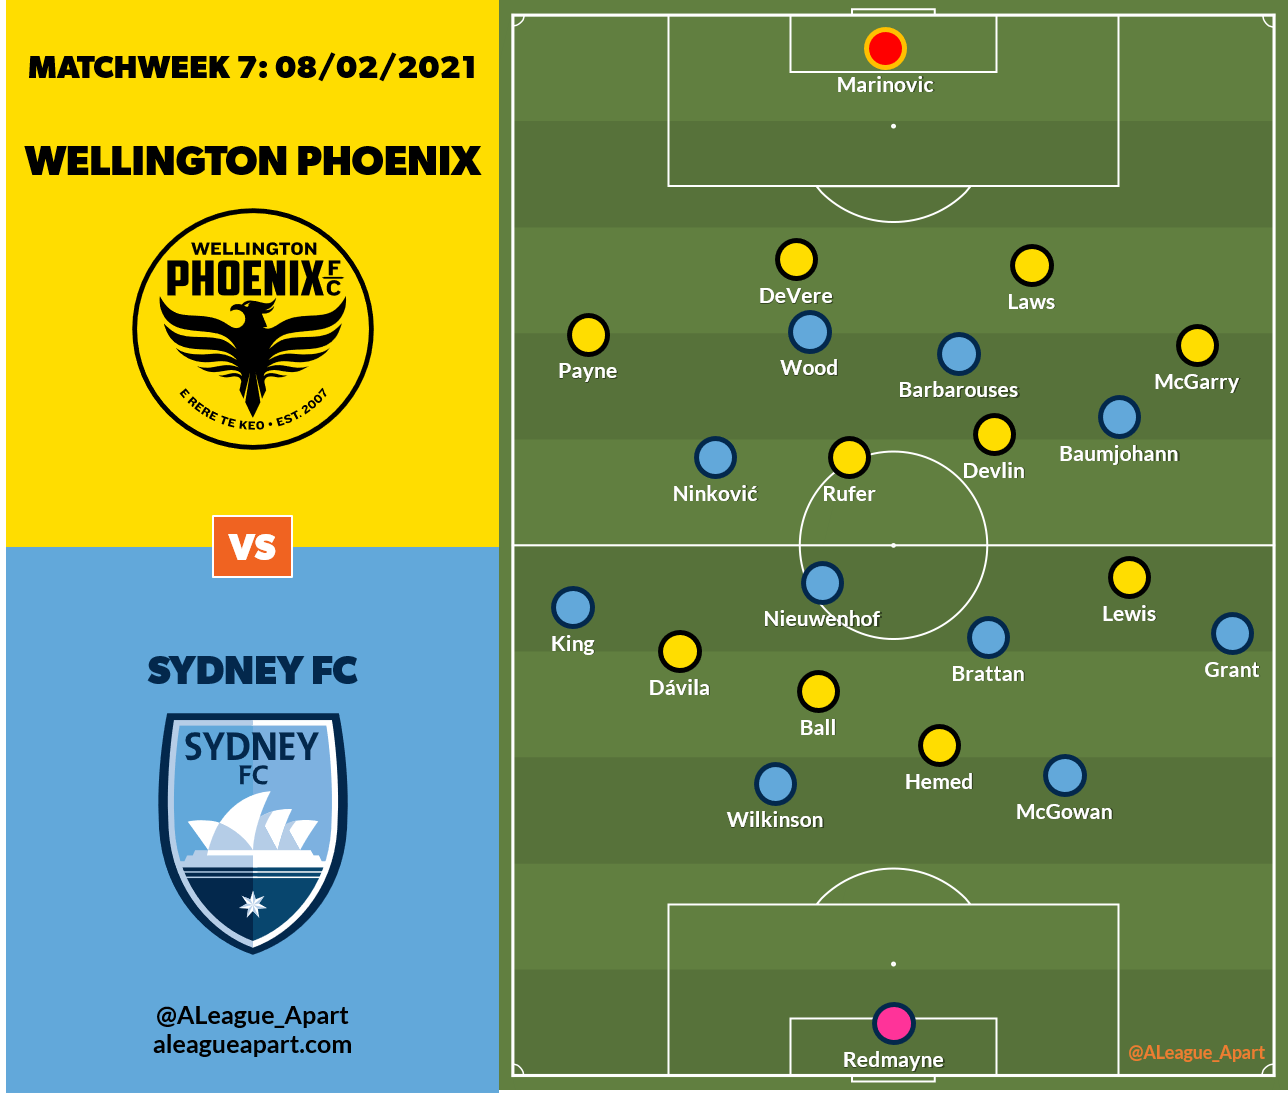
Both sides remarkably similar
Both sides set up in their familiar 4-2-2-2 setups, which made not only their shapes similar, but also their movements and patterns of play:
One midfielder dropping into defence in the buildup: Luke Brattan and Cameron Devlin would drop from midfield into the back line (either in between or outside the centre-backs), creating a 3-1 shape at the back. This helped them have a man spare against the press from the two attackers
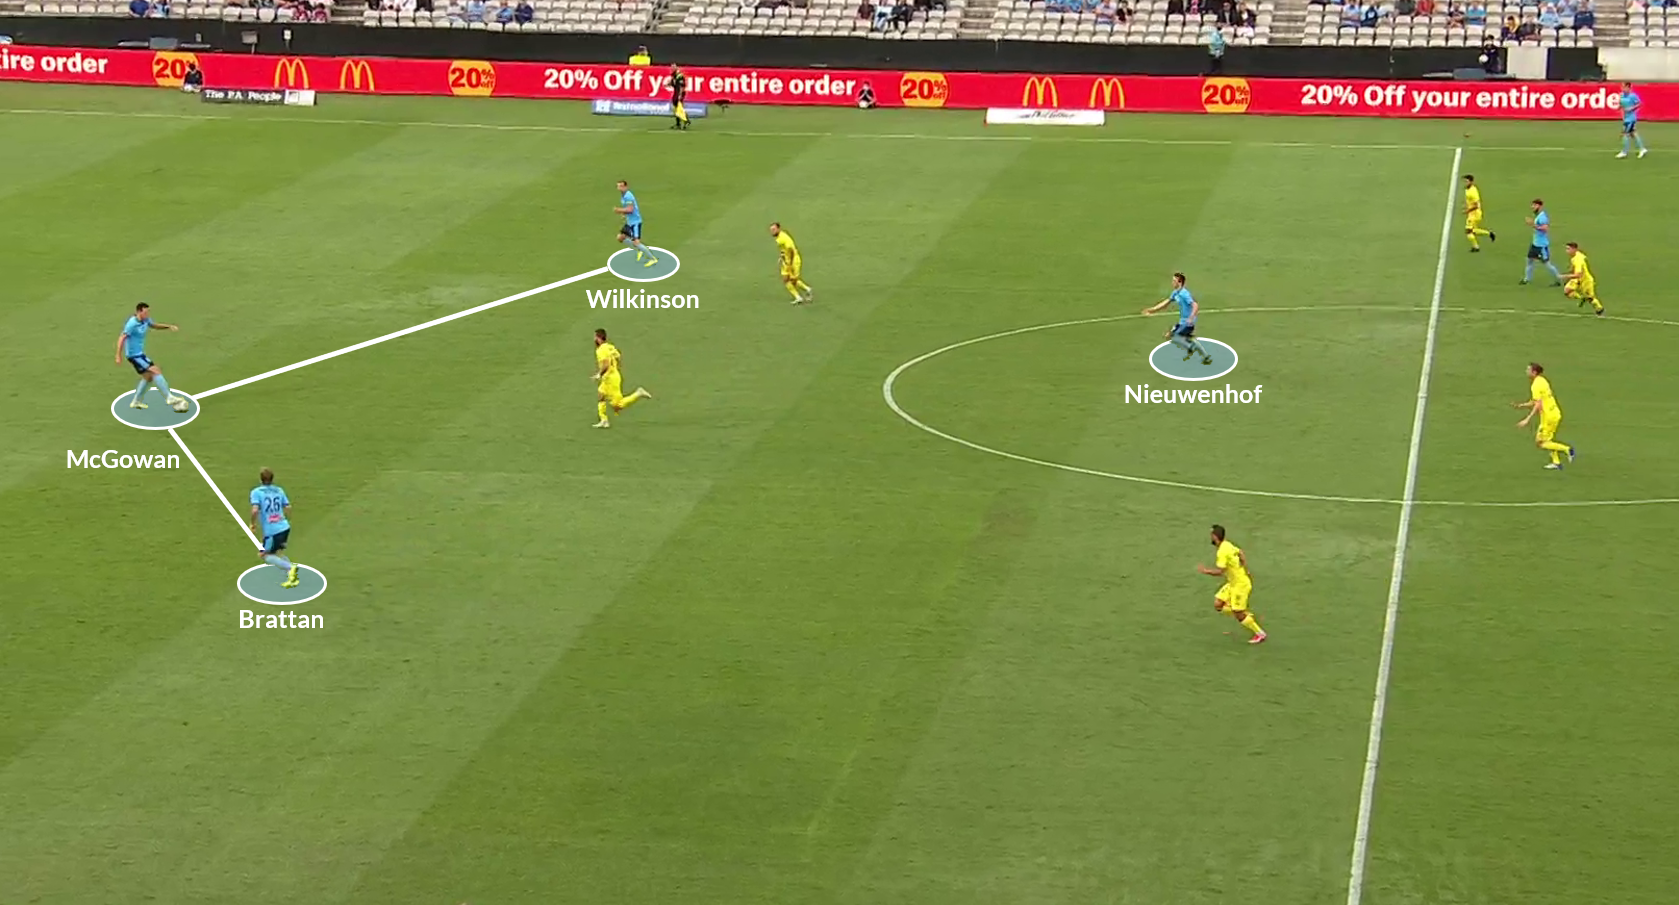
The other midfielder holding position centrally: Calem Nieuwenhof and Alex Rufer would stay central, finding a spot behind and in between the attackers and in front of the midfield line. They provided an easy option in case the press
‘10’s with similar roles: Both teams had an attacking midfielder who would drift into central positions (Milos Ninkovic and Ulises Dávila) and another who would stay slightly wider (Alexander Baumjohann and Clayton Lewis).
Attacking full-backs: Both sides’ fullbacks joined the attack on the outside of the attacking midfielders
Striker pairings: Each team had a striker who remained higher up the pitch (Patrick Wood and Tomer Hemed) and another who had more contributions coming short to link play and then running in behind.
4-4-2 defensive shape: Both teams dropped off and allowed the opposition to build up. The forwards would screen the midfield and the midfielders would collapse on the ball when the ball got past the forwards.
Because everything was matched so perfectly, the key was who could find a way to break through by creating space either inside or outside the structure.
Breaking lines
A 4-4-2 creates three defensive lines and generally sits compact and central, shifting over to either side as the ball is played into the flanks. The nature of these lines means that everyone has a defined position they should be taking up with respect to the system as a whole.
An opposition can work around this, by taking up positions in between these lines. This forces the defending team to make decisions - who picks up the player in between the lines?
Wellington’s style of play this season has been heavily dependent on players positioning themselves between the lines, so let’s take them as an example. (But of course, Sydney had a very similar approach - these could almost equally be applied to them.)
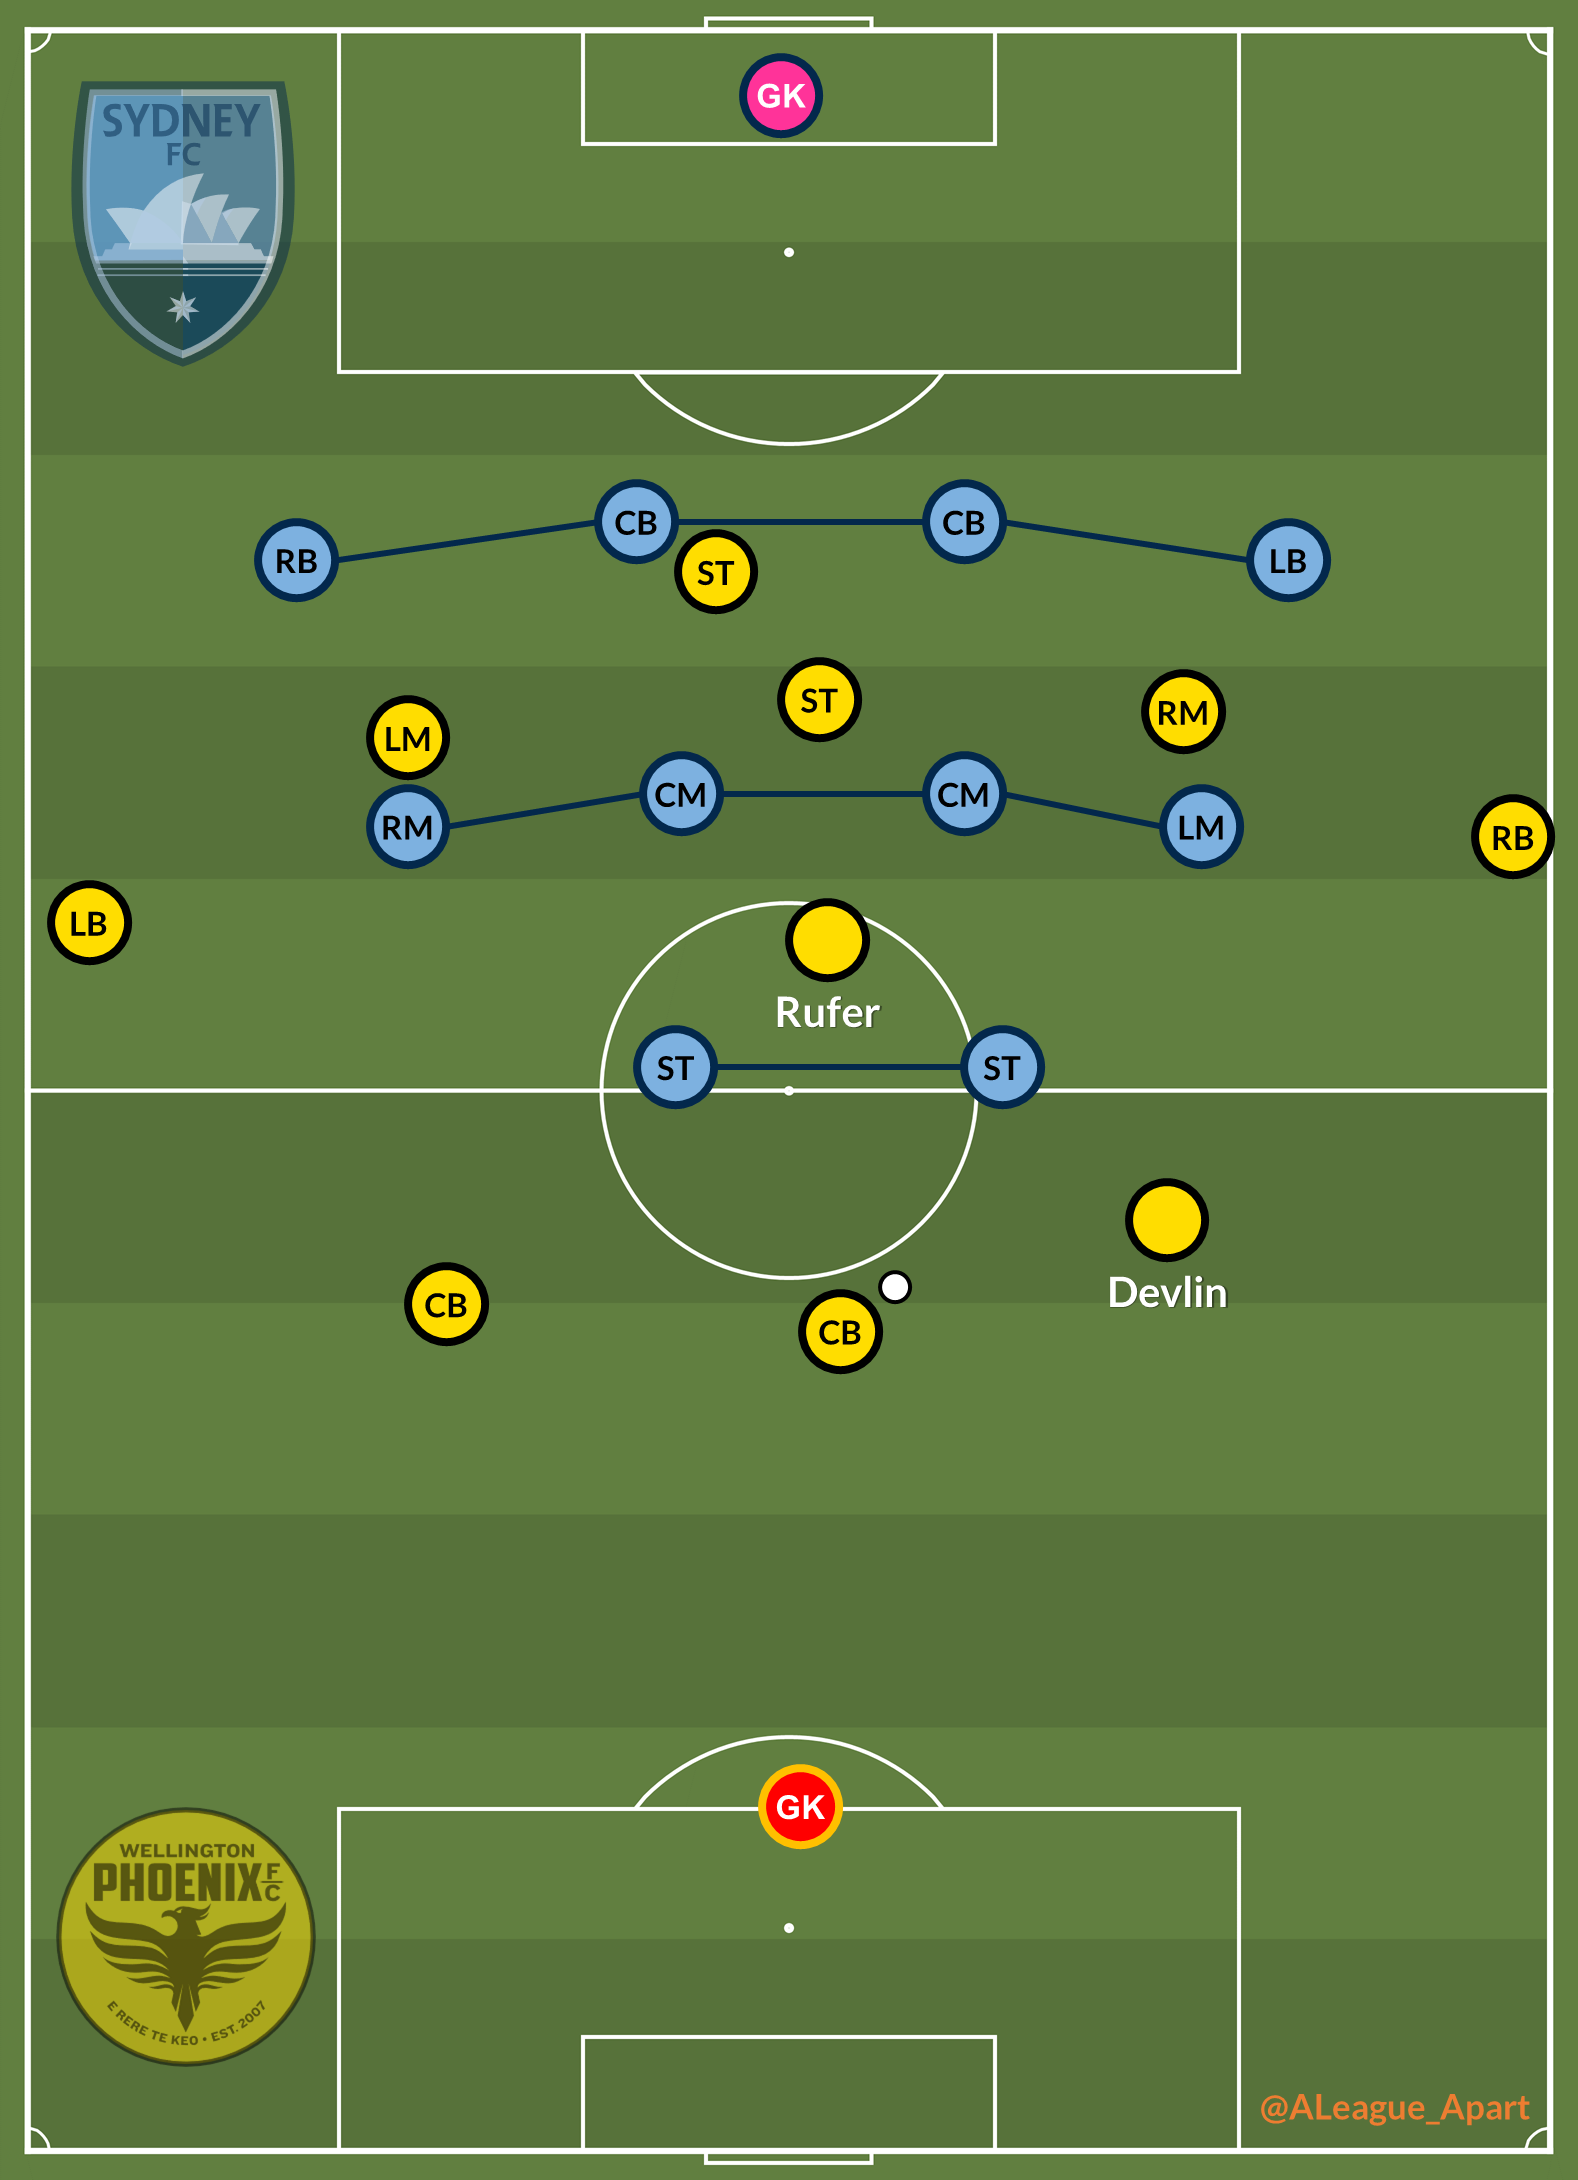
Alex Rufer frequently took up the role of the more advanced central midfielder, with Devlin dropping into defence. By positioning himself behind and in between the strikers, he acted as a target for passes breaking the first line. If the ball comes into him, should one of the strikers drop, potentially letting him turn and face forwards? Should Brattan and Nieuwenhof come out of their bank of four to close him down, potentially opening up space further back?
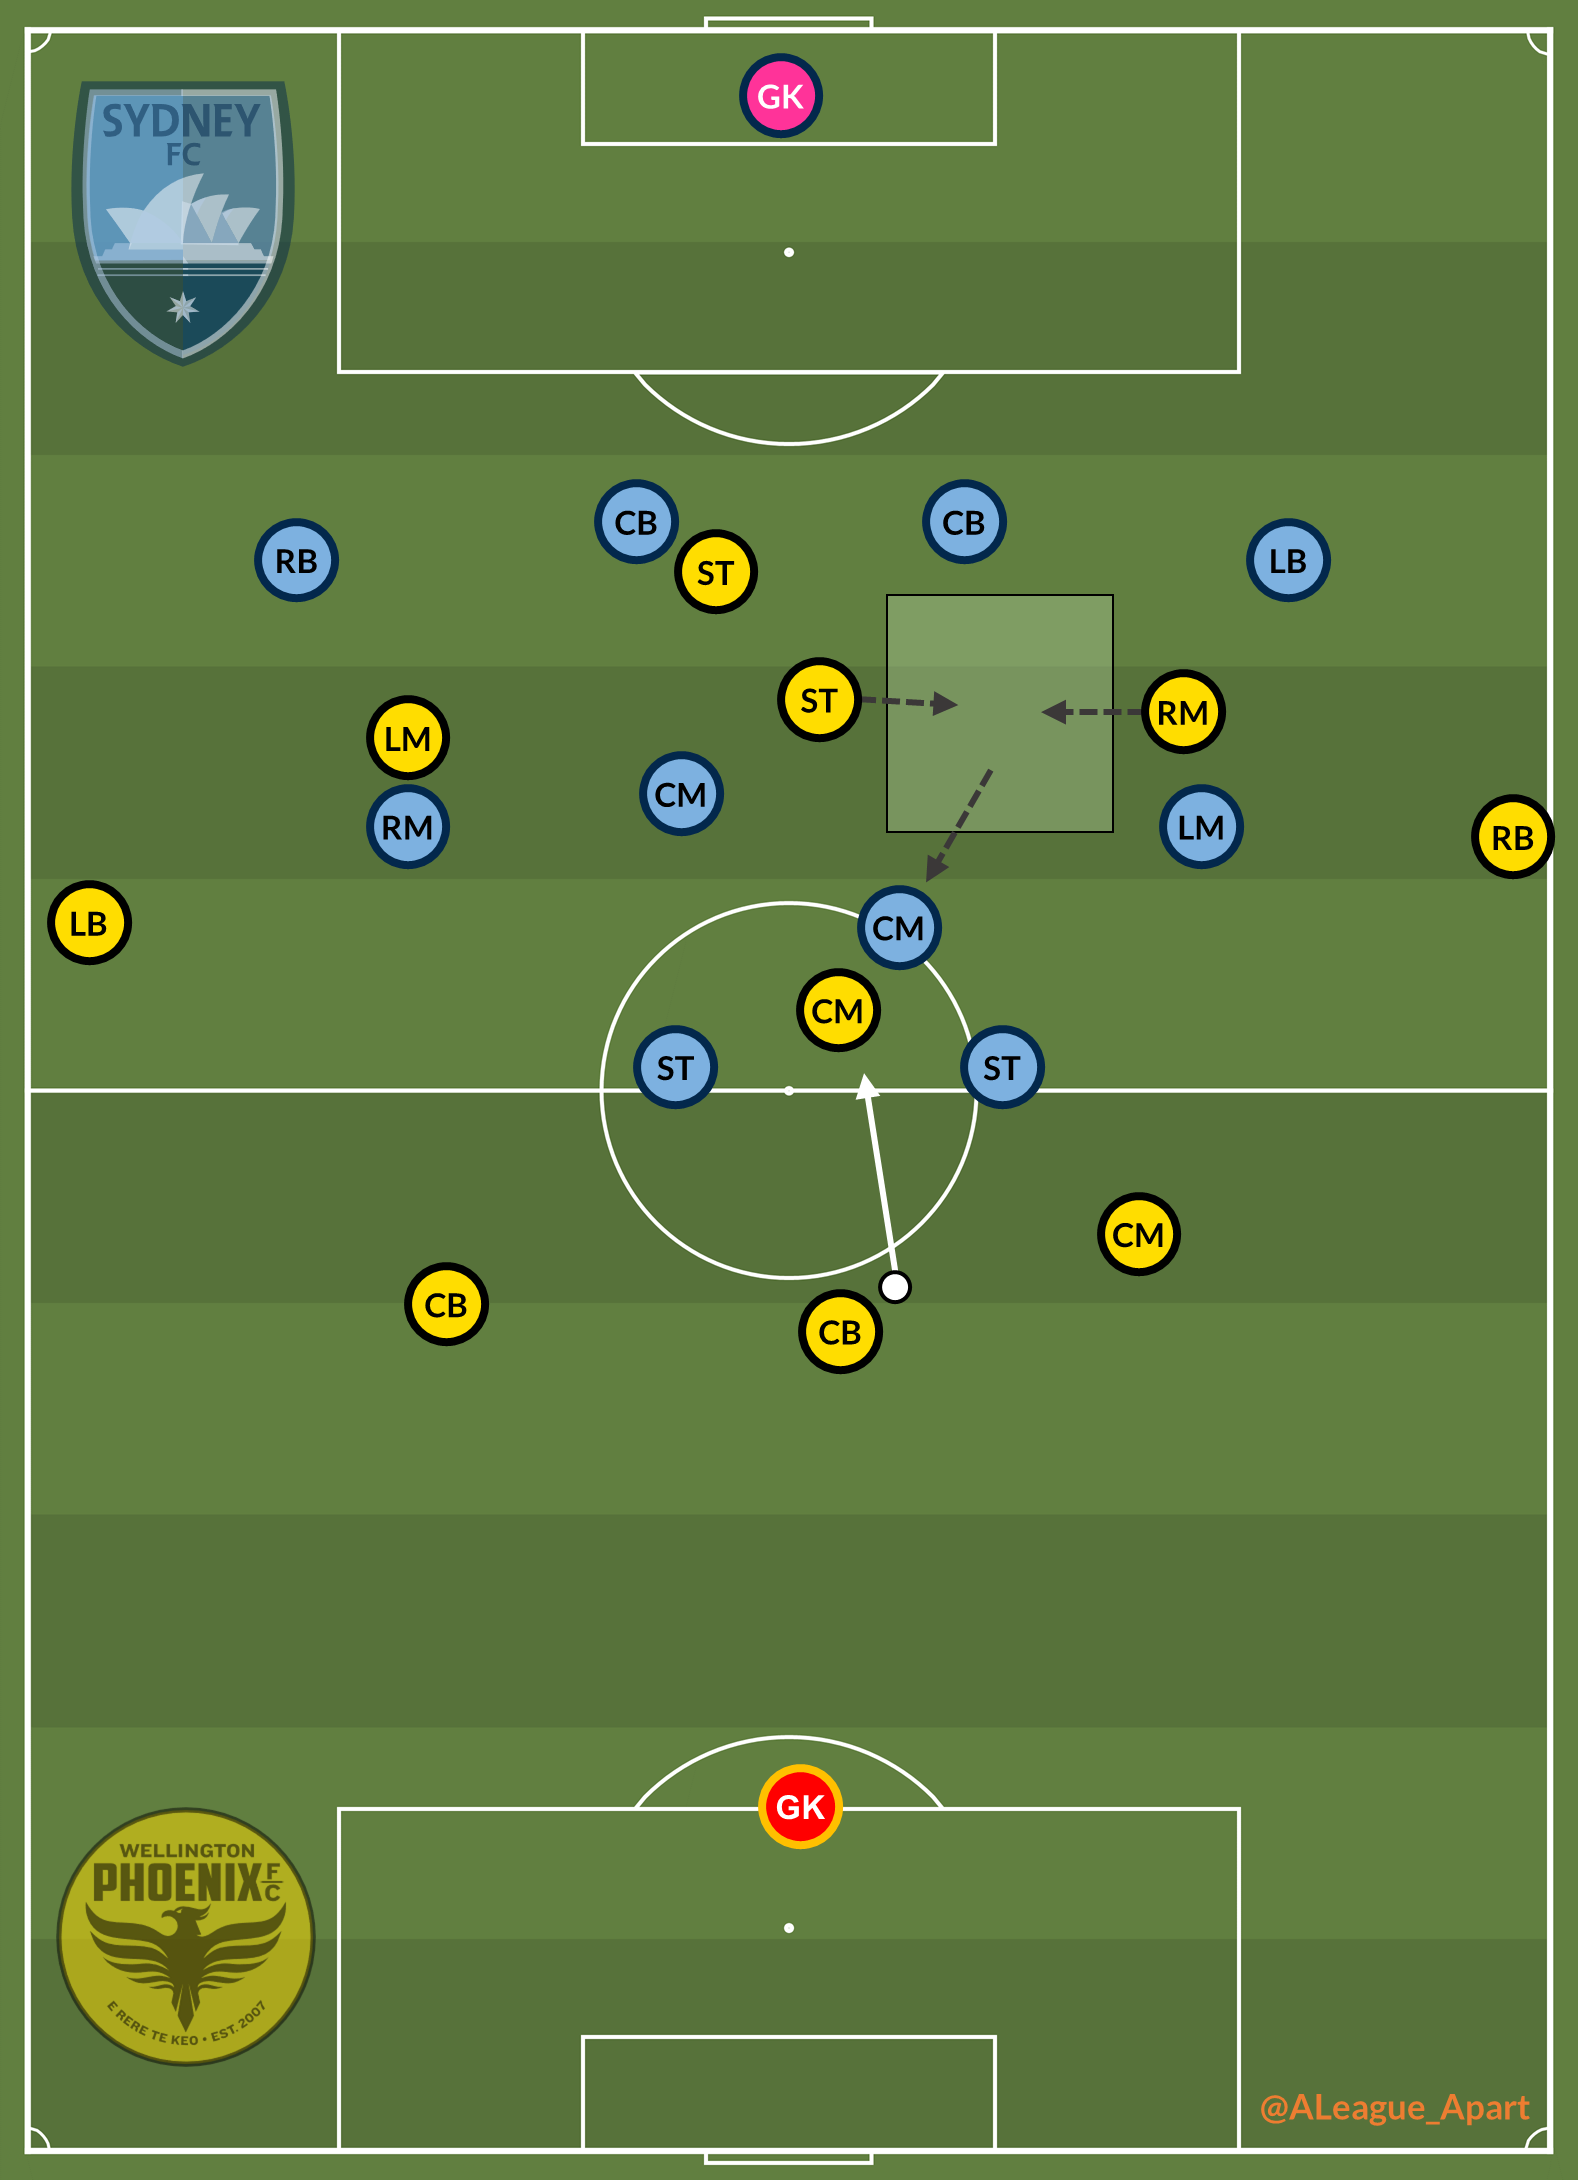
Rufer was excellent at this role. Upon receiving the ball he could recycle possession by playing back to the centre-backs, but was equally capable of turning with the ball, putting perfectly weighted passes through the midfield while also having the composure and technique to carry the ball forwards himself. (While I’ve focused on Rufer and Wellington here, Nieuwenhof deserves a lot of similar praise too, especially for his ability to carry the ball out of midfield.)
Further forward, Dávila’s preferred operating areas are in central areas, so he would come narrow from the right flank where he was deployed into central spaces behind the midfielders. His positioning placed him in another spot between the lines - should King come out from left back, should Ninkovic track him from left midfield, or should he be passed on to the central midfielders?
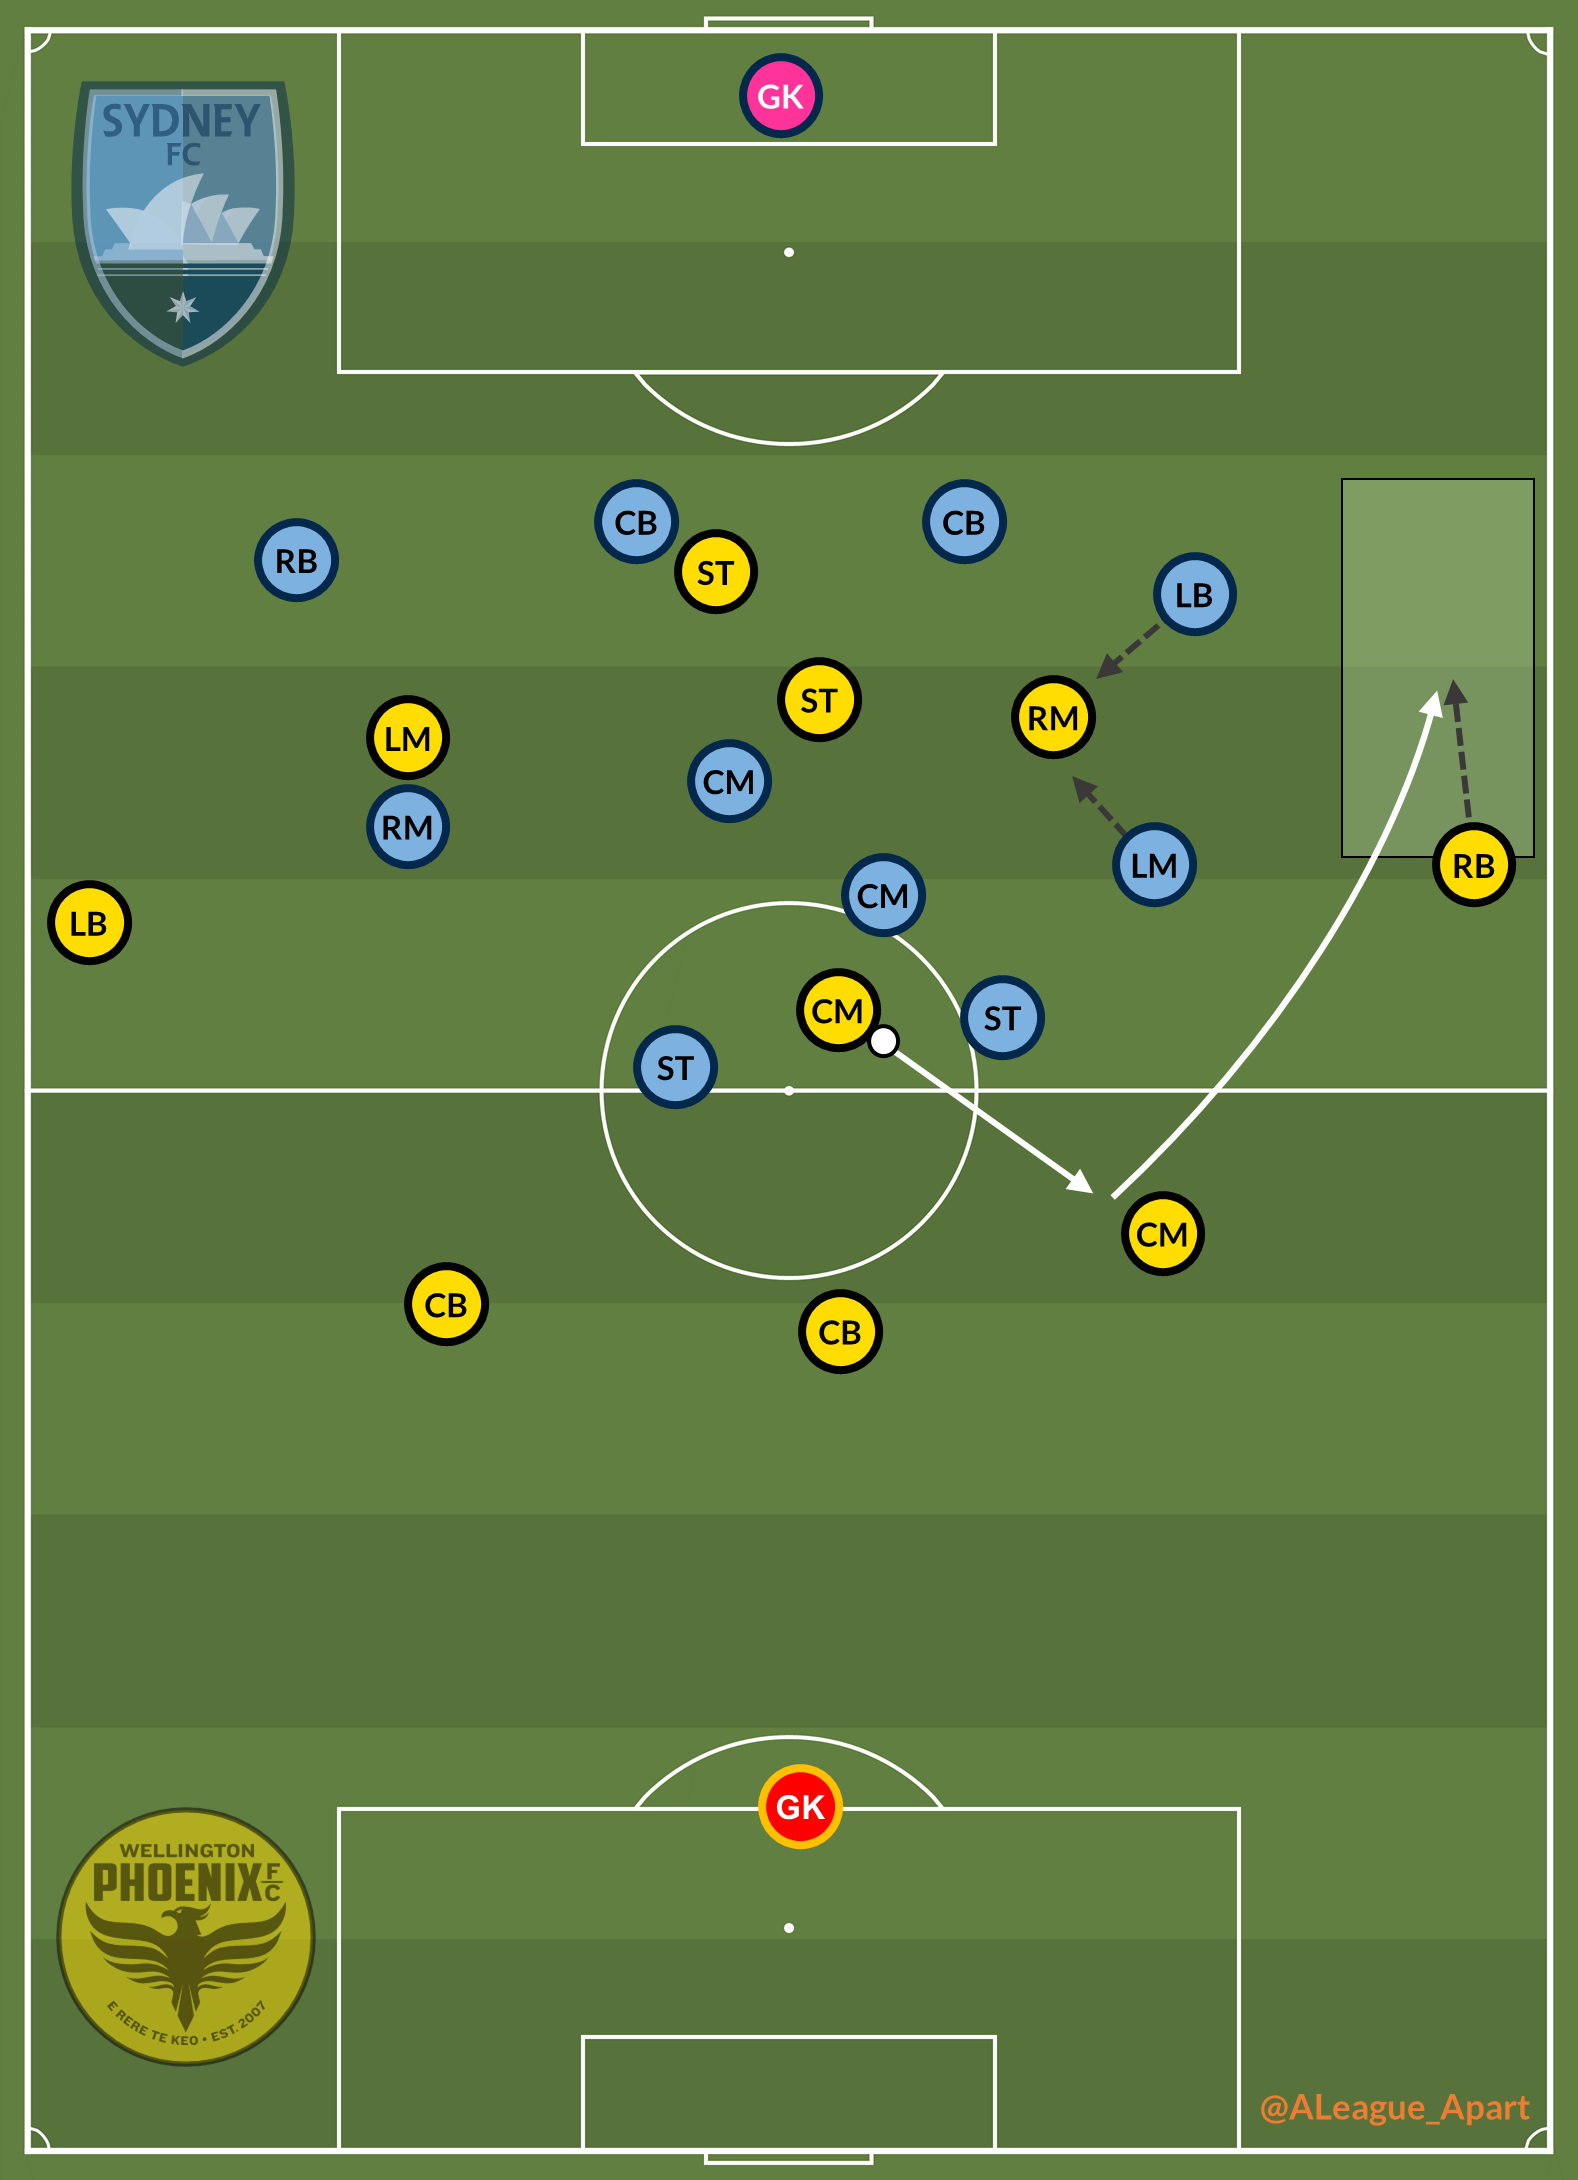
The system then becomes more complex with the addition of Lewis floating in and doing something similar from the left, Ball also joining in by dropping from up front, with Hemed staying forward. All of a sudden you have players from the defensively solid 4-4-2 shape having to make decisions all around the pitch.
Fullback overlaps
With the attacking players trying to find space centrally, the responsibility to provide width then falls to the full-backs.
This happened across all the full-backs, with Ninkovic and Baumjohann opening plenty of space for King and Grant respectively, while Dávila and Lewis opened up space for Payne and McGarry. The teams used this space on the flanks differently - Wellington used it to engineer more crossing opportunities using the full-backs, while Sydney’s full-backs stayed high and wide to open up more space for the attacking midfielders to drop into.
Transitions
With both sides’ defending very organised, space was hard to come by, with the best opportunities coming through direct transitions. Both sides attacked in numbers with full-backs generally pushing up quite high, so there were opportunities to catch the defence out with quick transitions before they could reorganise.
Sydney’s goals were direct and quick attacks - first a counterattack that allowed Baumjohann plenty of space outside the box to pick a pass, and the second a slightly fortuitous but surprisingly easy chance directly from a goal kick.
Wellington’s changes
Wellington’s changes - Rene Piscopo on for Hemed and Mirza Muratovic on for Lewis didn’t tweak the tactical setup much, with both players operating in the areas between the opposition’s midfield and defence. What they did enable was a more fluid setup up front, with Ball, Dávila and Piscopo rotating and shifting positions at will.
As the game went on, Wellington found it difficult to find space centrally outside the box, with Sydney happy to sit more compact and less proactive in defence. While Sydney are generally more conservative with their shooting and chance creation, Wellington attack in volume, with high numbers of shots from a high volume of balls into the box.
Sydney’s two goals allowed them to sit back deeper in defence as the game progressed, buttoning down the hatches for wave after wave of Wellington attack - to such an extent that from Barbarouses’ goal to the final whistle, they only managed four possessions with 10 or more actions. This was made more challenging with substitute Chris Zuvela’s gut-wrenching ACL injury, which left Sydney short a man for the final 15 minutes.
Dávila’s goal showed a typical passage of Wellington’s attacking play in the second half - progression down the flanks into an advanced position on the flank and a crowded Sydney penalty area. Dávila, with his ability to create out of nothing, received on the edge of the box, beating Paulo Retre and taking a shot which deflected out of Andrew Redmayne’s reach. Perhaps with 11 men on the pitch, the other striker would be in a position to reduce Dávila’s space.
Reflections
The first half was fairly evenly matched, with both sides construction dangerous possessions and having opportunities on the break. While the stats show a heavy skew towards Wellington with (xG: Wellington 2.4 - 0.73 Sydney, shots/on target: Wellington 21/4 - 7/2 Sydney), part of the reason is the sheer volume of shots that they took - averaging it out gives an xG per shot of 0.114 for Wellington against 0.104 for Sydney, suggesting Wellington’s shots were, on average, lower quality and more speculative.
Tomer Hemed’s goalless start to the A-League continues. At times it feels like he doesn’t particularly fit Wellington’s rapid, transitional play, while his penalty box presence hasn’t been as clinical in terms of finishing or physically dominating as a target man. (Note: Besart Berisha seems to be having a similar start to the season). Much of Wellington’s positive play has come instead from Dávila, who continues to just generate chances out of nowhere.
For Sydney fans, this was a typical Sydney performance - solid out of possession, organised in possession, and crucially, efficient up front. Barbarouses has finally scored from open play for the first time in over a year, with almost 29 hours (!) of game time separating his previous open play goal (Jan 24 2020 v Melbourne Victory). Sydney will be hoping that he can pick up this vein of form to be the replacement for Adam Le Fondre’s goals.
Barring any fixture reshuffles, Sydney and Wellington have played each other for the last time this season, meaning that there won’t be another opportunity to see another master vs apprentice battle between Steve Corica and Ufuk Talay. While they’ve got similar setups, they find themselves on opposite ends of the form guide. However one thing is for sure - there’s room for improvement for both sides.