Melbourne Victory 1 - 4 Sydney FC
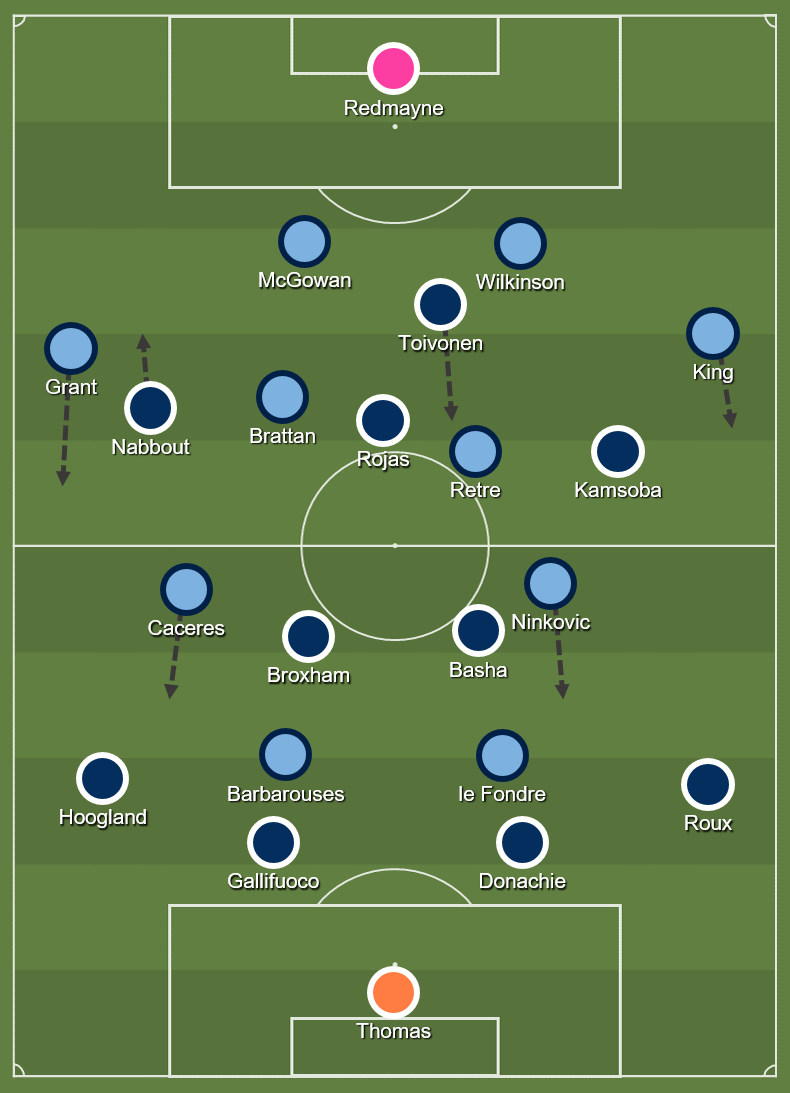
Sydney in Possession
Sydney’s 4-2-2-2 is fluid, with all players able to contribute to multiple areas of play. The attacking midfielders start out in the half space (not fully wide, not fully central) to link play, and have the option of going wide or making runs to attack the box. The full backs overlap to provide width and crossing, while the strikers are multi-talented, able to come deep, pull wide, or sprint into the channels. Brattan and Retre are both more than capable of dictating the play and playing long balls.
Sydney played the ball out of defence, with Brattan and Retre staying deep to take the ball off the centre-backs. Toivonen and Rojas were instructed to close them down, so Brattan would drop into the space between right-sided centre-back McGowan and Grant to give himself more space. Brattan and Retre both looked to find penetrating long passes once they received the ball in space. The Sydney forwards offered a dual threat, able to come short to link play and also sprint in behind the defence. le Fondre gives a great example of this, pulling Gallifuoco out by coming short, and running into the space he created (25 min).
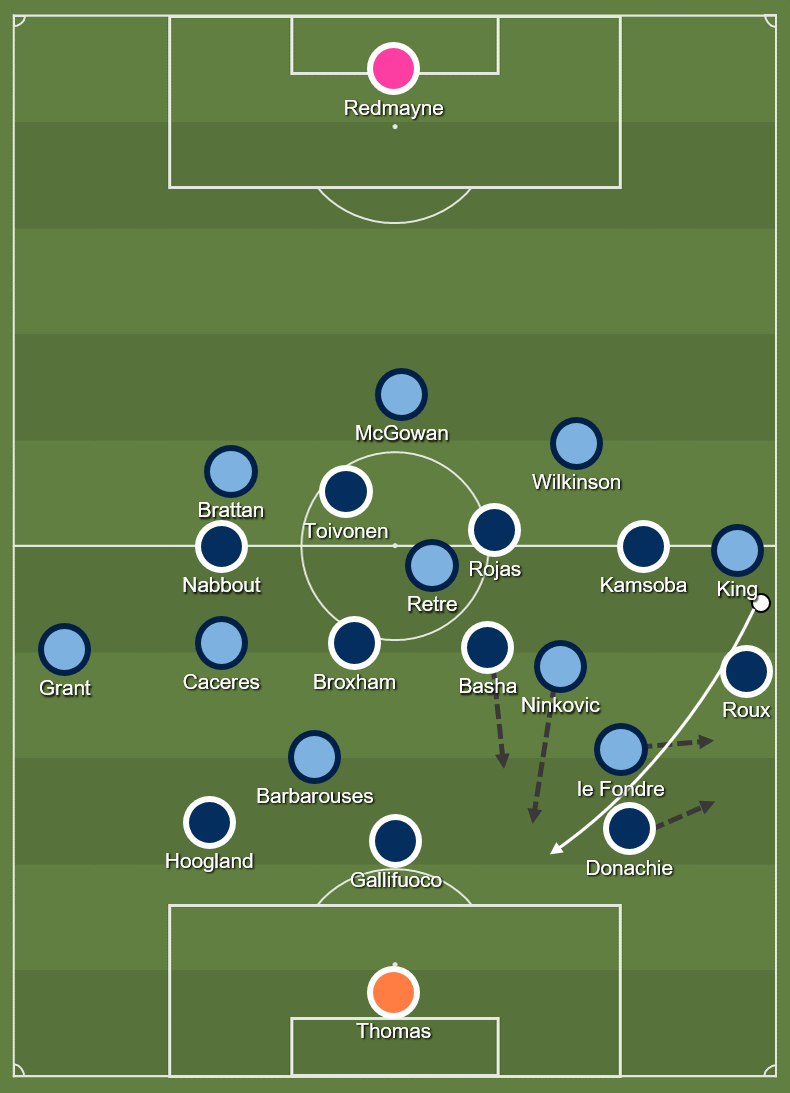
Pattern 1: Parting the Centre-backs
A rehearsed pattern saw Sydney’s strikers made dummy runs towards the touchline, dragging the centre back with them. This opened up the space between the two centrebacks for the attacking midfielder to burst into space from deep, outpacing either Broxham or Basha. The Victory full-backs also had a decision to make - do they stay wide to deal with the striker, or do they drop off to cover the run from the attacking midfield?
5 min - shown in the diagram above, ball slightly overhit
15 min - Ninkovic has a free run in, and Caceres is also free. At the end, the MV players are asking where the tracking was.
31 min - success! Able to engineer a cross and shot
45 min - a cheeky (uncalled) tactical foul from Basha to stop the move
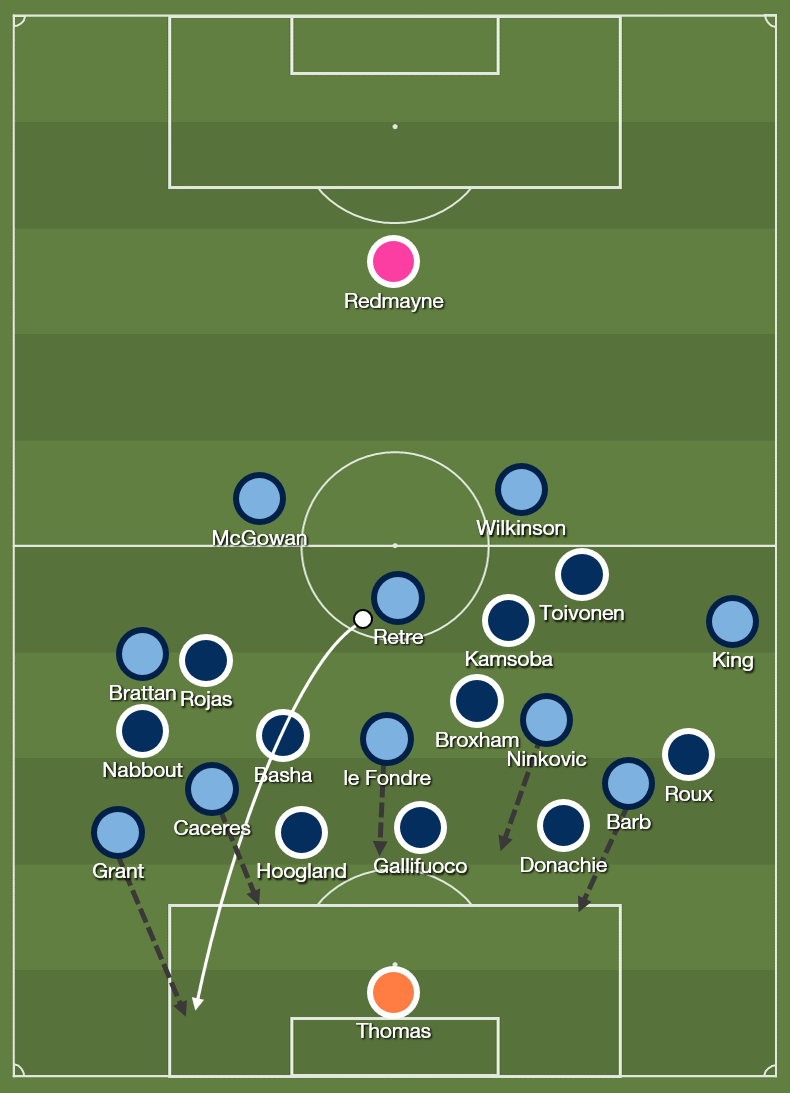
Pattern 2: Right-back Overlap
The full-backs also looked to push up on the overlap, with Grant in particular pushing up on the right hand side, looking to take advantage of Nabbout not tracking back. This was further amplified by Caceres drifting inside, which left Hoogland without a direct opponent. He had to make the decision of whether to follow Caceres inside, hold position to deal with the striker who would pop up on his flank, and he ended up being late to track Grant’s bursting overlapping runs on his blind side
10 min - notice Broxham just let Ninkovic go, Basha and Nabbout not tracking either Grant or Caceres, leaving a 5v3 situation
44 min - notice Caceres running in completely untracked
The target of both these types of plays was to get the ball in the wide positions near the corner flag to play crosses in. When they managed to get the ball in those positions, they always had targets to aim at, with the two strikers and the opposite-side attacking midfielder in the box, who were frequently untracked (1-1 goal).
Victory in Possession
Victory found it difficult to play in possession. Sydney defended with two banks of four across the midfield, dropping deep and closing up in midfield. It was hard for Victory to get the ball into dangerous positions centrally, and as a result, Rojas and Toivonen (who both like to receive the ball into feet) struggled to get any good possession facing the Sydney goal.
Instead, Toivonen dropped deep (2 min) (absurdly so at times) to get on the ball, only to find that he didn’t pull anyone out of position. It didn’t really matter to Sydney that he had the ball, as he had no targets to hit, with Rojas leading the line (!?), and Sydney sitting too deep for penetrative runs from either Nabbout or Kamsoba. To get the ball, all three had to come short for the ball, and had to get rid of it quickly if they managed to receive. In the event that Victory managed to work the ball up the pitch, Toivonen being deep meant the centrebacks were free to cut out any passes (7 min).
Victory were much more dangerous when the two wide players had room to drive into, although Nabbout and Kamsoba were both frustratingly inconsistent with their deliveries. When they came good, either they found Toivonen, who couldn’t manage to get good contact at all, or delivered to areas where someone probably should have been attacking.
Rojas is the best player they have in tight spaces, and he showed the danger he can have if he can get the ball facing goal with his fine goal, which came out of nothing. Unfortunately Victory couldn’t engineer more of those situations for Rojas in his preferred ‘10’ space.
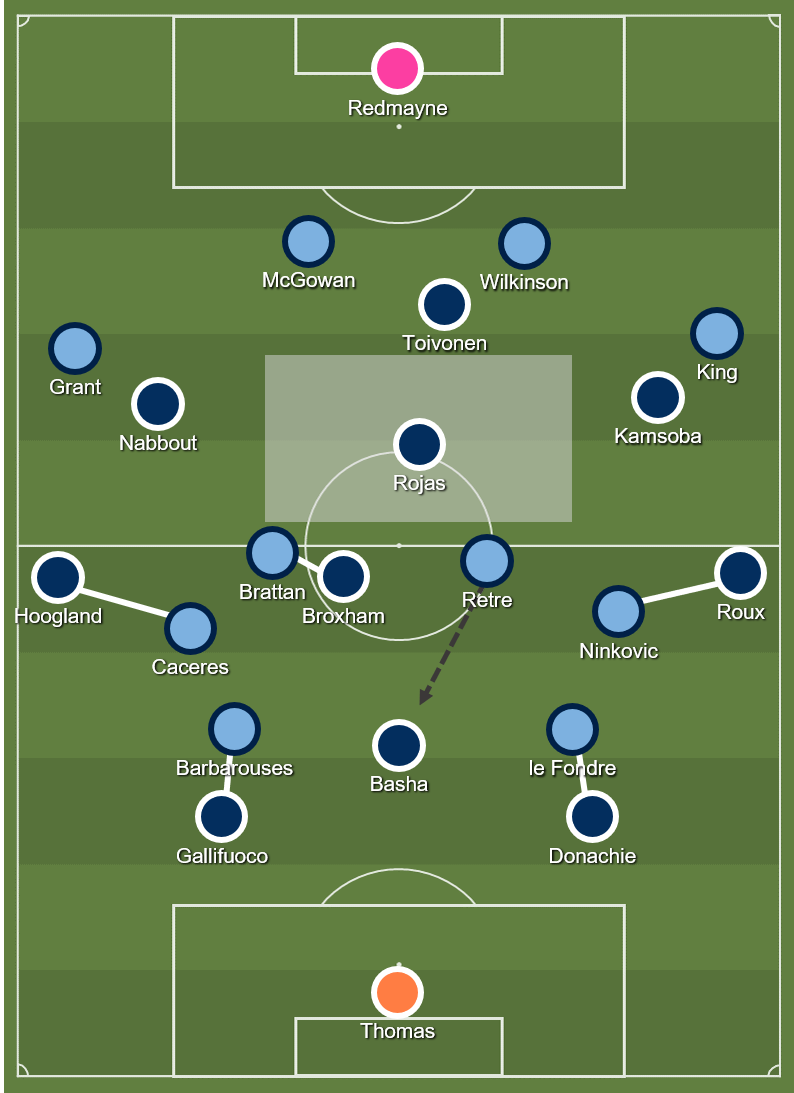
An interesting possibility to play out came from Victory goal kicks, and centre-back possession.
Basha would come deep to create three at the back and requiring one midfielder to come pick him up. If it was the attacking midfielder, the ball into the full-back was available, and if it was the defensive midfielder, the centre of the pitch was fairly open. Once they got the ball in these zones, Victory could immediately turn and drive into space - their preferred manner of attacking (38 min). Disappointingly, they hardly used this method to bring the ball up the field, and Sydney closed this opportunity in the second half.
Second Half
The second half saw a few improvements from Victory. They pressed harder, in an attempt to make life more difficult for Sydney to play out from the back. Broxham pressed higher and added some much needed energy to make up for the less mobile Toivonen.
Nabbout was given a more free role, and he used it to come deep to link play as well as drift inside carrying the ball. This was a positive change, that made his play less one-dimensional and more difficult for Sydney to pick up.
Sydney almost caught Victory out on the right (54 min), partly due to Nabbout's role, with Grant afforded plenty of time and space to find a great delivery to Ninkovic, whose run from deep was untracked by both Donachie, who had shifted over to right back to cover him, and Basha, whose zone Ninkovic ran in from.
But this early second half period was good for Victory, as Basha dropped between the centre-backs to allow for easier ball retention, Rojas able to come deeper to pick up the ball, and Toivonen looking lively in the ‘hole’. Kamsoba finally managed to get free to put in some tasty crosses that Toivonen wasn’t able to finish.
Then came the triple whammy:
The 2-1 goal from the corner came from the box near the centre, the kind of area where you might expect Rojas to be sitting, if he wasn’t getting treatment on the sidelines.
The 3-1 goal was an extremely frustrating goal to concede for Victory, with Broxham bafflingly deciding not to make the tactical foul to stop Grant, and with Gallifuoco stabbing in what probably should have been a goal-line clearance.
Rojas had been hobbling around the pitch a bit even following the treatment on the sidelines, and it wasn’t really a surprise to see him come off the pitch, with Athiu the replacement. It was unfortunate that his injury forced him off.
Athiu ran hard in the press, but without commitment from the rest of the Victory press, it was ultimately fruitless, as Sydney managed to play around the press. We got to see Toivonen come deep to play as a deep-lying playmaker (!) to make up for Rojas’ missing creativity, but the game petered out.