Elimination Final: Wellington Phoenix 0-1 Perth Glory
The first A-League elimination final was a battle of two teams out of form: Ufuk Talay’s Wellington Phoenix with 5 points in their last 6 games against Tony Popovic’s Perth Glory with 6 points in their last 6 games. But as both managers mentioned in the pre-match buildup, knockout football is a completely different beast, and they were confident in their teams’ abilities to win.

With Ufuk Talay setting Wellington Phoenix up in their standard 4-2-2-2 formation, the key selection decision was which four players would start up front and out wide. He went with an attacking selection: David Ball and Jaushua Sotirio leading the line, with Rene Piscopo and Ulises Davila on the flanks. Callum McCowatt had impressed since the restart, but dropped to the bench. Aside from Te Atawhai Hudson-Wihongi who replaced the injured Luke DeVere, the rest of the squad was as expected - Cameron Devlin and Matti Steinmann in midfield, Liberato Cacace and Callum Eliott at fullback, with Steven Taylor and Stefan Marinovic rounding out the team.
Tony Popovic set Perth Glory up in their (now) standard 5-3-2 formation, but had a few selection surprises. Bruno Fornaroli was partnered by Joel Chianese, who returned to the front line after having played at wingback. Kristian Popovic and Jake Brimmer both made the cut in central midfield, with Neil Kilkenny playing as the defensive midfielder. Juande shifted into the central centreback slot, with Tomi Mrcela and Tarek Elrich either side of him. The wingbacks were Ivan Franjic and Dane Ingham, with Liam Reddy playing in his 17th finals game.
Perth defending deep
My previous article previewing Perth looked a lot at how they press and previously they would have pushed the wingbacks up on to the opposition fullbacks, which would mean that they had to cover a large distance to reach them and also that there would be easy opportunities to overload Perth on the flanks. With their high press, Perth also tended to leave a lot of space in between the defence and midfield, which Piscopo and Davila would have loved to exploit.
Perth instead surprised by not pressing high at all. While at times Fornaroli and Chianese would press the centrebacks, there wasn’t a coordinated attempt to have the midfielders follow up. The wingbacks didn’t push forwards in defence and kept the structure by sitting on the outside of the centrebacks or watching the wide midfielders when they pushed up high.
Ufuk Talay’s selection of both Sotirio and Ball rather than McCowatt looked like he was expecting to play on the break. They were the pacier options, and sat on the outside of the centrebacks and constantly threatened to run in behind the defence or onto balls into the channels behind the wingbacks. This didn’t turn out to be too much of an option with the wingbacks not venturing forwards and with the Perth line sitting fairly deep. It also looked like they wanted to pin the wingbacks back in order to free up space for Davila and Piscopo to pop up in between the lines, but the Perth midfield prevented this too.
Shuttling midfield stifles the wide overloads
Popovic also surprised here by naming Juande in defence, with Neil Kilkenny playing in the central defensive midfielder slot. On either side of him were Popovic and Brimmer, the more energetic and mobile midfielders, whose role was to shuttle out to the flanks in defence. As previously mentioned, Perth had struggled with being overloaded out wide especially against 4-at-the-back systems, and their inclusion looked like an attempt to stifle the options out wide - they’d track the wide midfielders when they came inside, but also provide assistance with Wellington’s continually onrushing fullbacks Cacace and Elliot. Their defensive output, combined with the wingbacks sitting deep meant that it would generally always be an even match up of 2v2 or 3v3 on the flanks.
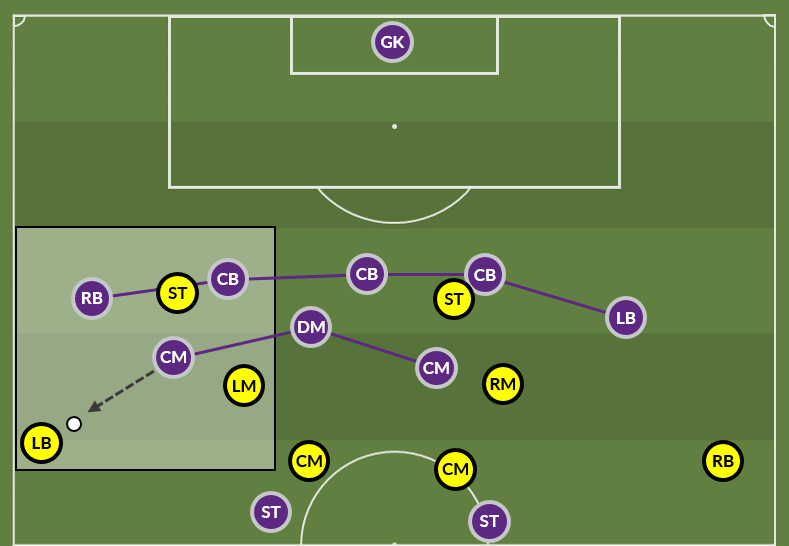
With Perth matching them well on the flank, it was a bit of a surprise to see how slow Wellington were at shifting the ball to the other side. If they could move the ball over quickly (at least quicker than Perth’s defence could shift over), it would open up an opportunity on the far side for Cacace or Elliott to take on Franjic or Ingham 1v1. The option was there, with Cameron Devlin and Matti Steinmann not always being closed down by the forwards Chianese and Fornaroli. It took until the 18th minute for them to do this, with Matti Steinmann (who had a decent game) finding Cacace with a quick switch over the top, with Cacace just unable to take it down.
The trio in midfield also made it difficult when Wellington were attempting to attack centrally, as they’d track the midfielders Davila and Piscopo if they came inside, and crowded them and the strikers out with the help of the three centrebacks just behind them.
Perth’s early goal from Chianese’s return to the front
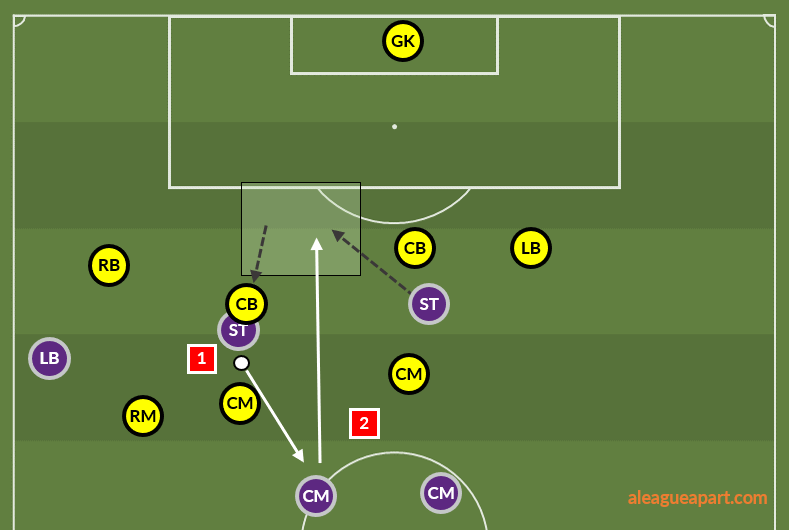
Chianese had not played much since the restart with most of his minutes at right wingback, so to see him partnering Fornaroli up front was another surprise. Chianese’s main strength in the forward line is his pacey penetrating runs, and he provided a perfect counterbalance for when Diego Castro was still in the side. When Diego Castro and Fornaroli dropped in between the lines to receive, Chianese would look to run in behind.
The same kind of movement resulted in Perth’s goal, with Fornaroli being the player to draw the defender out.
Wellington dominate possession
This was perfect for Perth. The early goal meant that they could comfortably sit back and defend without having to worry too much about getting a goal going forward and meant that Wellington were able to dominate possession. Most of the possession was still focused on the flanks, with the penetration coming from combinations between fullbacks and the wide midfielders. The end results of this possession was crossing and Sotirio and Ball managed to get on a few crosses, albeit without significant impact. Frustratingly, the fullbacks were conservative with their positioning when the ball was on the opposite flank and wouldn’t push forwards to get into the box to provide the overlap, and when they did, Devlin would surprisingly not attempt the long diagonal switch that we’ve grown accustomed to seeing from him. Thankfully Steinmann helped out in this regard.
Second Half
The first 15 minutes of the second half saw Perth increase their pressing intensity which made it difficult for Wellington to settle into the second half. The game opened up a bit here, with Perth attacking more, and Wellington able to attack on the counter.
On the rare occasions that they managed to get forwards, Perth’s midfielders were once again key to how they wanted to play. The nature of Wellington’s back four means that as the Perth wingback pushed up, the fullback had to go wide in order to track them, while the two strikers would pin the centrebacks in the middle. This opened up a channel in between the fullback and centreback that the shuttling midfielders would try to exploit.
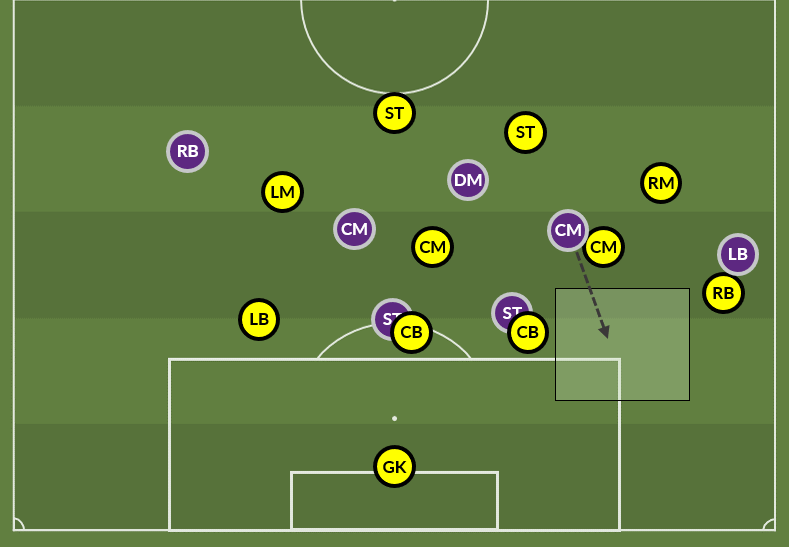
After the hour mark, Perth began to drop off again, and Wellington continued with their same attacking style focused on the wide areas and crossing. The most dangerous pieces of play were from more direct pieces of play, such as when Cacace cut inside dribbling the ball and drew players towards him, or on counterattacks where they played direct balls in behind.
It certainly looked like Wellington needed to make a few substitutions to shake things up, but Ufuk Talay waited until the 74th minute, replacing the yellow-carded Devlin for McCowatt. It wasn’t a straight substitution, as McCowatt played further forward than Devlin as more of an attacking midfielder, and his extra sprints in behind helped to stretch the Perth back line. Sotirio and Ball stayed on, and it seemed that Talay wanted to keep them on for their penalty area presence.
The best chance of the game for Wellington came in the 75th minute and combined all of the previously mentioned Wellington points:
Cacace playing direct - dribbling the ball forward and beating his man K. Popovic
Ball making a run into the channel after Franjic steps forward to pressure
The Perth midfield shifting over to cover for Popovic, allowing Piscopo to pick up the ball following a scuffed pass from Davila
Completing the switch from left to right to Elliot arriving on the overlap to attack Ingham 1v1
A pullback to Sotirio, who unfortunately fires wide after the ball bounces onto his ankle
Surprisingly, Talay only made one more substitution, which wasn’t a particularly game-changing one, with Alex Rufer coming on, seemingly to refresh the midfield. Tony Popovic added more energy into the midfield with Osama Malik on for Popovic and Vince Lia on for Brimmer, who was suffering from cramp.
Wellington managed to create a few more scoring chances, but ultimately the flank and crossing play wasn’t able to result in a goal with Perth packing the box and making it difficult for Wellington until the final whistle.
Summary
Wellington dominated possession during the game, but they weren’t able to convert this dominance into quality shots on goal. While Reddy had an excellent game, saving the 10 shots that they got on target, they took 25 shots, with 13 coming from outside the box, with the quality of shots being low with an average xG per shot of 0.07 (ie. shots with a 7% chance of scoring). Ufuk Talay’s side desperately missed Gary Hooper’s penalty area presence and striking ability, which would also have allowed them make more impactful subs with probably Sotirio starting on the bench instead.
Popovic got his tactics and selections right, setting up a gameplan that worked out perfectly with them scoring early and allowing them to focus on their defensive plans. It shows that Perth have an element of versatility to their play and can press high or defend deep at an instant. This game also acts as a perfect dress rehearsal for the game against Sydney, who notably play a very similar style of play to Wellington. If they do keep the same gameplan, it remains to be seen if they can continue to defend deep without conceding goals, and also whether they can chase the game well with this setup. Steve Corica and Sydney will have been taking notes - it seems like this Perth side will offer ample opportunities to shoot and score.