Scouting Report: Sydney FC
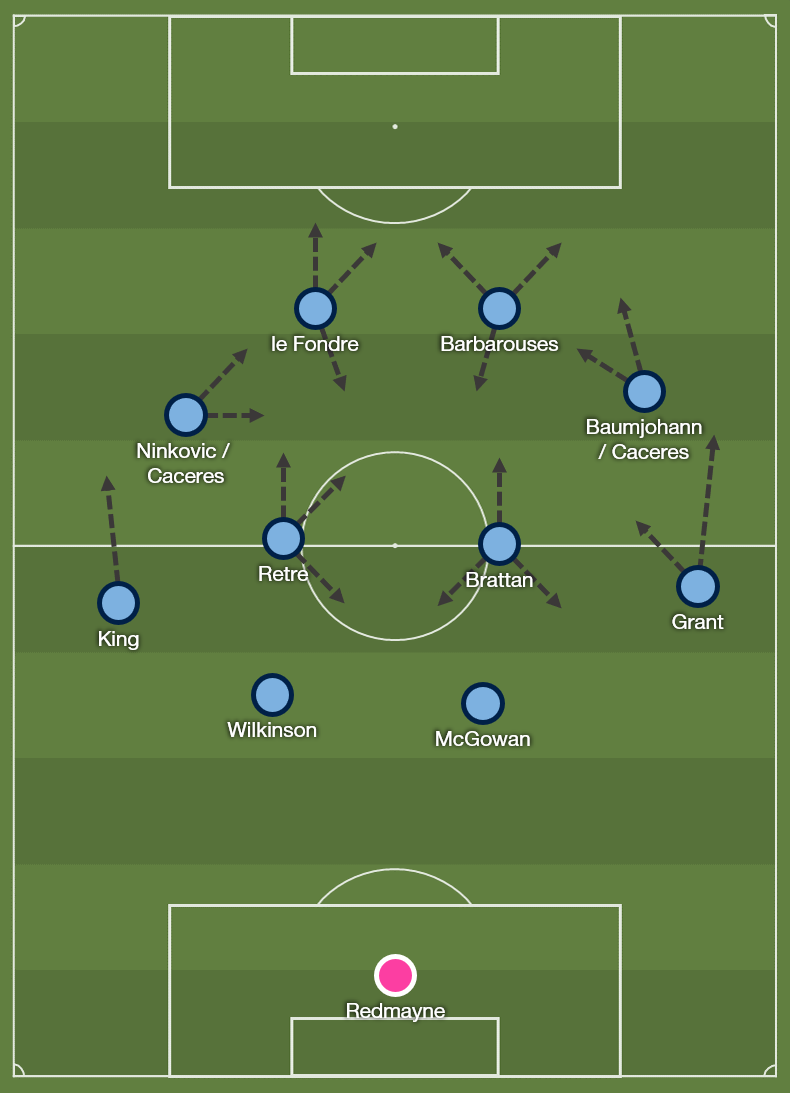
Sydney FC find themselves top of the A-League, 8 points clear of Melbourne City, but with three games in hand. They have a consistent and entertaining style of play; an attack minded 4-2-2-2 (wide attacking midfielders) which combines possession play, passing and has a focus on efficiency and intelligence in attack, while their defensive structure is patient and passive until the ball reaches the final third of the pitch.
Lineup
Sydney have a preferred lineup that has very consistently played:
GK: Andrew Redmayne
RB: Rhyan Grant
RCB: Ryan McGowan
LCB: Alex Wilkinson
LB: Joel King
RCM: Luke Brattan
LCM: Paulo Retre
RAM: Alexander Baumjohann / Anthony Caceres
LAM: Milos Ninkovic / Anthony Caceres
ST: Kosta Barbarouses
ST: Adam le Fondre
Principles
Patience in possession, followed by killer balls in behind
Penetration in wide areas
Dynamic pass and move combinations
Work the ball into good shooting opportunities
Narrow, compact and passive defence
Offensive Organisation
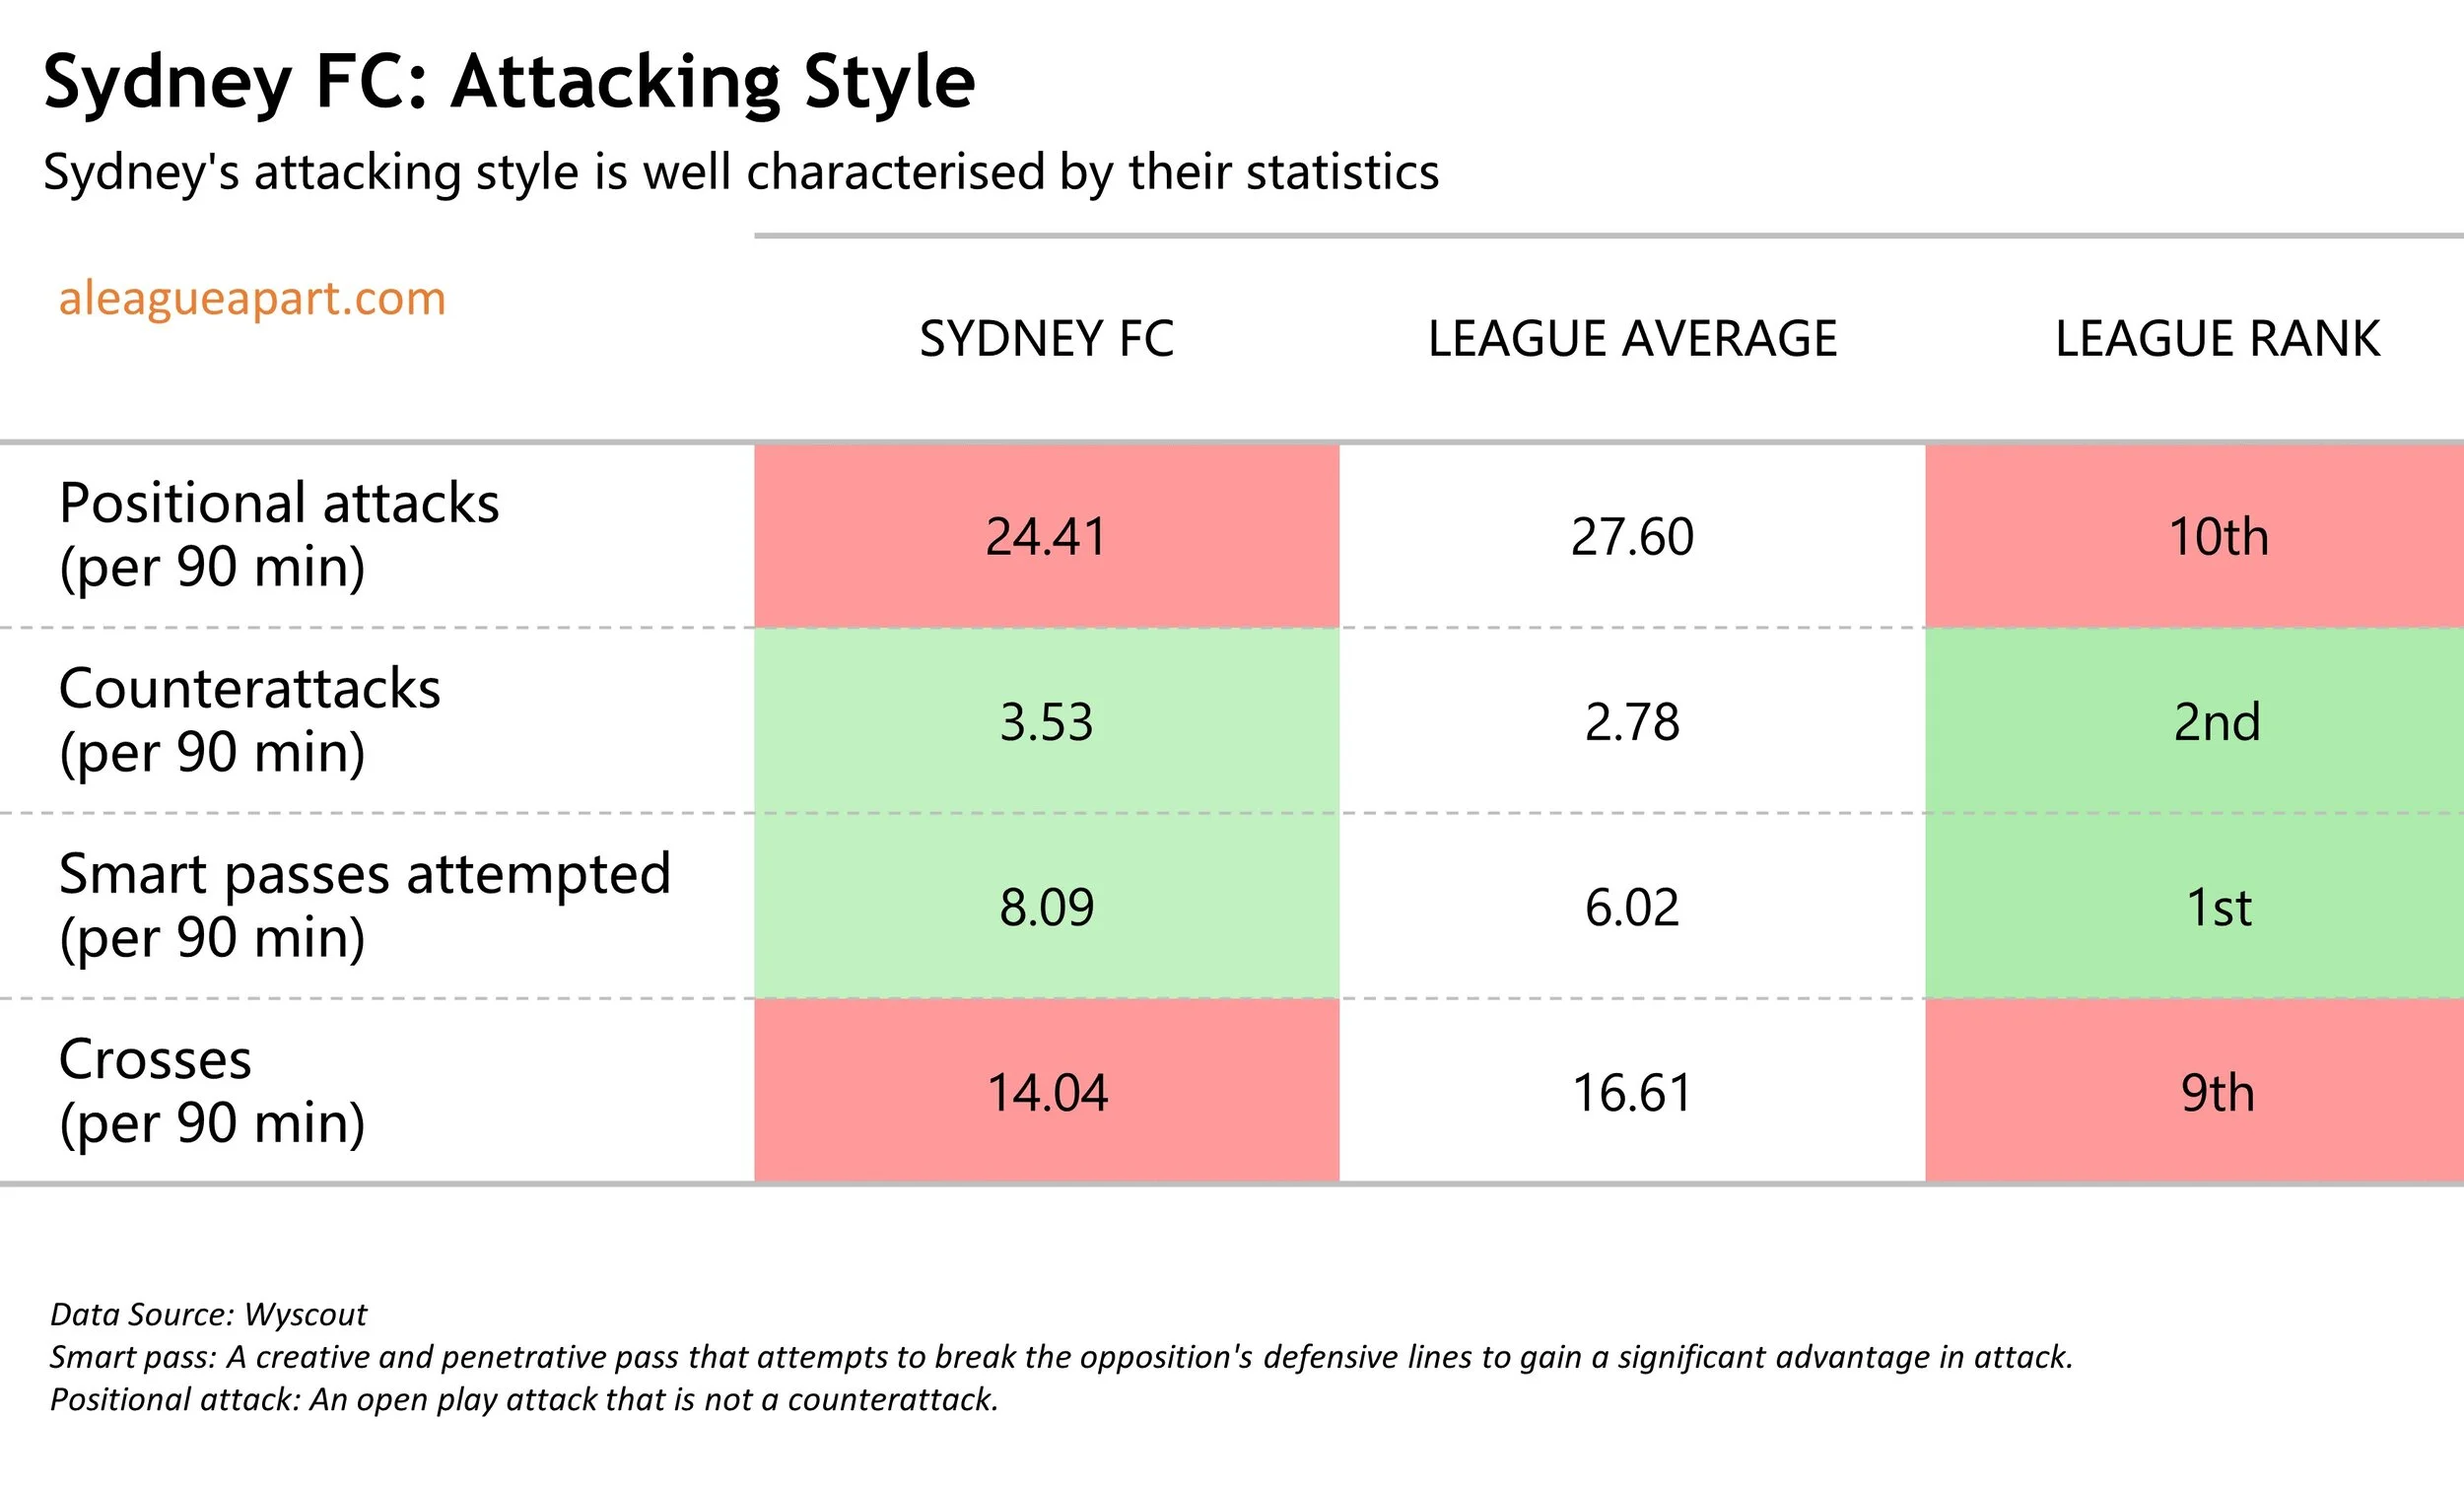
Sydney are not a relentless attacking side, and prefer to be more clever with how they attack. They are happy to keep possession, patiently passing the ball around, and then will flick a switch to rapidly increase the tempo when a penetrative pass is available. They rely less on crossing and instead prefer to make penetrative passes, while they’re also happy to defend, and use counterattacks instead. As can be seen in the table below, Sydney have nearly the fewest positional attacks in the league and nearly the most counterattacks.
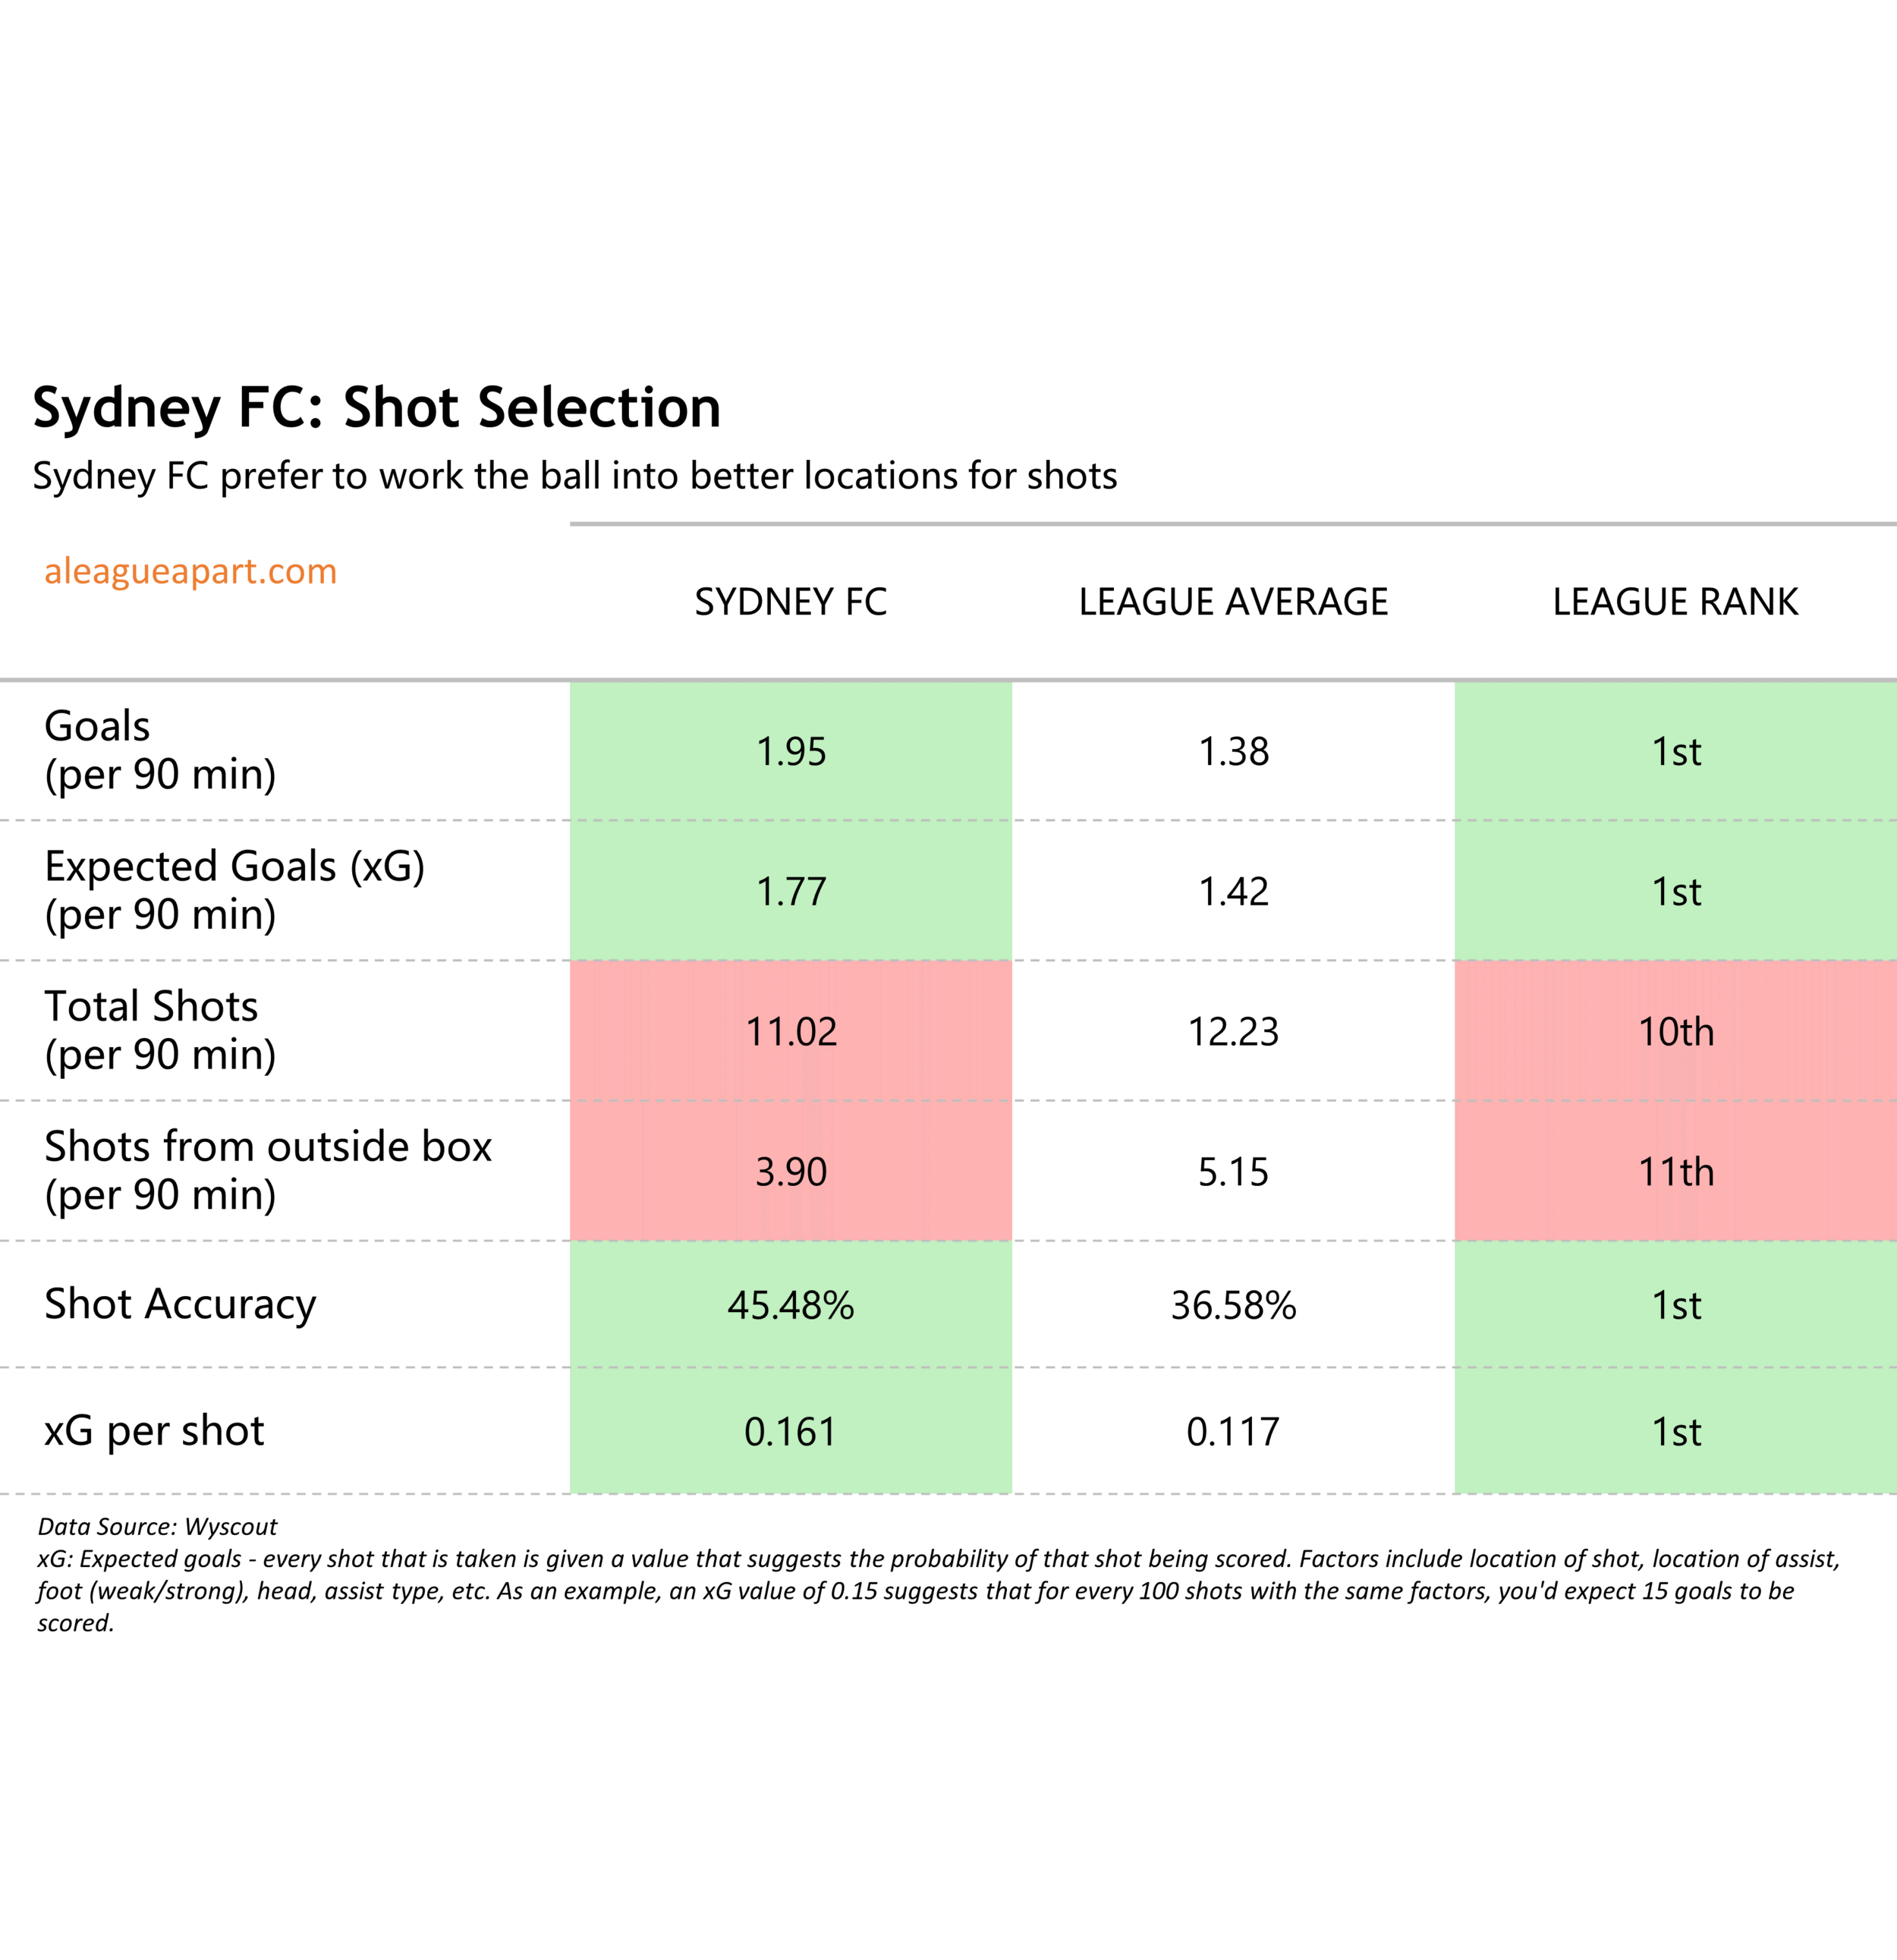
Their shooting efficiency is also relevant. They take the 2nd fewest number of shots in games, yet their expected goals over 90 minutes is the highest in the league. Sydney prefer to work the ball into positions to create better scoring opportunities, as evidenced by the fewest shots from outside the box being taken, and generally take higher quality shots, as evidenced by the high expected goal value per shot. This is interesting when looking at it in conjunction with shot accuracy, which suggests that based on the better scoring opportunities, the Sydney players are able to be more accurate with their shots.
Offensive Phases of play
Phase 1: Build-up from defence
Sydney FC can go long or short in their build-up.
Short build-up 1: Short distribution to full-backs. Invites the press, with central midfielders ready to receive the ball in the middle of the pitch to pivot.
Short build-up 2: Short distribution to centre-backs. Full-backs are higher up the pitch and one of Brattan/Retre comes short to pick up the ball.
Medium build-up: Aerial ball to full-backs. Used when the opposition is pressing high and leaves the full-backs free. Grant is a good target, as he is strong in the air and can flick the ball on to the attacking midfielders or central midfielders.
Long build-up: Hit long balls to Le Fondre. Barbarouses runs in behind for the flick-on, attacking midfielders are close by to win the knock-down, central midfielders are behind the ball for passing options.
Phase 2: Progressing the ball
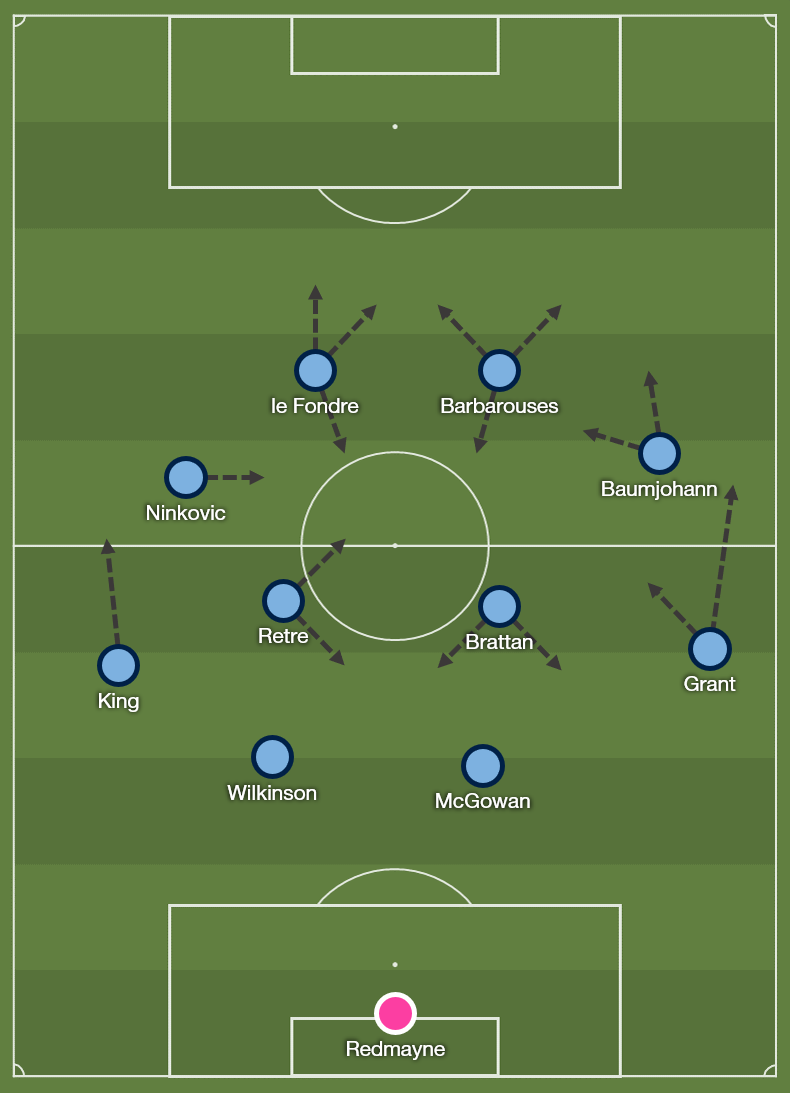
Phase 2 generally resembles a 2-4-2-2 shape, with Brattan frequently dropping short to help play the ball out. There are a few components to this, that can be broken down by position.
Up front, the strikers Le Fondre and Barbarouses stay forward to pin the back line. They are always ready to run in behind, especially Barbarouses making runs into the channel. He will generally be looking to play against the slower centreback, and will position himself on the corresponding flank accordingly.
The attacking midfielders, Ninkovic, Baumjohann and Caceres look to take up spaces between the lines. Their positions and actions vary;
Ninkovic only plays on the left, and drifts inside to act as a central playmaker
Caceres can play on either side, and plays as a central or wide (on the right) playmaker.
Baumjohann only plays on the right, and is more direct. While he drops into space centrally, he will often go further wide and forward, and will drive forwards with the ball into crossing positions
The fullbacks start to progress forwards, staying wide. Grant is more assured in possession, and will combine neatly with the attacking midfielders and central midfielders through 1-2s to progress the ball. On the other side, King is less dangerous with the ball, but can play simple passes. Under pressure, he will play the ball back to the centrebacks, which creates an opportunity to set a pressing trap.
The central midfielders are the ones who will find themselves in possession most in this phase - they keep their position centrally to help circulate the ball. Brattan will frequently drop deeper on the right-hand side (especially when Grant pushes forward) to help circulate the ball if passing lanes are cut, and is excellent under pressure. Retre generally offsets Brattan’s positioning - if Brattan drops deep Retre will act as the pivot, receiving the ball and turning to bring it forwards, while if Brattan stays further forward, Retre will drop deep to pick up the ball.
Both central midfielders have a good range of passing, and from this position, are able to play line-breaking passes into the attacking midfielders and strikers, or balls in behind the defence.
Phase 3: Penetration and creation of chances
Sydney’s players combine very well together on the ball and off the ball. In the final third, they are able to combine with one-touch football and interact with each others’ runs with complementary movement (if one player comes short, the other will move into space deep). During this phase, if they are unable to find penetration, they are happy to circulate the ball back to Phase 2.
Focus on the right
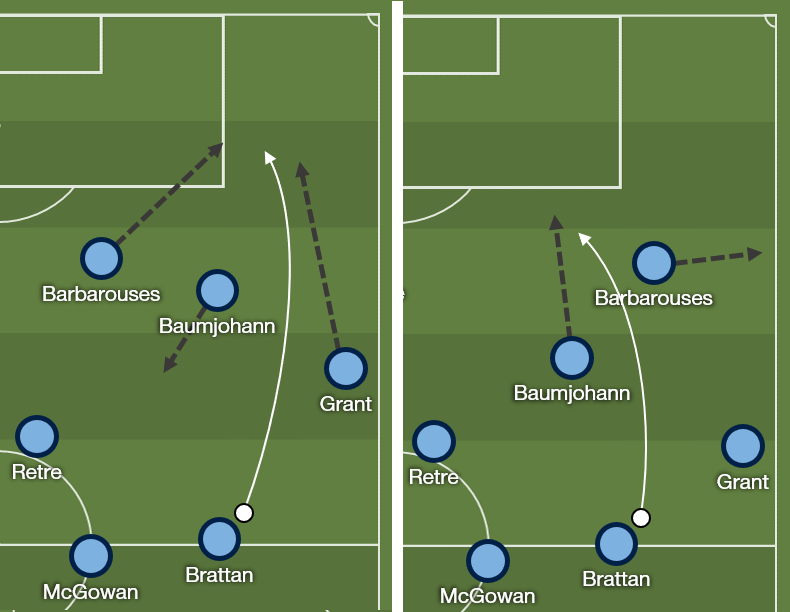
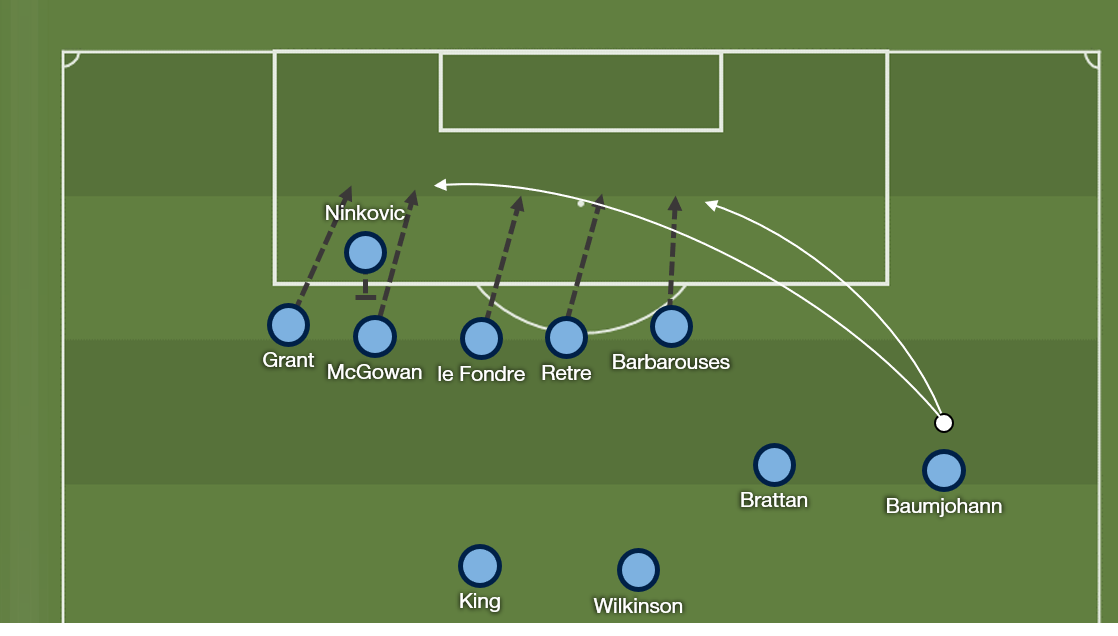
Sydney have a strong preference for attacking down the right, with many of their players’ preferred movements targeting the space wide on the right. Sydney take advantage using three patterns:
Long balls into the channel. Barbarouses’ preferred movement is to make a run from inside to outside, into the space behind the left back. This space will often be created by
Le Fondre dropping deep, pulling the centreback with him
Baumjohann/Caceres not pushing as high, drawing the left fullback/wingback forwards
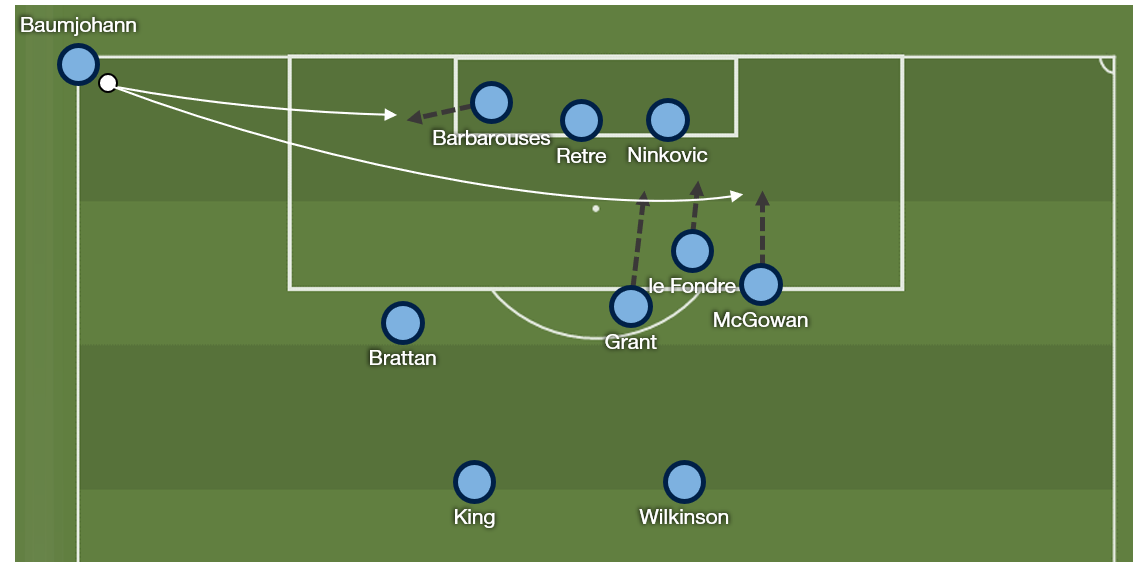
Strikers opening the channel by pulling wide. Barbarouses and Le Fondre both make dummy runs towards the touchline, drawing the centreback marking them out wide in response. The space that is vacated is attacked by a run from the attacking midfielder.
Overlaps from Grant. Grant’s athleticism means that he is able to constantly bomb forward from right back on the overlap. When Baumjohann/Caceres tuck in centrally and draw the opposition full-back, Grant can run in behind unmarked.
Sydney are always ready to pull the trigger on these movements, and you can see that whenever Brattan, Retre or Grant get the ball facing forward centrally, that the players are ready to spring into action.
Play in between the lines
Additionally, Sydney have players who are capable of, and like to play in between the lines. Le Fondre and Barbarouses can come short to link play with short lay-offs. They have good chemistry, and will often offset each others’ movement - if one goes short, the other will look to run in behind in the space vacated for quick flick-ons.
Ninkovic, drifts inside from the left to become a central playmaker, playing through passes into the strikers, while Baumjohann and Caceres like to receive the ball in these spaces, turn, and dribble at the defenders centrally or pulling out wide.
Grant also manages to find his way into these areas, especially when Baumjohann/Caceres go wide. If space is available inside, Grant is always willing to underlap into these areas. From these positions, he can cross from deep or threaten with long shots.
King, on the left, is not as proficient on the ball, but is still a willing runner. With Ninkovic always coming in narrow, the extra width on the outside is a must, and King often finds himself in space on the outside and in decent crossing/shooting positions.
Phase 4: Finishing
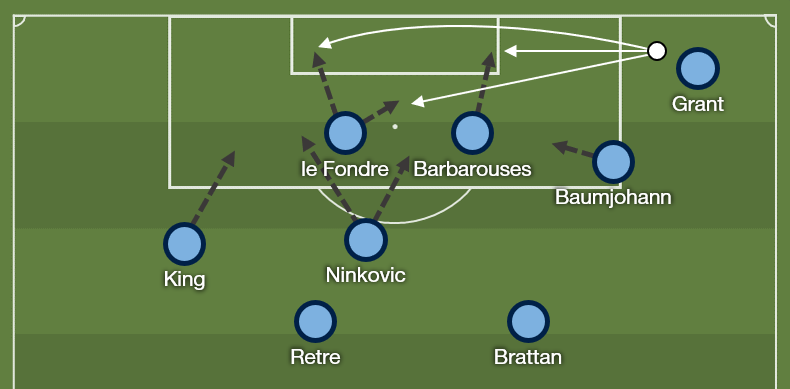
Sydney generally have at least three players attacking the ball in the box
Barbarouses will either make a run to the front post or look to pop up at the back post behind the last defender. Because of his acceleration, his movements can be tricky to pick up, especially when he darts into space at the last second to receive in front of the defender.
Le Fondre will generally hover around the penalty spot or at the far post. He is good with both feet and his head, so can be a threat no matter where the ball falls. He has good positional sense, and is able to find space in the box, and is good at following up loose balls.
Ninkovic arrives centrally in the box with good timing, while Baumjohann/Caceres will tuck in narrower to support. It’s important to pay attention to these late runs from attacking midfielders
When Grant and King find themselves forward, they will also attack the box also as the last man on the outside, while Grant can often find his way into the box centrally.
Brattan and Retre generally hover around outside the penalty box, ready for deflections, recoveries and are happy to take long shots.
Defensive Organisation
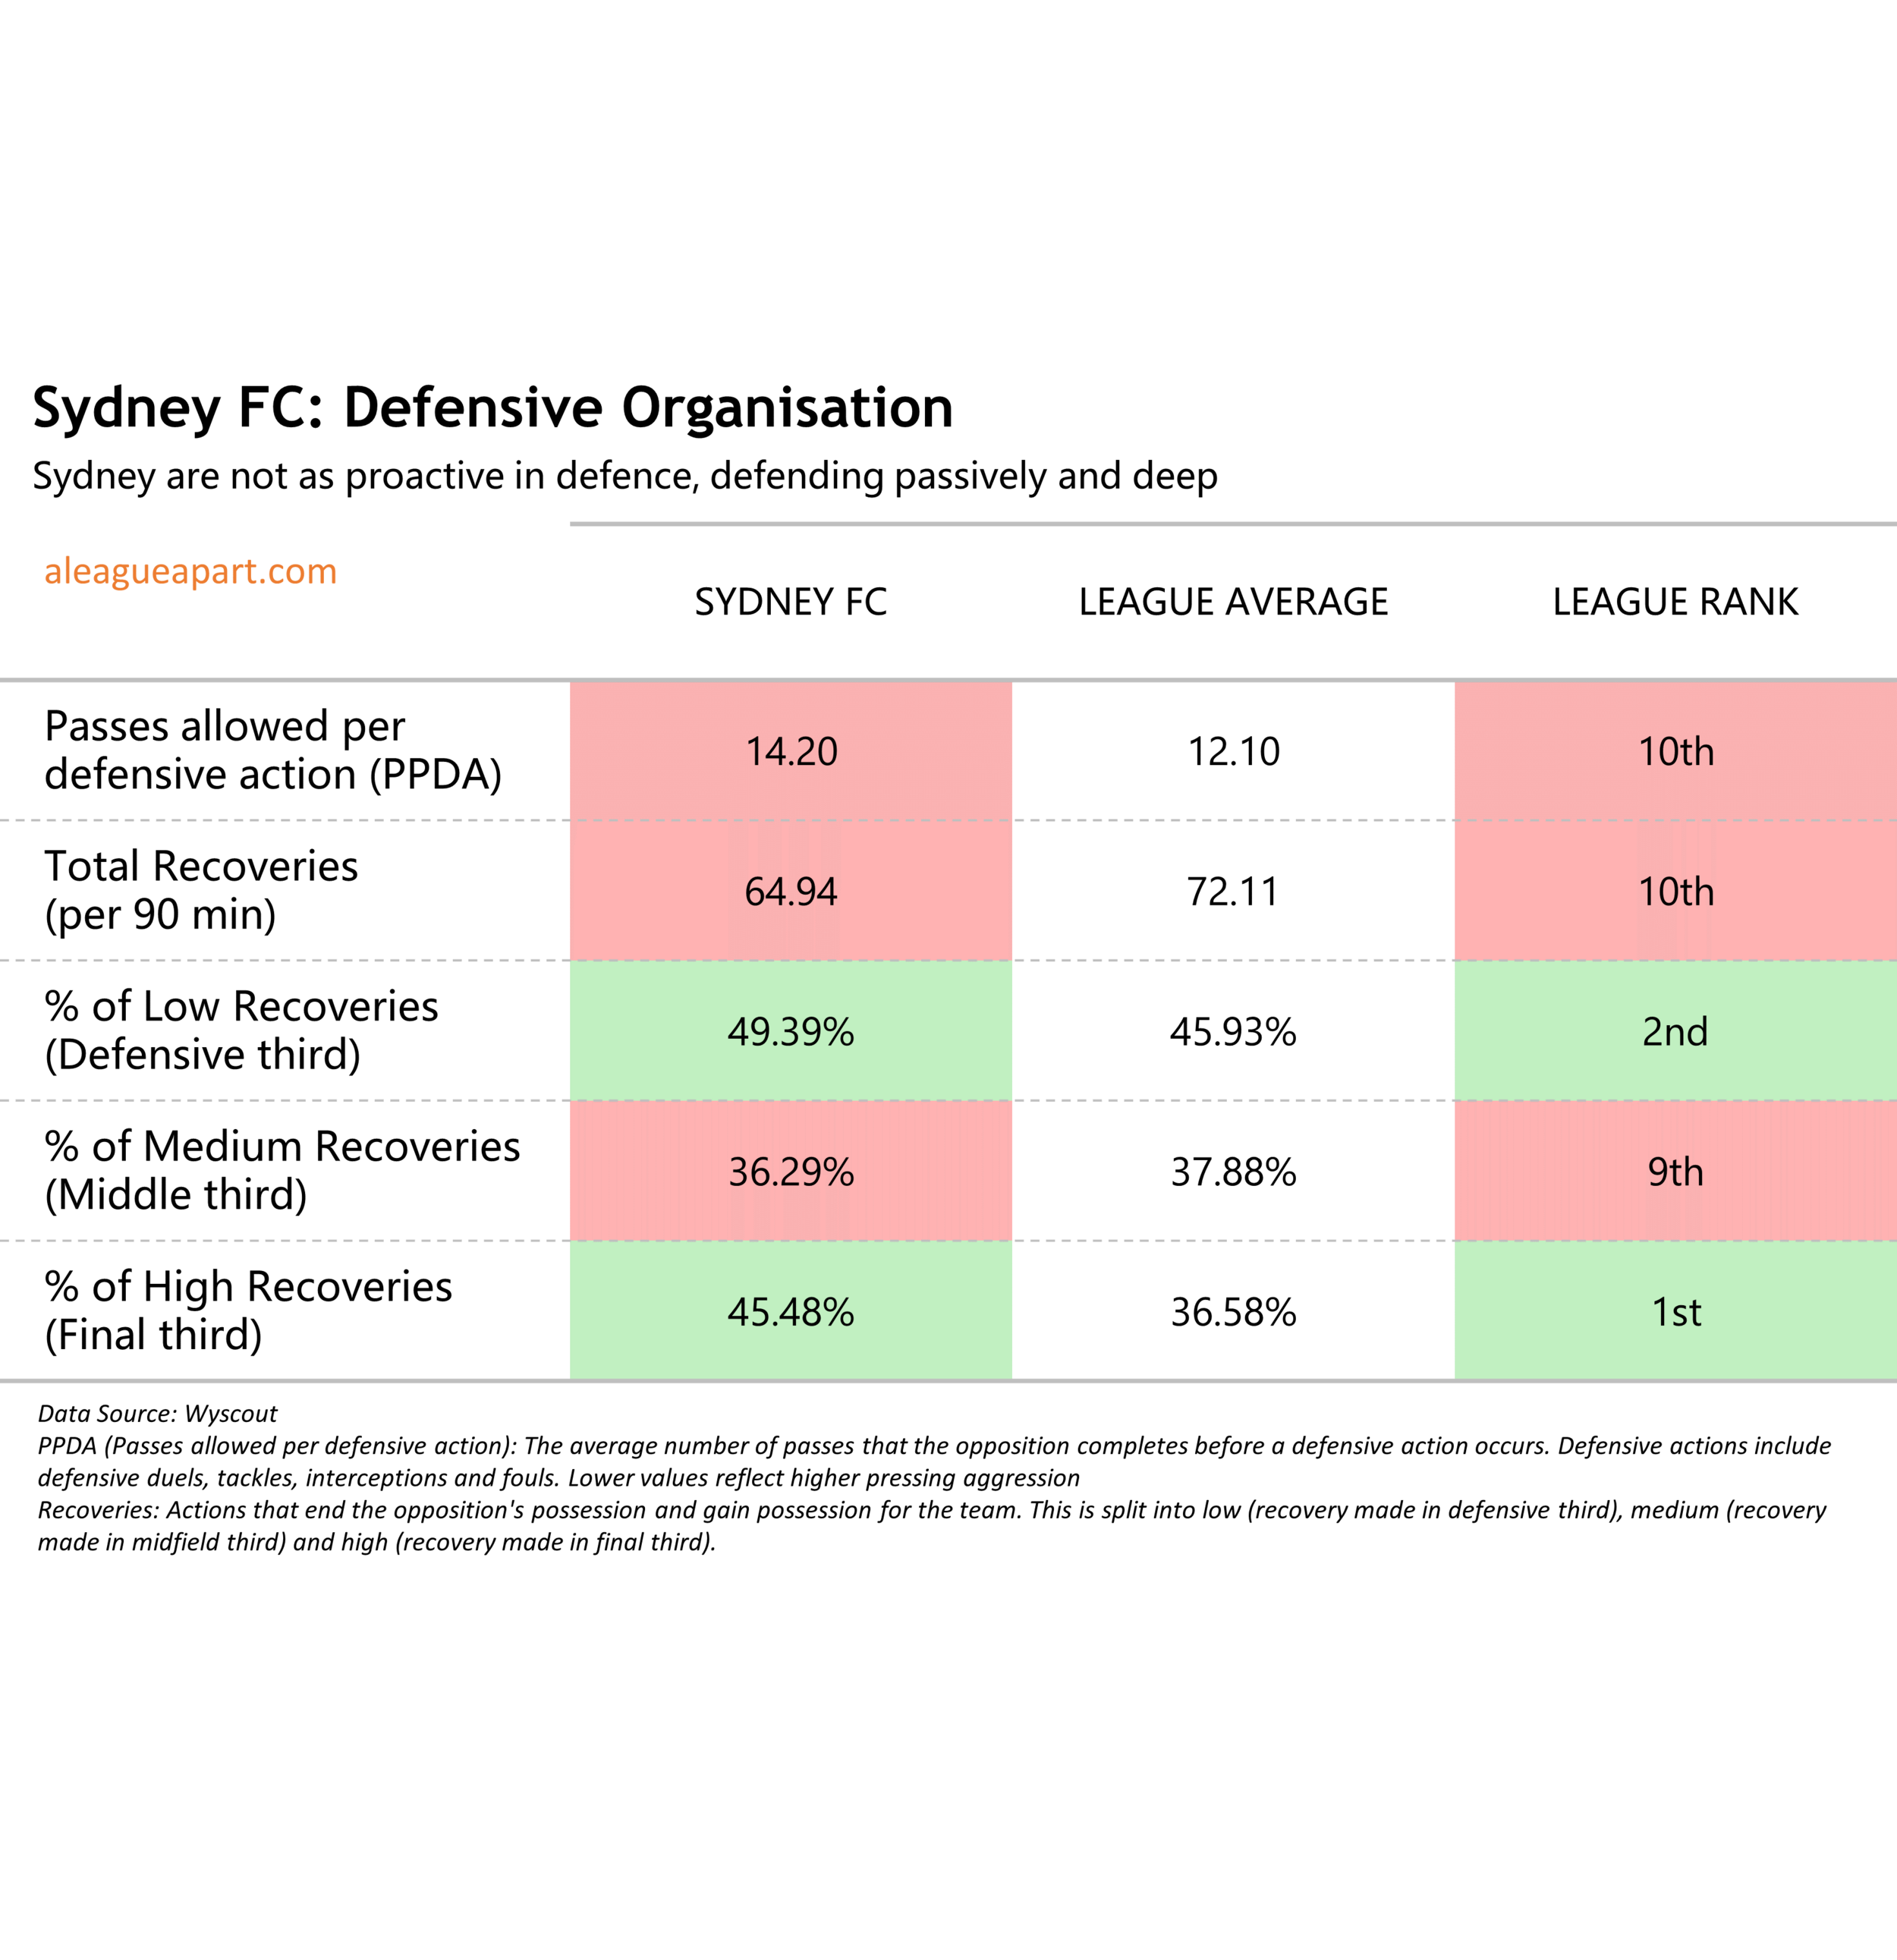
Sydney are happy to be quite passive with their defence, staying in a compact, narrow block that shifts from side to side with men behind the ball. They generally don’t press very hard until Phase 3/4 when the ball is in the final third - compressing tight and making it difficult for the opposition to play line-breaking passes. This is shown by the statistics - Sydney have the second lowest pressing intensity, the second fewest ball recoveries, and more of their ball recoveries occur in their defensive third, with fewer recoveries occurring further forwards (Western United are the team who defend the deepest/most passively in the league).
Defensive Phases of Play
Phase 1 & 2: Stand off and cut passing lanes
When the opponent are building up from defence, Sydney stays in a 4-2-4/4-2-2-2 setup, focused on blocking passing lanes into the centre of the pitch. The wide midfielders come forward to block the ground passing lanes into fullbacks/wingbacks. The team doesn’t press, instead waiting for specific pressing triggers; a back pass to the centrebacks, a pass into the fullback/wingback, or line-breaking passes into the centre.
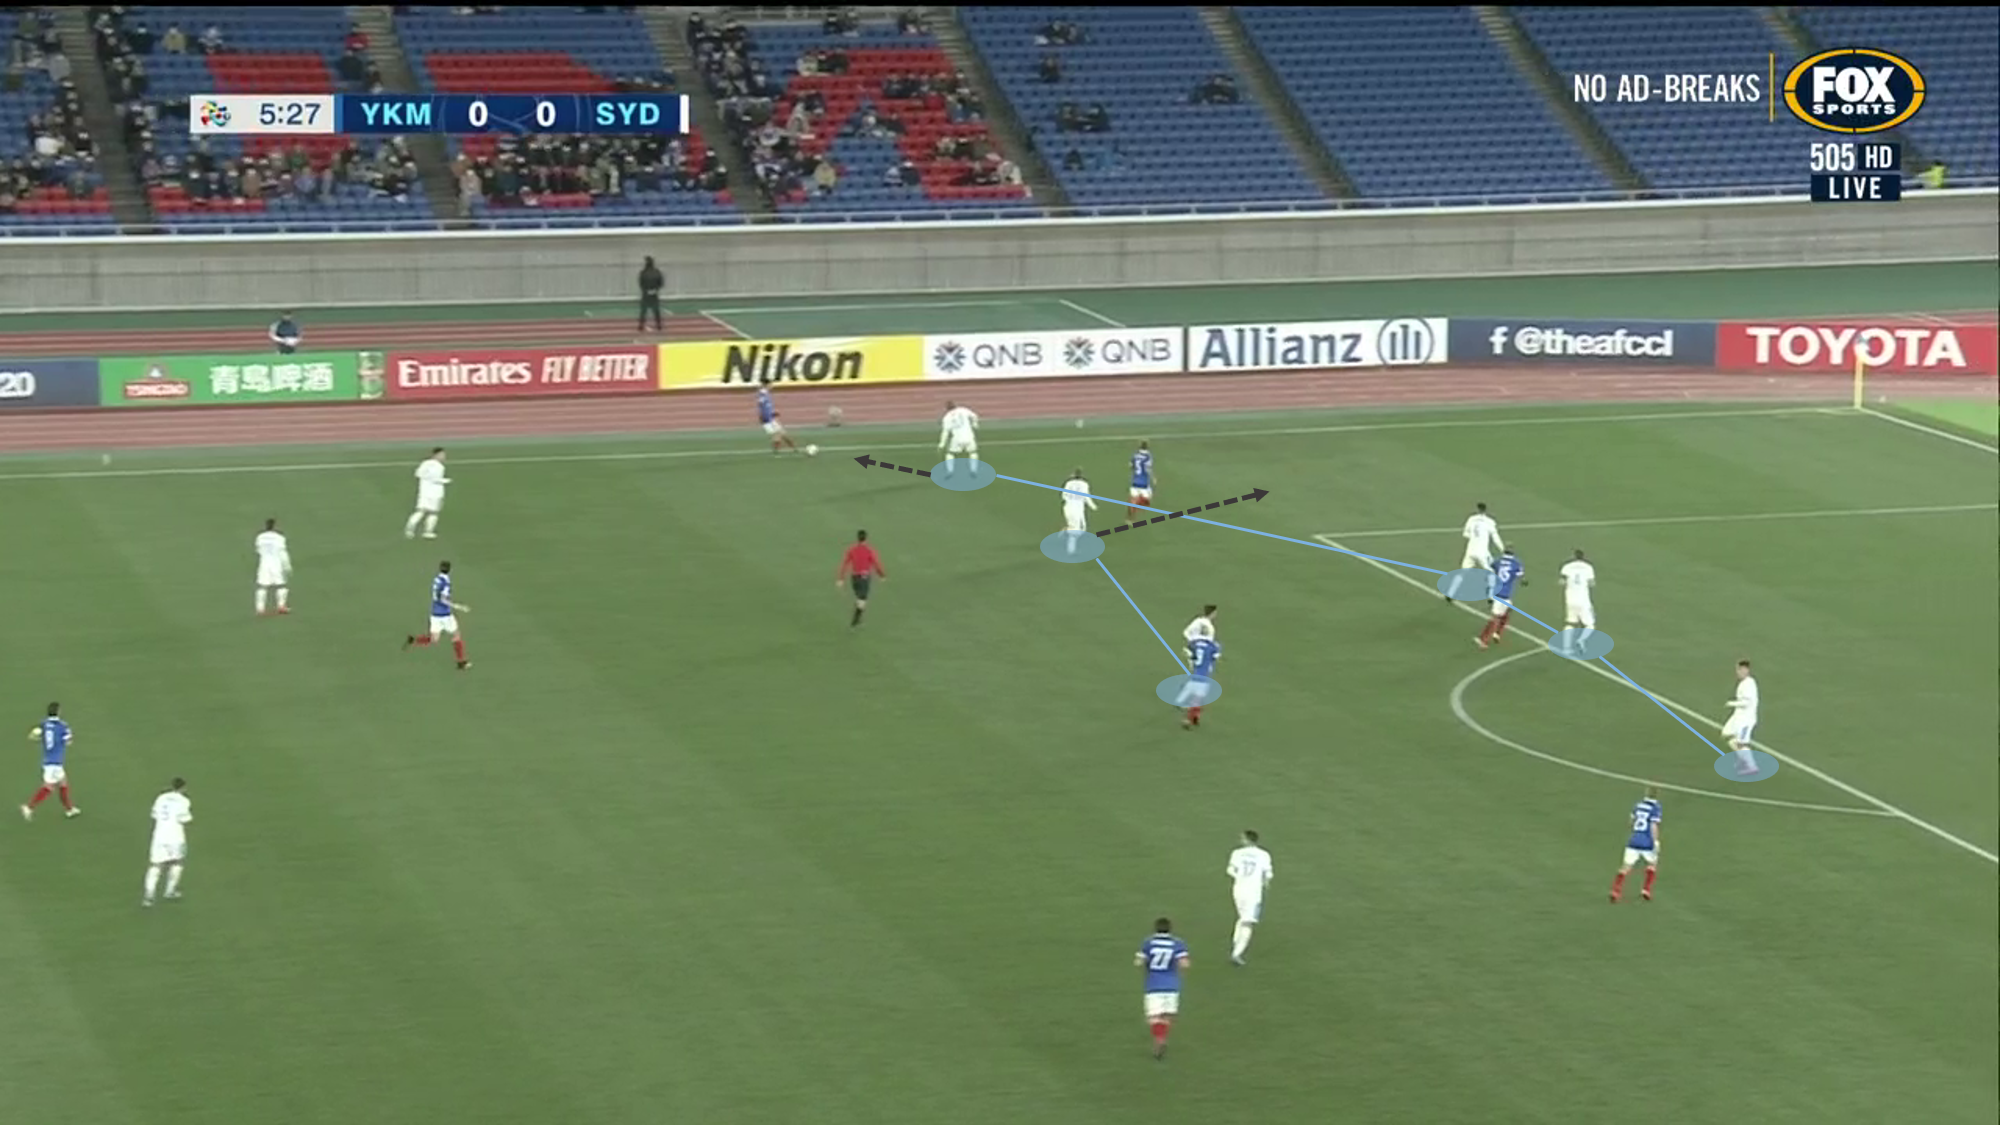
Barbarouses and Le Fondre are intelligent enough to understand when the press should be triggered. When they trigger the press, the midfielders Retre and Brattan come forward to ensure the gap between the first pressing line is not as easily exploited. With the central midfielders coming up, however, space opens up behind them, and a line-breaking pass at this stage can exploit this quite easily.
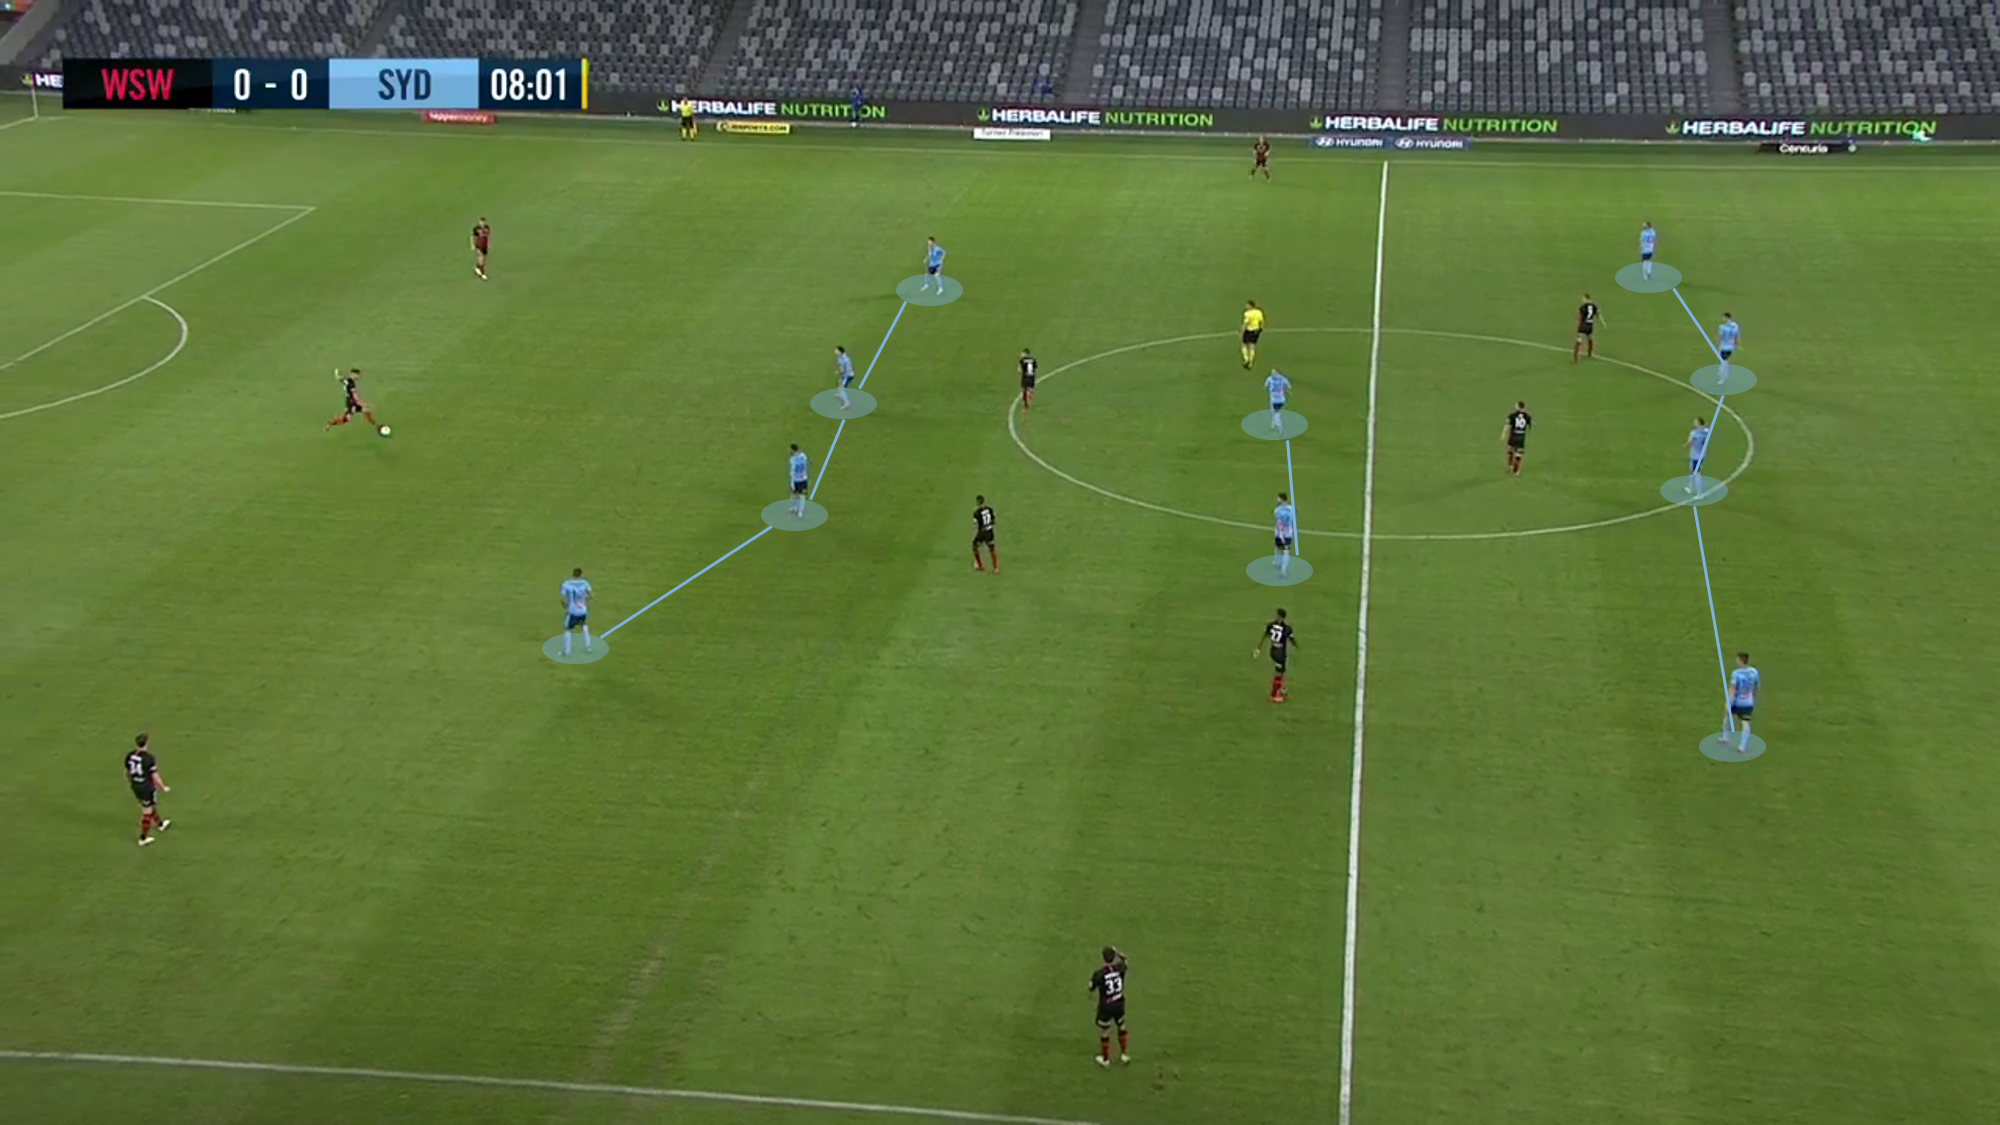
This was exploited very effectively by Yokohama F-Marinos in their Asian Champions League clash, where the press was drawn out, followed by neat combinations to find Marinos players dropping in between the lines in dangerous areas.
Phase 3: Drop and Compress
When the opposition is able to break through the initial structure, Sydney retreat into a compact low block 4-4-2. The positioning is narrow, and they are happy to let the opposition have the ball wide, The strikers track back to provide additional support, particularly Barbarouses, who can track back to press from behind with pace. For prolonged attacks, they will often sit in front of the midfielders, allowing Sydney to have 11 men behind the ball. At this stage, Sydney press hard when the ball comes into the half-spaces or in the centre. This makes it difficult for their opposition to have prolonged possession in central areas.
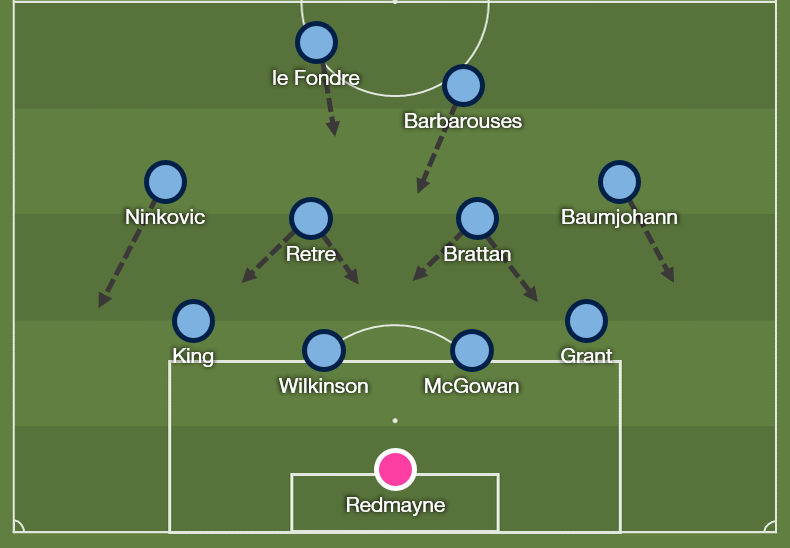
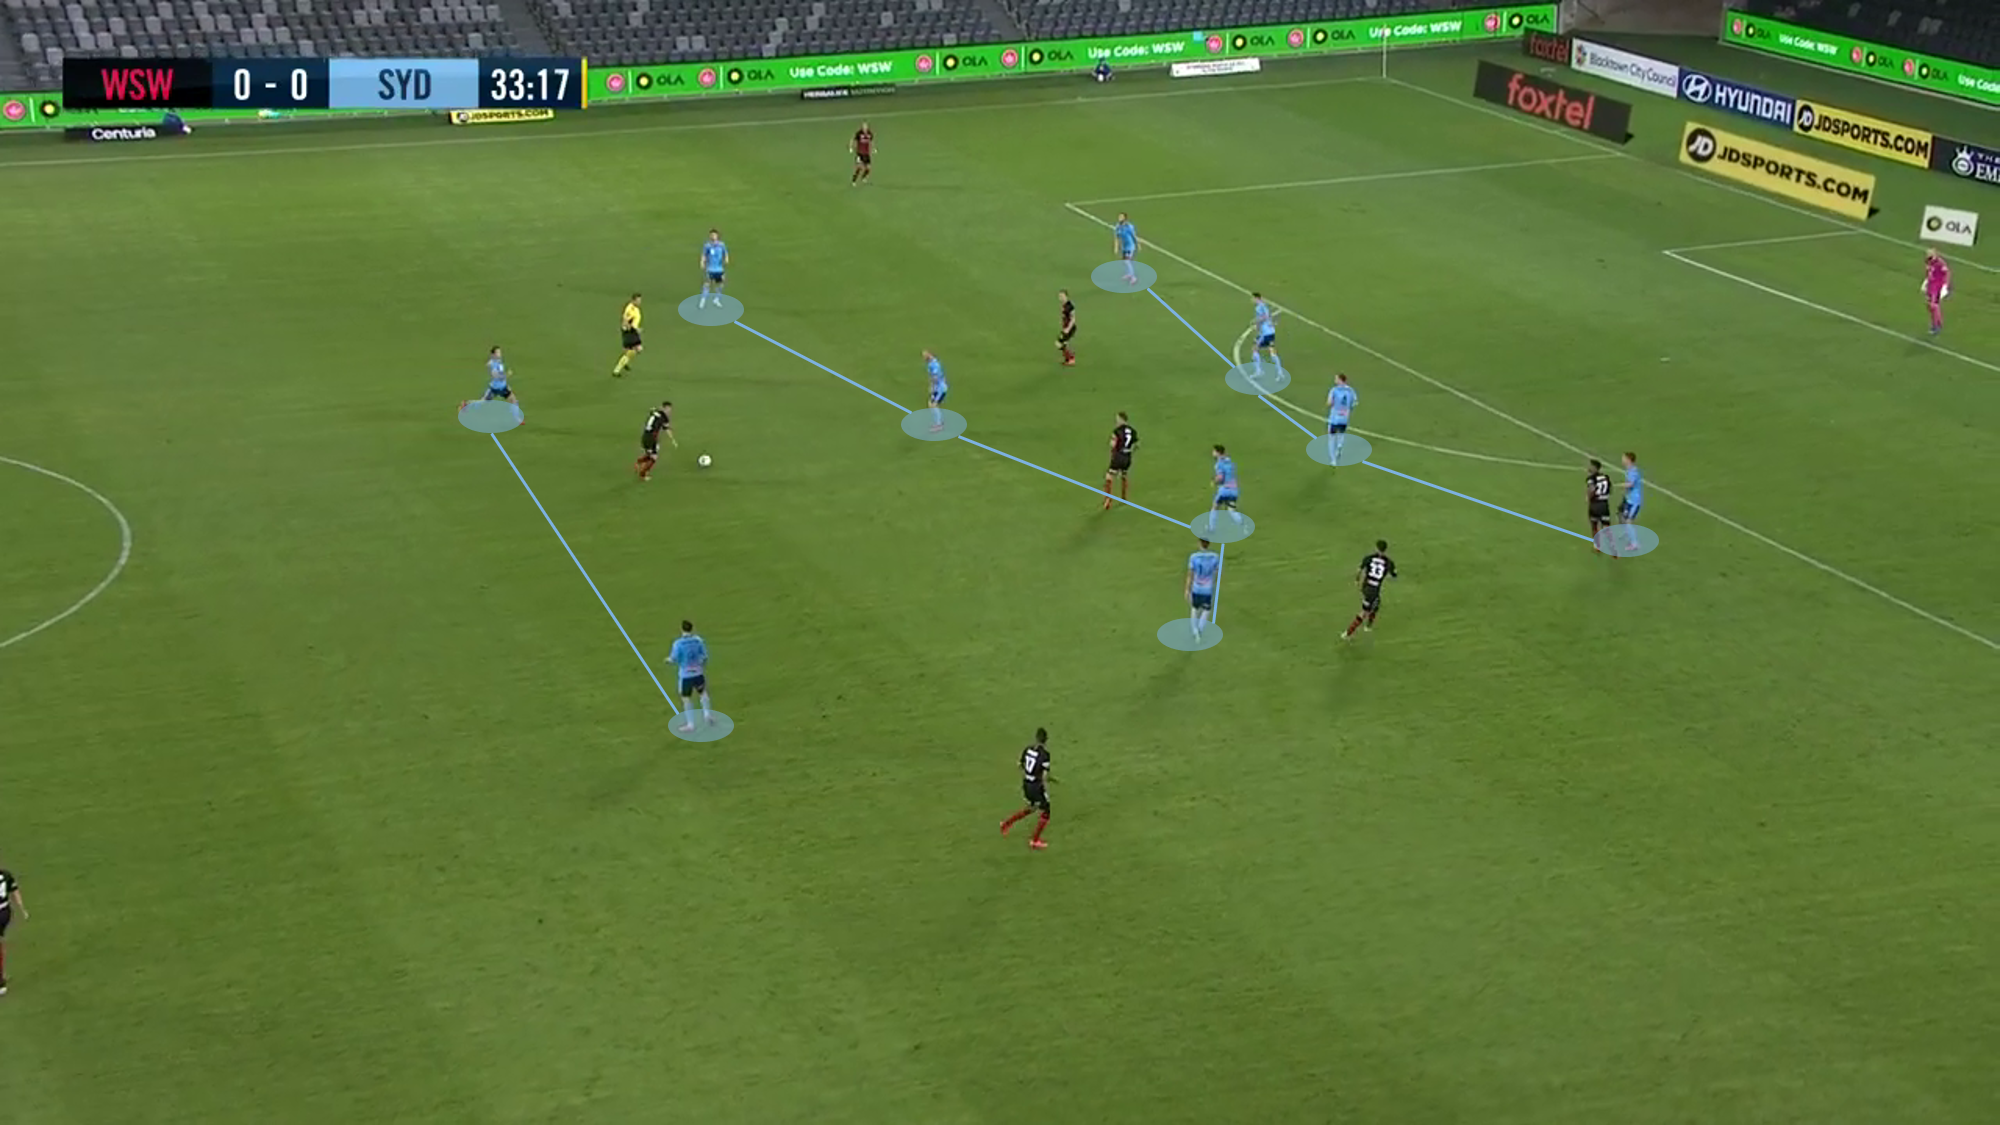
This narrow defensive structure presents difficulty for when the opponent is attacking with width - should the fullback come out wide to meet him, or should the attacking midfielder be responsible for dropping in to provide extra width?
The option that is used more frequently is the attacking midfielder dropping to cover. When the ball goes out wide, the other midfielders will shuffle across, ensuring that the spaces in front of the defence are still covered. The fullback stays narrow, ensuring that his half-space is protected. However, the attacking midfielders can be slow to respond and recover back (Baumjohann in particular can switch off on the right-hand side), which can result in easy overloads. Grant and/or Brattan have to shift over to cover, which leaves the central areas quite light on, with only Retre left in the centre.
When the wide players are particularly dangerous, the fullbacks will be in charge of going out wide to meet them. This means that they have them covered tightly, and makes it difficult for them to receive the ball easily and turn. This does, however, leave the half-space wide open, and increases the defensive load on the centrebacks, and/or the central midfielder, who would have to drop in to track runs, and also opens up the centre of the pitch.
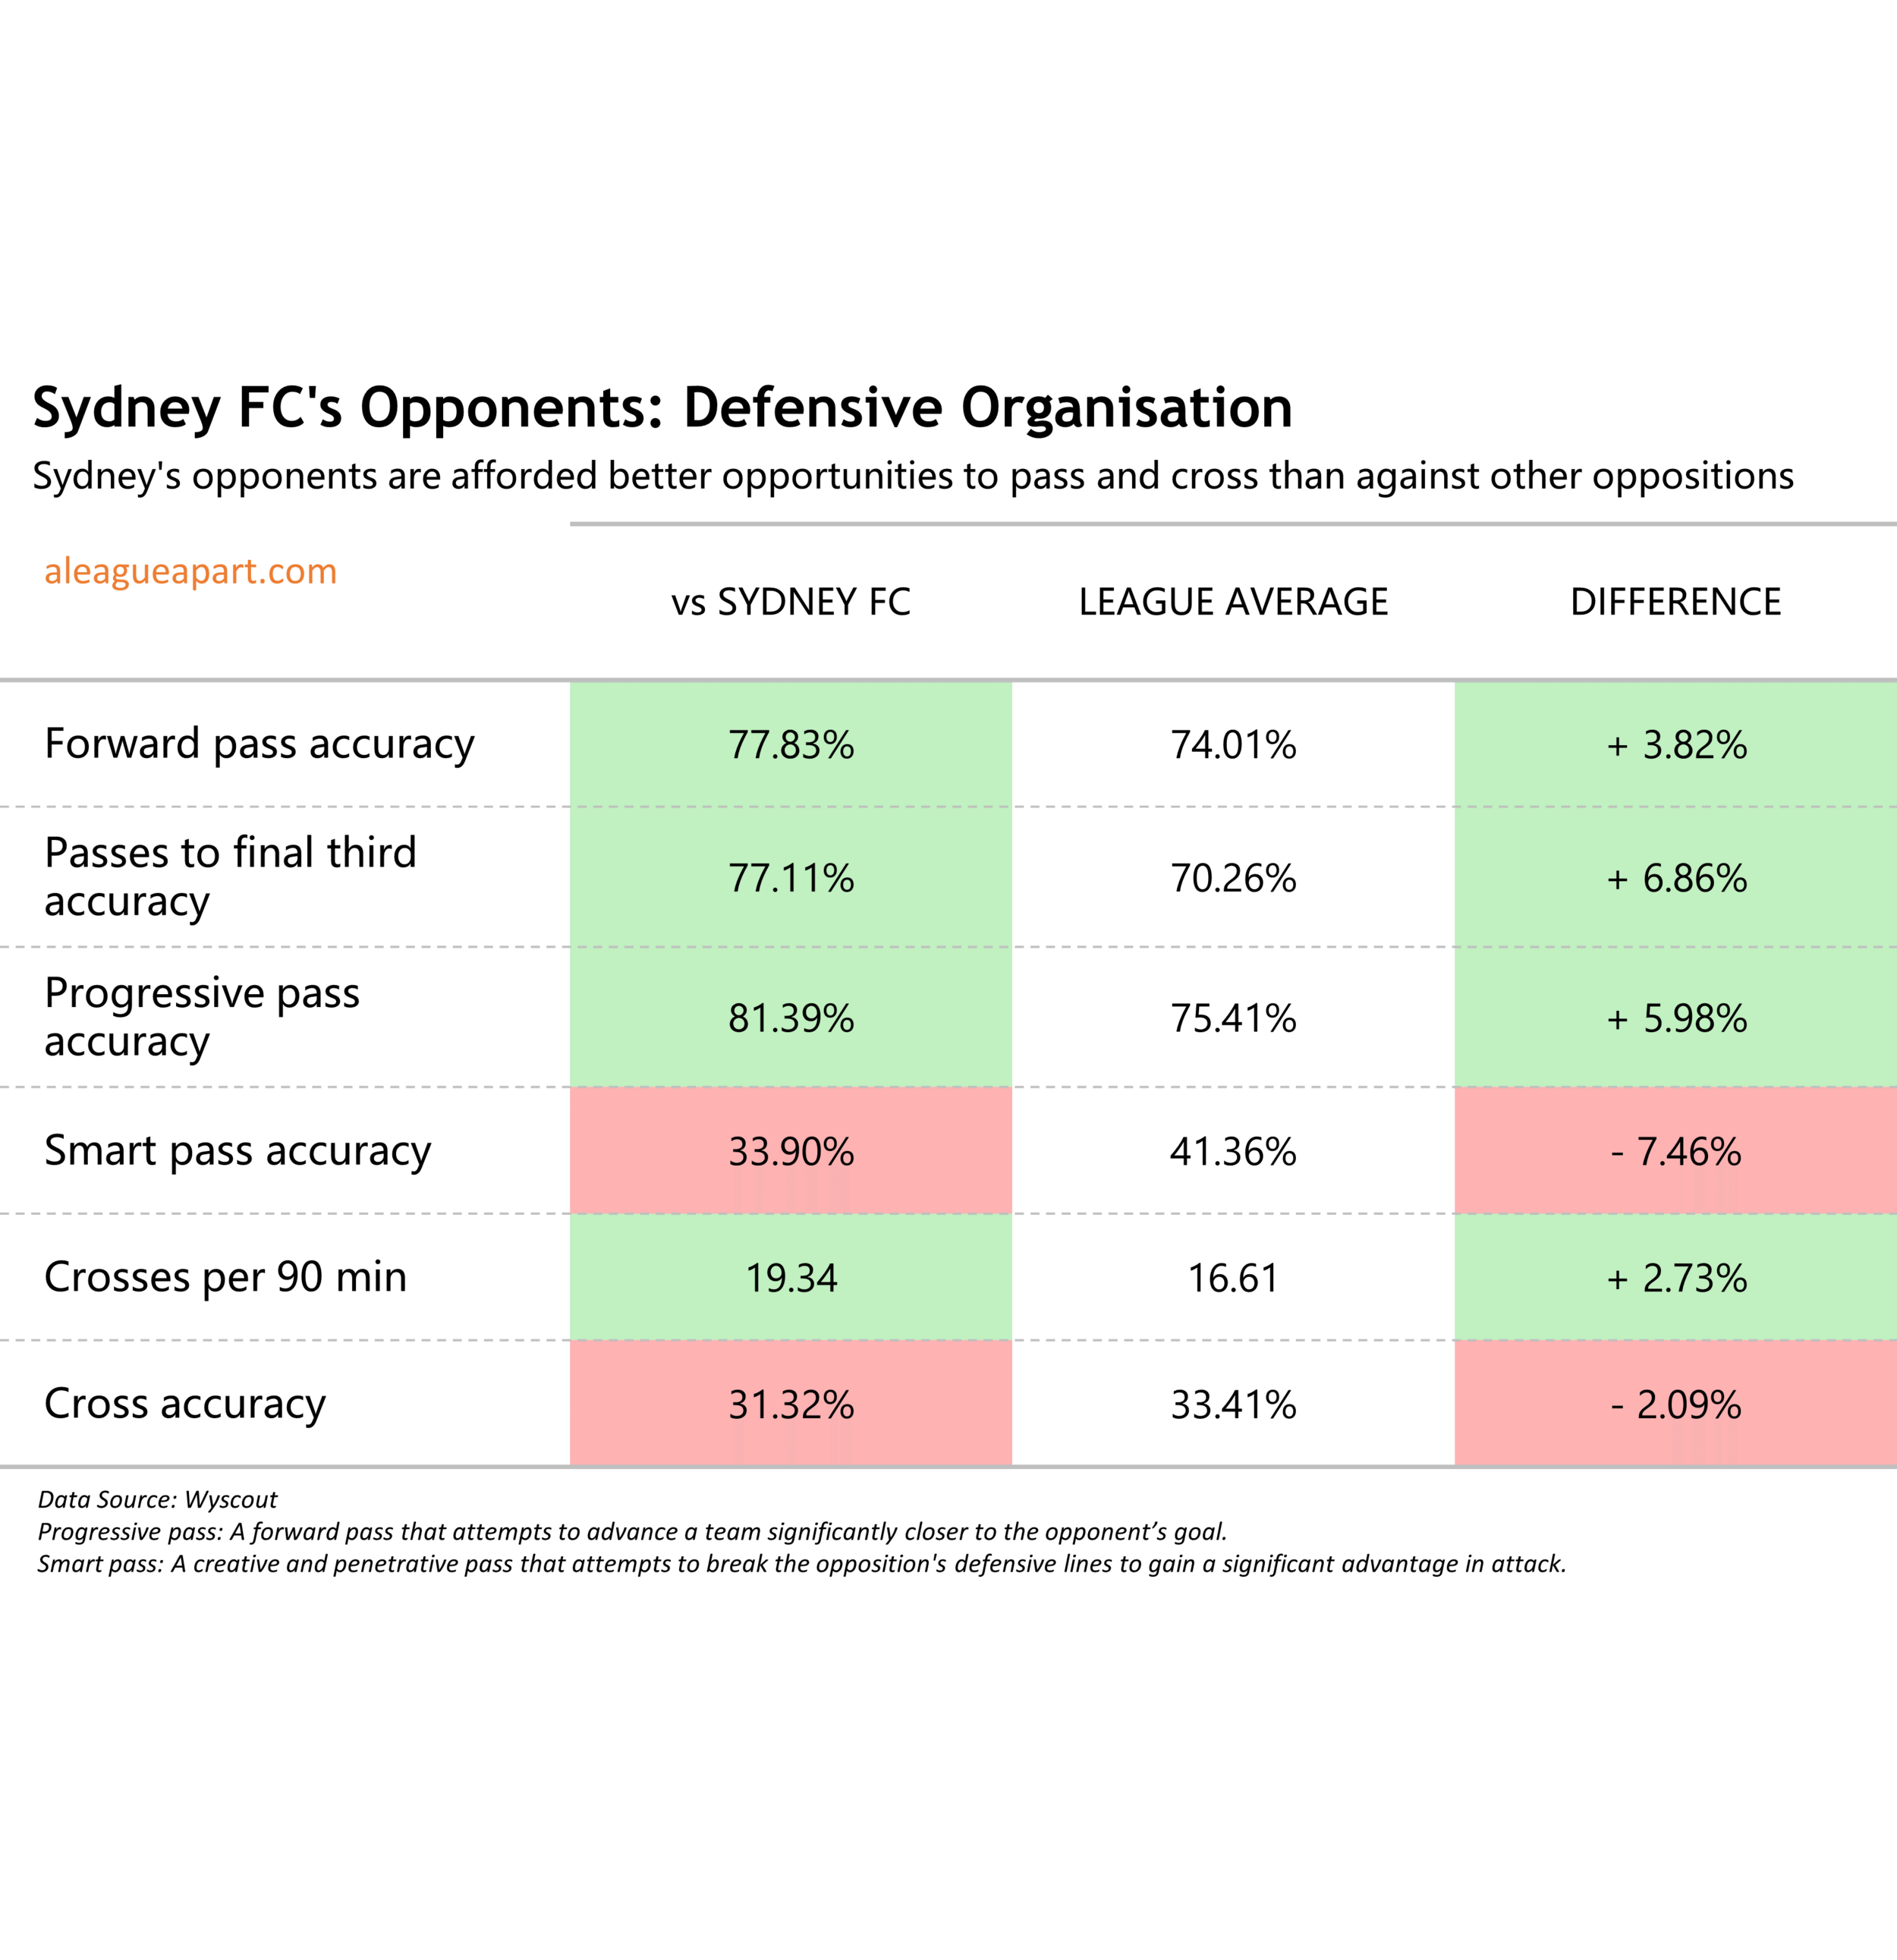
The impacts of this setup shows up in statistics; in games against Sydney, teams have an easier time making forward passes and are able to attempt more crosses, while on the other hand, their ability to break the lines with smart passes and make successful crosses decreases - Sydney prefer to defend deeper and closer to the box. The table below compares the averages across all A-League games against the average of the games played against Sydney.
Phase 4: Defend the box
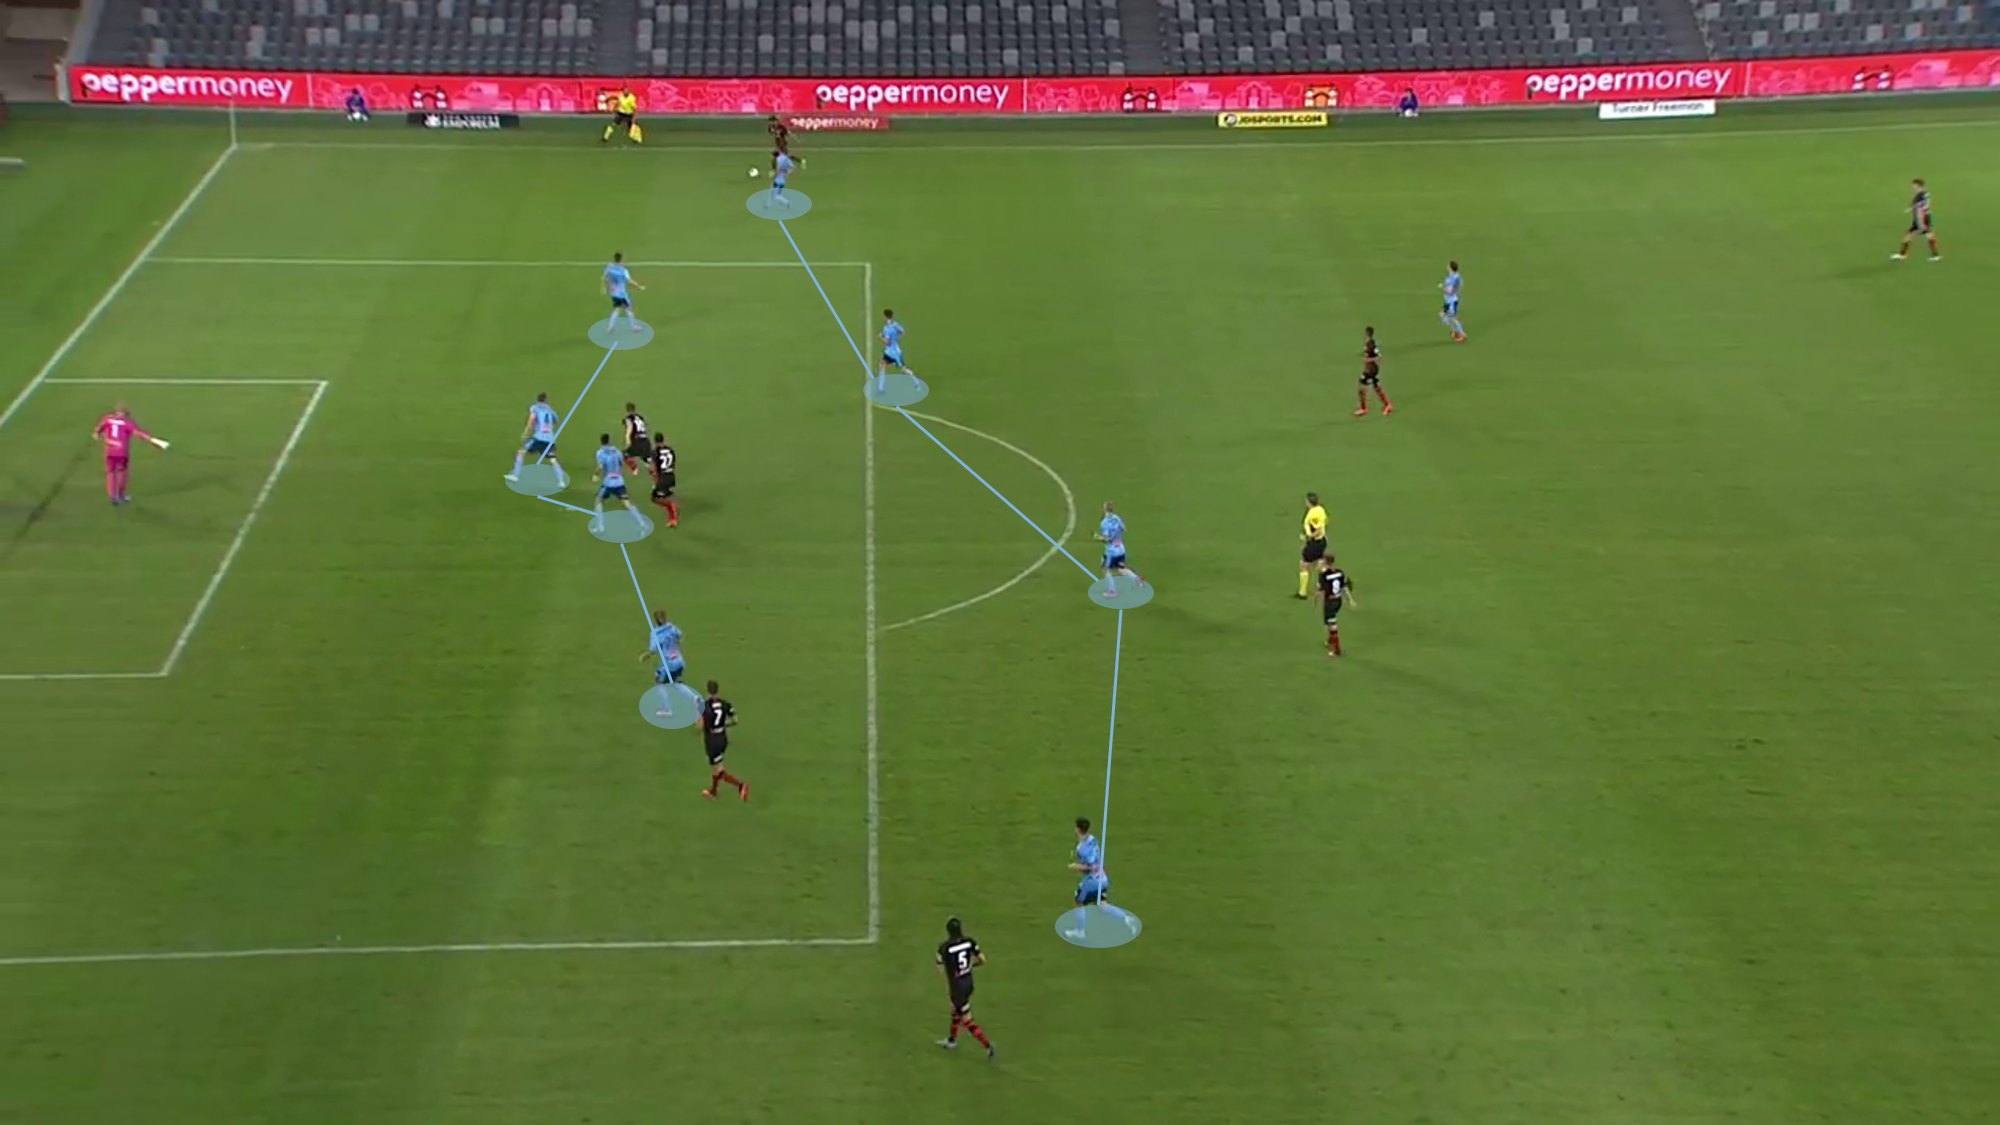
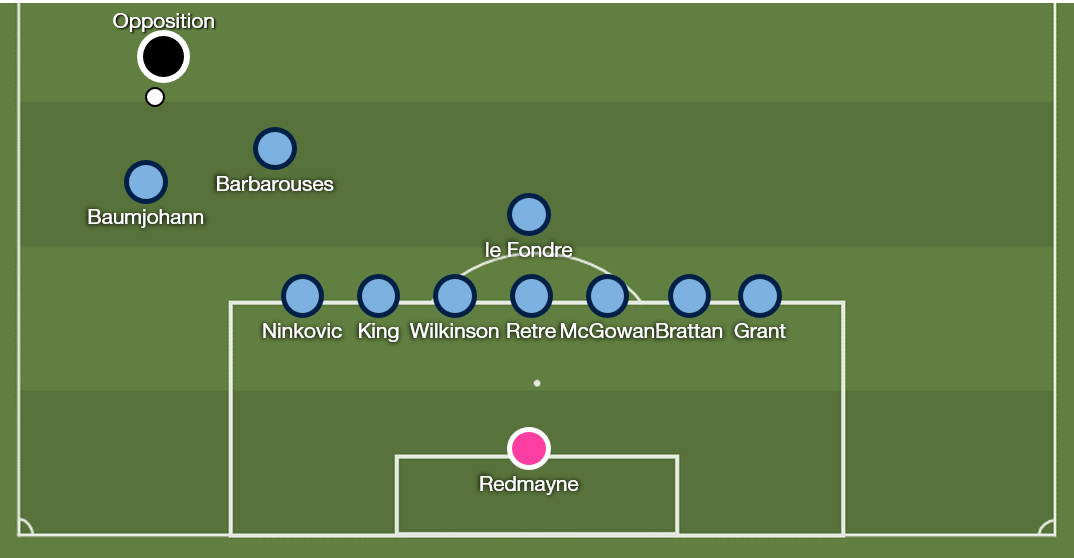
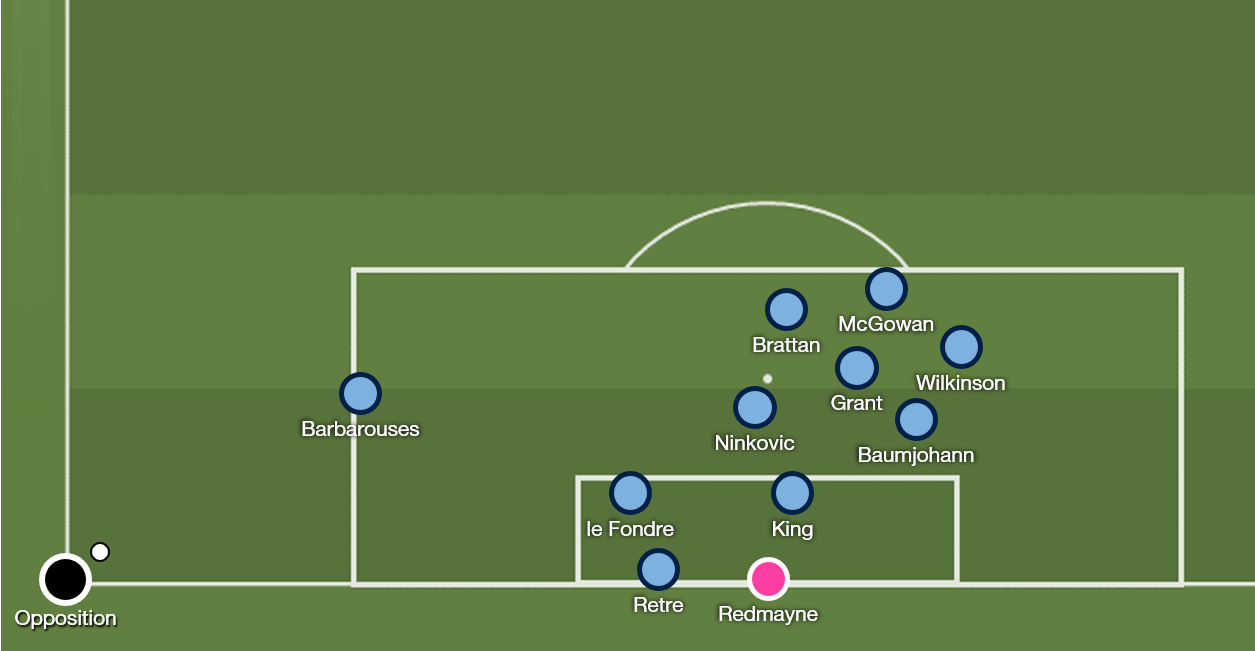
Phase 4 is an ultra-low block, that aims to deny any space in the 18-yard box. The fullbacks tuck inside (when they can), and the central midfielders either drop in to cover spaces left by the full backs, or cover the penalty spot. The attacking midfielders, if not following the play out wide, are positioned by the corners of the box. The strikers will track back to cover the outside of the box in case the ball rebounds out to this area.
Redmayne is comfortable dealing with crosses, and will come out to claim crosses when possible.
Offensive Transitions
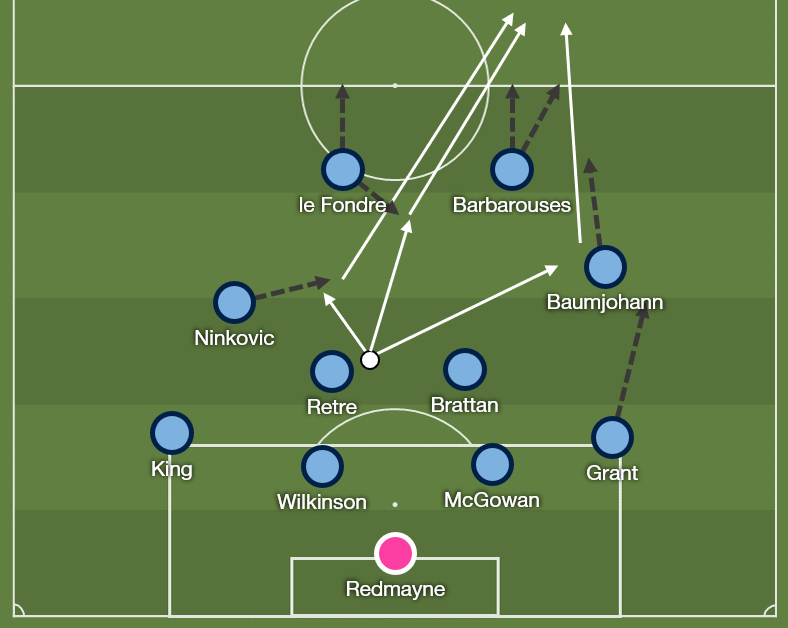
Upon winning the ball back, Sydney quickly transitions into offence, with the front four and Grant immediately looking to go forwards.
The Sydney players, especially the midfielders, are all quite technical players who can play short passes quickly. This enables them to retain possession immediately after winning the ball.
Barbarouses immediately sprints forward beyond the defensive line, and provides an option for balls in behind on the right side channel. Barbarouses can then cut the ball back, play the ball across the box for a simple tap in, or hold up the ball for overlaps.
If the ball in behind is not on, Le Fondre can come short to link play to the attacking midfielders. When the attacking midfielders are able to receive the ball on the turn or facing forwards, they will drive forward on the ball and look for direct passing options in behind.
It’s important to counter-press during transitions:
Delay - forcing Sydney to circulate the ball to retain possession can provide an opportunity for the defence to recover and get organised.
Time taken for strikers to get in behind - the long balls in behind are not always immediately on, as the strikers will often drop deep in order to help with defence. This time can provide an opportunity to quickly counterpress before the runs mature.
Recover ball - with the main playmakers staying central, they have to turn in order to be able to play a forward pass. The ball can be won back if the defender is tight to the midfielder trying to turn on the ball.
Tactical fouls can be useful here to stop the reversal of momentum.
Defensive Transitions
Sydney’s attacks commit men forwards, and as a result, they can find themselves exposed when they lose possession of the ball.
This is more visible on the right hand side, with Sydney generally preferring to attack on this side. Grant in particular can be caught upfield when they lose the ball, while Baumjohann/Caceres will generally be high up the pitch as well.
Sydney will look to counterpress if they are able. This can result in the centre of the pitch being lightly manned too - Brattan in particular presses energetically, but can overextend and be played around, leaving Retre and the centrebacks the only players back while the rest of the team comes back.
Substitutions
Trent Buhagiar (ST): Very pacey player. Will come on towards the ends of games (around 20 mins) for Barbarouses to provide an out-ball in behind the defence. Low physicality means he can be pushed off the ball fairly easily - is better when released directly on goal.
Harry Van der Saag (RB/RW): Comes on as a functional player at RW to increase defensive coverage, or as a replacement at RB.
Set Pieces
Baumjohann delivers most set pieces, with Brattan as the second choice.